Category: iPad Tips

10 Useful Tweaks You Can Make to the iPad’s Settings

When you first unwrap your iPad, it’s a pretty sweet device as is. But once you become familiar with it, there are a few tweaks to its settings you can make to improve your user experience even more. Below are 10 tweaks you can make to the iPad’s settings to improve the iPad.
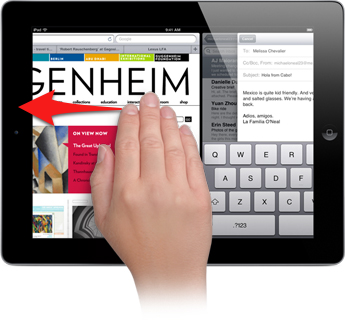
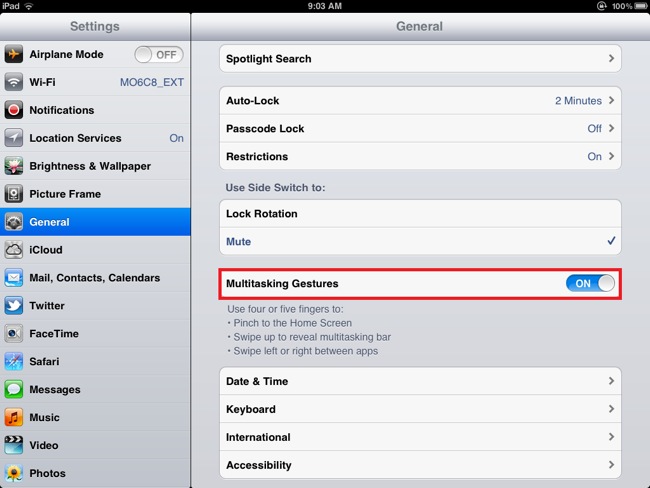
1. Turn on 4-finger swipe gestures for improved multitasking. Want to quickly switch between apps by swiping the screen with four fingers? First, go into the iPad’s Settings–>General and slide the Multitasking Gestures tab to On. Now, launch a app, then to swipe to the left with four or five fingers touching the screen at the same time. See how quick that is? Now swipe to the right to switch back.

Having trouble getting your fingertips to touch the screen at the same time? Here’s a tip: form a claw with your hand and paw the screen (trust me, it’s more accurate). Full instructions here.
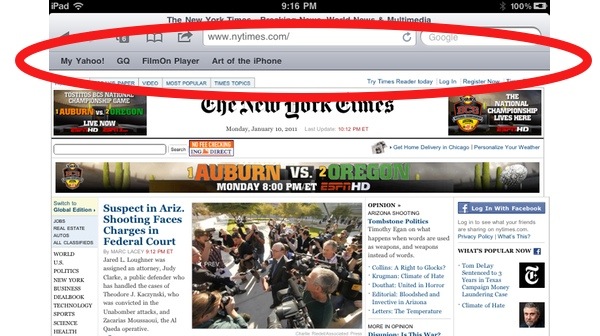

2. Add a bookmark bar to the iPad’s browser. Tired of navigating the maze of folders and subfolders in the iPad’s bookmark menu to launch your favorite sites? Turn on the bookmarks bar for always-visible, one-tap access to your favorite sites! Here’s how:

Go into the iPad’s Settings–>Safari and swipe the Always Show Bookmarks Bar tab to On.

Now go back into the Safari browser and you’ll see a bar has been added. Now fill that bar up with your favorite sites. To add bookmarks to this bar, tap the + symbol at the top of Safari, tap Add Bookmark, then tap Add to Bookmarks Bar. Visual instructions here.
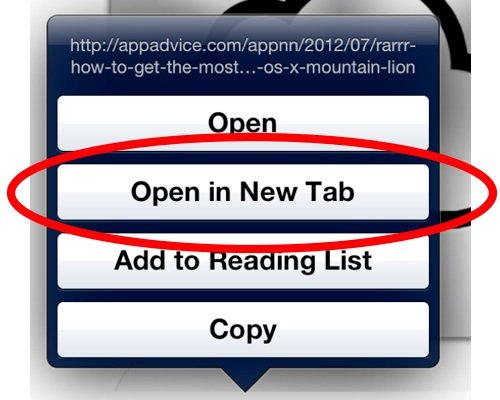

3. Open new web links in the background in Safari. One annoying feature of mobile Safari is that opening links in a new tab means you automatically switch to that new tab. You can change this behavior so that the new tab opens in the background instead (without switching). To enable this, go to Settings > Safari and slide the Open New Tabs in Background to On.

Please note that, for this to work, you have to hold your finger on a link until a pop-up menu appears (see photo above) and then tap Open in New Tab. Simply tapping a link (without holding your finger on it) will always take you to that link in the current window.
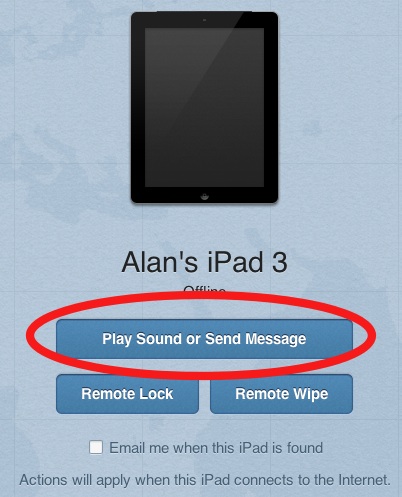

4. Find a lost iPad by making it beep. Some people think that the Find My iPhone/iPad service is only for when your device is stolen. But it also comes in handy for an iPad lost under a stack of newspapers or between the couch cushions at your home. You can make the iPad emit a beeping noise to help you find it. It will even beep if you have the sound muted! But first, you’ll need to activate Find My iPad. Here’s how. Go to Settings on your iPad, tap iCloud, and enable Find My iPad. Note your iPad must be connected to Wi-Fi.

Now, to make your iPad beep, go to iCloud.com, sign in, and go to Find My iPhone (yes, iPhone). Select the iPad and click Play sound or message.


iPad Side Switch Settings

5. Change the iPad’s side switch to serve as an orientation lock. The switch on the side of the iPad by default functions as a mute switch. But you can change it so that it functions to lock the iPad’s screen into its current view (portrait or landscape). To change the switch’s function, go into Settings > General, and under Use Slide Switch to: tap either Lock Rotation or Mute.
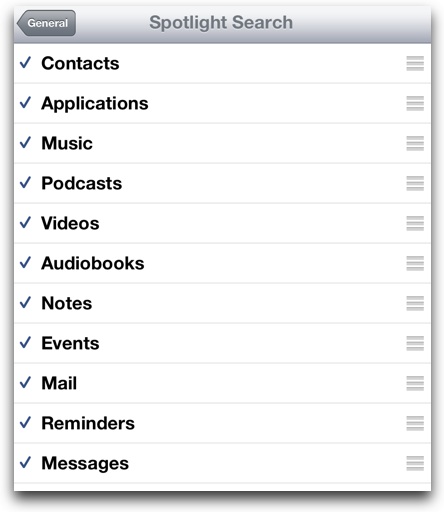

6. Prevent email, contacts, songs, etc, from showing up in Spotlight search. Spotlight search is a powerful feature for the iPad that lets you quickly locate and launch apps, contacts, etc. But the search results can easily become clogged with items you may not want, like emails, notes, etc. You can filter out these items by going to Settings > General > Spotlight Search and selecting or deselecting items in the list.
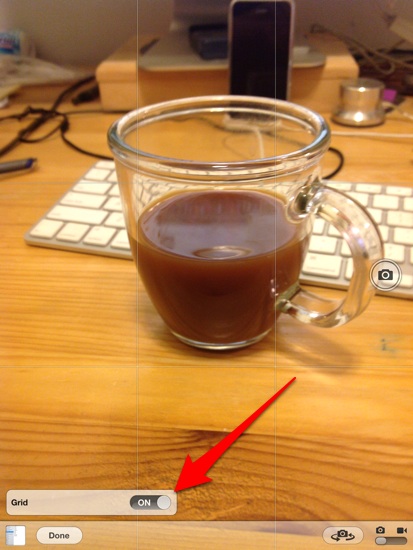

7. Have the Camera app display a grid while taking photos. Part of good photo taking is making sure subjects are centered and aligned. To aid you in this, the iPad’s Camera app has a grid to help you align objects in your photos. To turn on the grid, open the Camera app, tap Options in the bottom left corner, and slide the Grid tab to On.
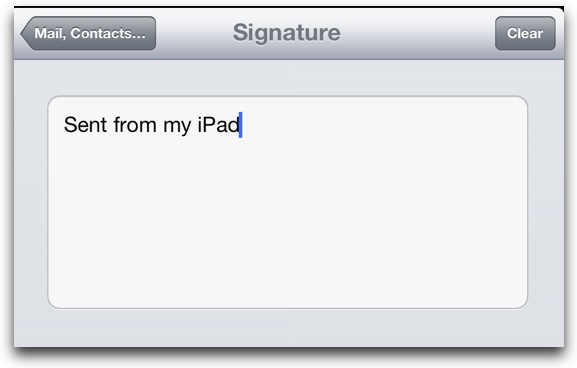

8. Change or delete the “Sent from my iPad” email signature. If you’re annoyed that the iPad adds “Sent from my iPad” to the end of every email you send, you can personalize it with your own message or delete it all together. Simply go into Settings > Mail, Contacts, Calendars, and tap Signature. Delete the text shown or change it to whatever you want.
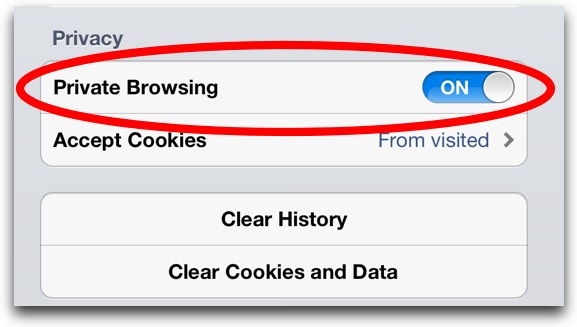


9. Cover your web browsing tracks by turning on Private Browsing Mode. We all occasionally go to websites we don’t want others to know we’ve visited. The iPad offers a Private Browsing Mode that won’t remember sites visited or your Google searches. To cover your tracks and enable Private Browsing, go into Settings > Safari and slide the Private Browsing tab to On.
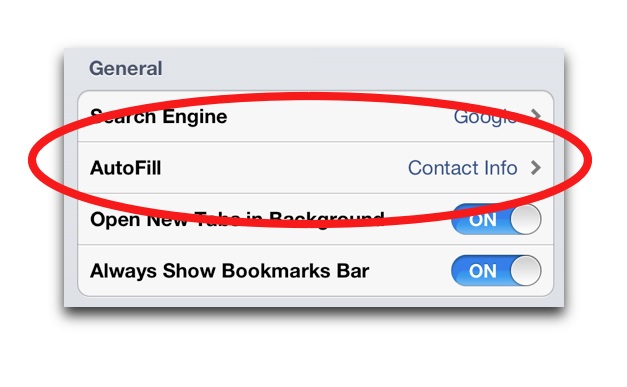

10. Turn on Auto-Fill to Automatically Fill Out Web Forms. Tired of repetitively typing in your address, email, etc, into web forms? You can turn on the iPad’s Auto-Fill feature to instantly fill out those fields in web forms. To turn on AutoFill, go to Settings > Safari and tap AutoFill, then slide the Use Contact Info tab to On. Please note that it pulls info from your contact info in the Contacts app, so go fill out that information if you haven’t yet.

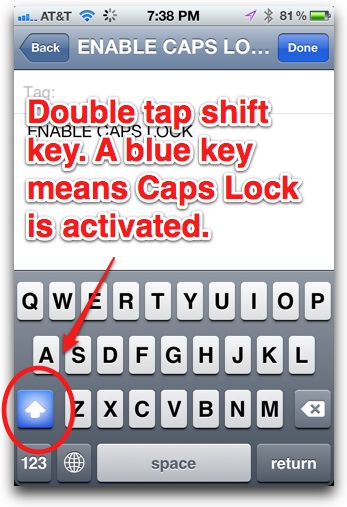
Basics: How to Activate Caps Lock on the iPhone and iPad

The iPhone’s keyboard has a Caps Lock feature, but you may have to first activate it in the iPhone’s Settings to use it. To test if Caps Lock activated, first try double tapping the shift key (the key with the up arrow, see image above) on the touchscreen keyboard—the key will turn blue to tell you Caps Lock is activated. If it doesn’t turn blue, you’ll need to go into the iPhone’s Settings to enable it. Just follow the step-by-step instructions below.

Video Instructions:

Text:

1. Open Settings:

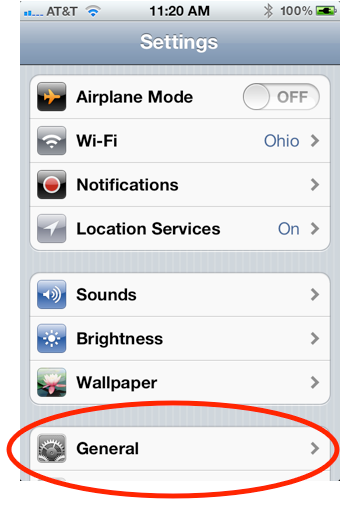
2. Tap General:

General in iPhone Settings

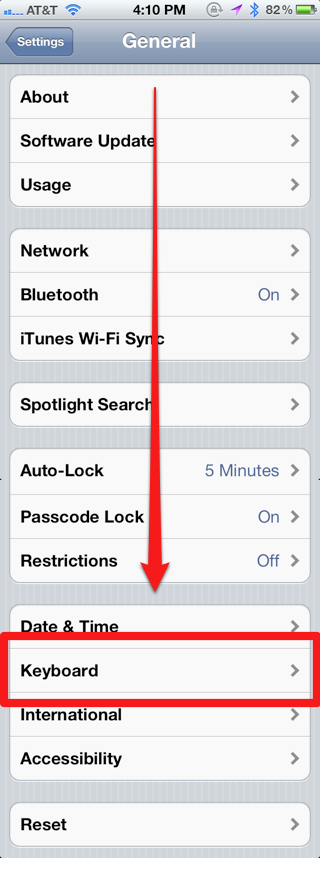
3. Scroll down and tap Keyboard:

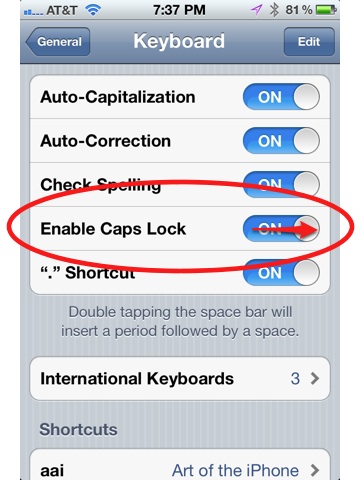
4. Slide the tab for Enable Caps Lock to On:

Now, when you double tap the shift key on the iPhone/iPad’s keyboard (the key with the up arrow), Caps Lock will be activated. To turn off Caps Lock, tap the key again.

Here’s a Simple Trick to Make the iPhone/iPad’s Reader Button More Useful

Reader is one of my favorite and most-used features introduced in iOS 5. If you’re not familiar, Reader is a feature of the iPhone/iPad’s browser that strips aways ads from a web page, enlarges the text, and fills the entire screen with the article to make it easier to read on the iPhone/iPad. You activate it by tapping a button that appears in the browser’s address bar:

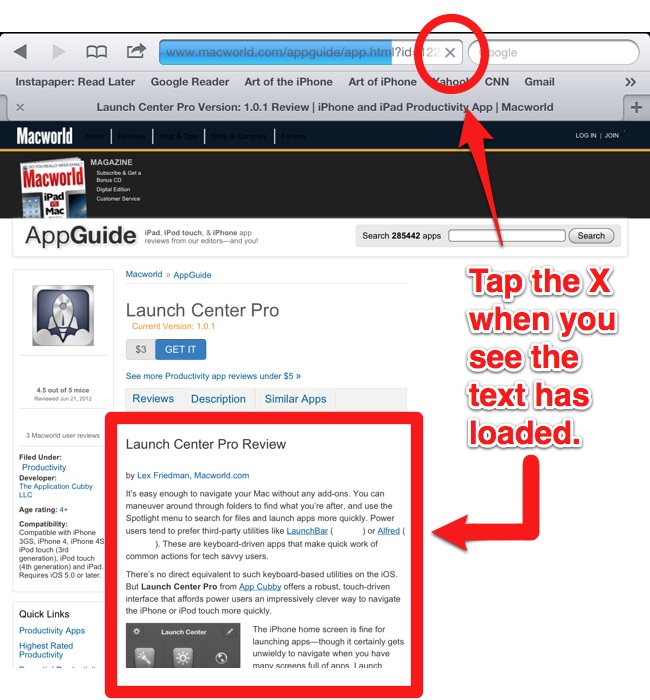
But there is one huge annoyance with Reader: the button doesn’t appear until after a web page stops loading. This means, if you’re waiting for an entire web page to load, you can often wait up to several minutes for the reader button to show up, even though you can see the text of the article has loaded. The solution is simple:

When you see the article’s text and images have loaded, simply tap the X in Safari’s address bar to stop the rest of the web page from loading. The Reader button will then appear:

It seems like an obvious solution, but I admit, it took me a while to figure it out.

So why, oh why, do web pages seem to keep loading and loading sometimes? It often has nothing to do with the website you are visiting, but rather third-party advertisements that are attempting to contact other Internet services to pull in data. The good news is that websites are usually designed to load their own content first, and that’s why this tip works.

iPad Basics: Multitasking Gestures Using Four or Five Fingers

Multitasking gestures are a relatively new iOS feature (introduced in iOS 4.3) that currently work only on the iPad due to its larger screen. Once activated, multitasking gestures allow you to use four- or five-finger swipes to quickly switch between apps and thus improve your multitasking performance on the iPad.

Note that these gestures will not work on the first-gen iPad, only the iPad 2, iPad 3, and newer.

How to Turn on Multitasking Gestures

To activate multitasking gestures, go into the iPad’s Settings–>General and slide the Multitasking Gestures to On.

The Four-Finger Swipe

Swipe Left. While in an app, swipe to the left with four fingers and the entire screen will slide over, switching to the second most recently used app. Keep swiping to the left, and you’ll cycle through your most recently used apps.

Then Swipe Right. After four-finger swiping to the left, you can then swipe to the right and you’ll cycle the other way through your apps.

One thing to note is that once you switch to another app using a four-finger swipe and use that app, you can once again swipe left or right again; however, if you switch to another app without using multitasking gestures, you’ll no longer be able to four-finger swipe to the right until your first swipe left—in other words, the recently-used-app-order resets itself with your current app at the front of the line.

Swipe Up. Swipe up with four fingers and you’ll bring up the task bar, just like double-clicking the home button.

Swipe Down. After swiping up to bring up the task bar, you can swipe down to close. Easy peasy.

The Four-Finger Pinch

Pinch. While in an app, if you pinch the screen with four or five fingers, you’ll “close” the app and be taken to the home screen. A four-finger pinch has the same effect as a single-click of the home button.

Basics: How to Save Pictures From the Web on the iPhone (and iPad)

If you see a picture you like while browsing the Internet on your iPhone, you can easily save those photos to your iPhone’s Camera Roll. Here’s how.

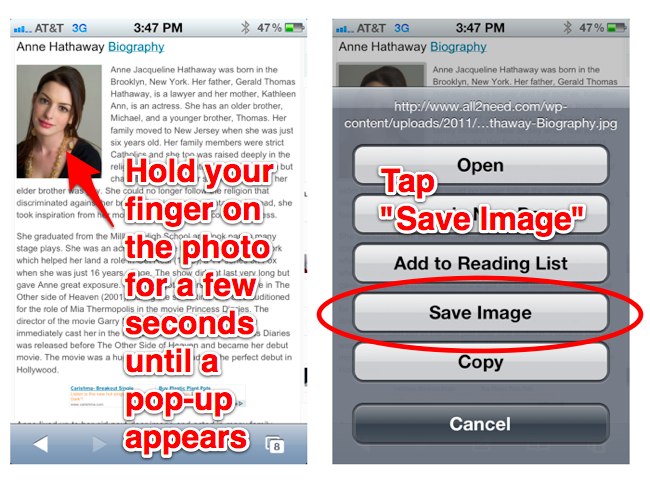
While using the iPhone’s web browser, you can save a photo simply by holding your finger on the photo for a few seconds. A pop-up box will appear with a few options, one of which will read Save Image, as seen below:

To save the photo, tap Save Image. It will be saved to the iPhone’s Camera Roll alongside your other photos.

Endnotes:

  • Note that you can also tap Copy. You can then paste the photo into any app that will allow you to insert photos, like in an email (in the Mail app) or in Pages (Apple’s word processor). To paste, simply hold your finger down on the insertion point, then from the pop-up menu that appears, tap Paste.
  • If a website prevents you from saving the photo, just take a screenshot instead by pressing the sleep and home buttons at the same time.

Why AppleCare+ for iPad May Be Worth Buying

I recently wrote an article about why AppleCare+ for iPhone isn’t worth buying, basically because repair costs aren’t that much more expensive without it than with it. But now, Apple has introduced AppleCare+ for iPad, and while I still feel the same about the iPhone version, AppleCare+ for iPad could be worth buying.

The Basics of AppleCare+ for iPad

AppleCare+ for iPad costs the same as the iPhone version ($99) and offers basically the same terms: a two-year warranty (the iPad by default comes with a 1-year warranty), coverage for accidental damage that includes a $49 fee to fix each time for up to two times, and free technical phone support.

So if the terms are similar, why is the iPad version of AppleCare+ worth it where the iPhone version isn’t? Because a broken iPad will cost you a lot more to fix without AppleCare+ than a broken iPhone, especially if you purchase one of the more expensive iPad models. What are the costs to fix a broken iPad? Read on.

What It Costs to Fix the iPad Out of Warranty

Below are the non-warranty costs to fix the iPad 1 and iPad 2 from Apple’s own website (Apple hasn’t updated the charts to take into account the 3rd-gen iPad yet, but costs will likely to be the same).


iPad Wi-Fi
iPad 2 Wi-Fi
Out-of-Warranty Service Fee
16GB $269
32GB $299
64GB $349
iPad Wi-Fi + 3G
iPad 2 Wi-Fi + 3G
Out-of-Warranty Service Fee
16GB $319
32GB $369
64GB $419

When you compare the $269 non-warranty cost to fix the cheapest iPad (16GB version) to AppleCare+’s $99 + $49 pricetag, AppleCare+ supplies a savings of $121. It goes up to $271 in savings for the most-expensive iPad. And that’s only if you break the iPad once (AppleCare+ covers you for up to two accidental damage repairs). Break it twice, and it’s a savings of $341 to fix the cheapest iPad.

So, Is It Worth It?

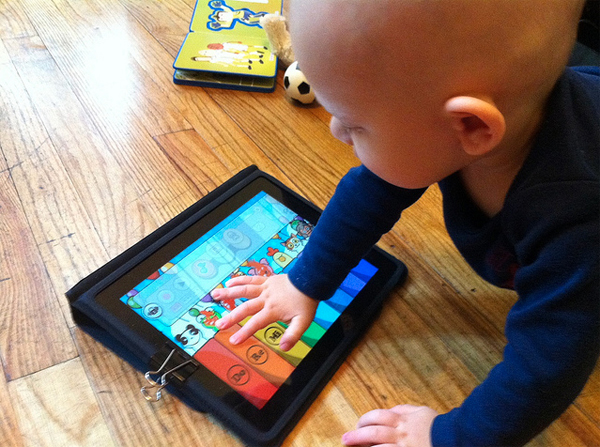
The gamble of AppleCare+ is that of any insurance: you may never break your iPad and you’re still out the initial $99 cost. And $99 is still a lot of money to most people. But seeing as the iPad is a mobile device, the chances of breaking it are much more than, say, a home computer or HDTV, but maybe less than an iPhone. It may all come down to how you plan to use the iPad. Are your small children going to be playing with it? Is it never going to leave your home?

Me? I’m buying it for my $829 64 GB iPad 3, But I am a heavy iPad user who travels with it.

Endnotes:

  • According to the official legal terms, AppleCare+ for iPad doesn’t cover theft, loss, fire, earthquake, cosmetic damages like scratches and dents that don’t affect the iPad’s functionality, or abuse (so talk nice to your iPad).
  • AppleCare+ for iPad doesn’t cover damage that occurs before you buy AppleCare+, so make sure you tell them the damage occurred after (but don’t lie, never lie).
  • You must purchase AppleCare+ for iPad within 30 days of your iPad purchase.
  • If you don’t live near an Apple Store, Apple will pay for the shipping to mail in the iPad for service.
  • AppleCare+ for iPad also covers repair or replacement coverage for an Apple Time Capsule or Airport device. Why? I have no idea. You just have to have purchased the device within two years of the iPad.
  • While the cost to fix an iPad off-warranty ranges from $269-$419, the iPhone 4S costs only $199 to fix out of warranty, and older iPhones even less, only $149. If you have AppleCare+ for iPhone, it’s $149 to fix a broken iPhone 4S, saving you only $49. Not much of a savings.

*Updated 3-14-2012 to fix factual error about when you must purchase AppleCare+ for iPad. Previously the articled claimed you could wait up to a year, but Apple’s page says it must be within 30 days.

iPhone & iPad Tip: Use iOS 5’s Reader Feature to Automatically Load the Next Page of an Article

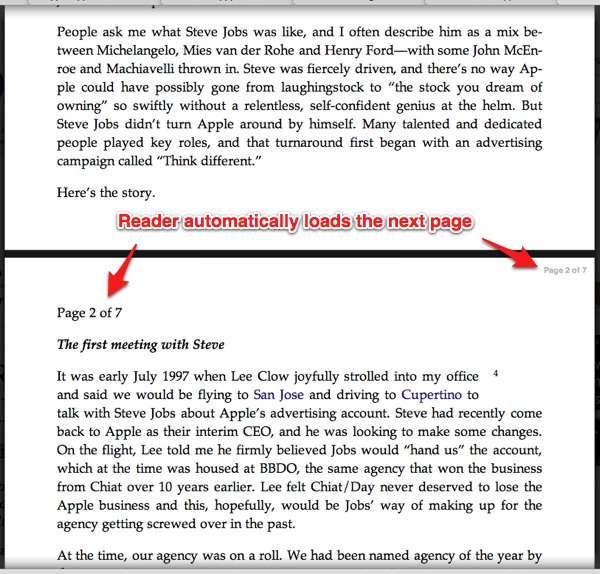
Multipage articles on the web can be annoying, especially when you have to click to the next page every few hundred words. It’s a dirty trick websites use to inflate pageviews for advertisers, all at the expense of user experience. Apple has your back though with the new built-in Reader feature, which can load the next page of an article without you having to do anything.

To see it work, simply tap the Reader button in Mobile Safari’s URL bar and then scroll down to the end of a multi-page article. When the end comes into view, the next page will load automatically. Oh Apple, you clever bastards, you.

What Is Reader?

New to the iPhone/iPad and don’t know what I’m talking about? No problem, Reader is simply a button that (sometimes) appears in Mobile Safari’s address bar when you browse to an individual article on the web. Whether the button appears or not depends on different factors, but it’s supposed to appear on articles and not on things like home pages, etc.

When you tap the Reader button, Reader strips away advertising and extraneous formatting and presents just basic text to you for a more comfortable reading experience. On a multi-page article, when you scroll down to the end of one page, it should begin loading the next one. Reader doesn’t always work perfectly though, as some sites can break the feature and/or Reader won’t recognize an article as more than one page.

Notes:

  • The Reader button doesn’t always appear after loading individual web articles, as the coding on some sites isn’t compatible with Reader, but it should appear most of the time.
  • The next page won’t load until the end of the current page becomes visible in Reader’s window.
  • Reader lets you adjust font size. Just tap the two letter A’s in the top left corner to increase/decrease font size.

Tips for Child Proofing Your iPhone and iPad

1. Binder Clip

Childprooding iPad with Binder Clip

Image via Make.

A common binder clip is a simple solution for preventing kids from pressing the home button and quitting out of apps—a huge source of frustration for parents and kids alike. Best of all, you may already have a binder clip around the house. It’s awkward looking but effective, especially for toddlers.

If you’ve ever used a binder clip, you’ll know that it requires a good amount of wrist strength to remove, especially when the binder is already attached to a thick object, so young kids will have trouble removing it.

Binder clips are cheap too. Amazon has a box of 12 for $1.99.

This tip comes via Make Magazine.

2. BubCap

The BubCap is a more elegant solution for preventing kids from pressing the home button. The BubCap is a thin but rigid piece of plastic that fits over the home button via strong adhesive and prevents a toddler from pressing the home button. The adhesive is strong enough that young children will lack the coordination and strength to remove it, yet adults can remove it without adverse effects to the iDevice.

BubCaps are mainly designed for toddlers, as older children and adults will still be able to push the button through the plastic and remove the BubCap itself.

BubCaps sell for $6 on Amazon for a set of four Bubcaps, which includes two different rigidities.

3. Child-Friendly Cases

If it makes you nervous to hand over your expensive iDevice to a child, a good protective case can be an insurance policy against damage.

BigGrips are thick, colorful iPad cases that will give the device a softer, kid-friendly feel. They are available for the iPad 2 and original iPad for around $35.

If you don’t like the bright colors and would rather have a full-time protective case you’re not embarrassed to carry around yourself, we recommend checking out a company called Otterbox, which is known for its ultra-protective cases that even the US military uses to protect its iDevices. Their MSRP is usually over $60, but you can find them at deep discounts on Amazon.

4. Restriction Settings

iPhone Restrictions

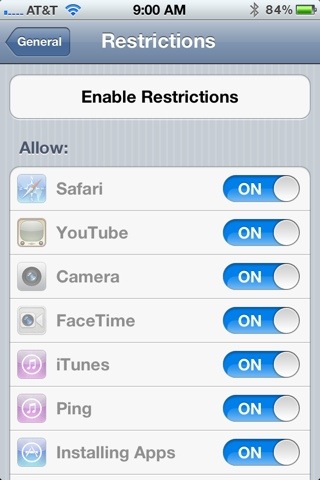
In the iPhone’s Settings, a feature called Restrictions can prevent kids from accessing certain apps and features. Once Restrictions are turned on, they are passcode protected, so kids can’t change them without the passcode. Restrictions are mainly meant for older kids, but there are a few that could come in handy for toddlers too, preventing them from:

  • Deleting apps
  • Installing apps
  • Making in-app purchases

To access Restrictions, open up the Settings app and go to General–>Restrictions. Apple has made it easy to turn off restrictions with one tap. You can find out more about Restrictions on Apple’s site here.

5. Passcode

Kids may try to play with Mommy’s iPhone when Mommy isn’t around, which can lead to trouble. It’s recommended that everyone, parents and nonparents alike, use a passcode to protect their iPhone from unwanted intrusions.

Sure, passcodes can be annoying if you access your iPhone a lot, but you can change the amount of time that must pass before your iPhone passcode locks itself to make it less annoying. For example, my iPhone is set to require a passcode after 1 hour of non-use.

How to Easily Share an iPhone Contact’s Details Via Text Message or Email

You can easily share any of your iPhone contact’s details with just a few taps. The iPhone is compatible with the vCard format, which is essentially a digital version of a business card. iPhone vCards can be exchanged via text message or email, and all the recipient has to do is tap the vCard to add that contact and their details to their iPhone’s address book. Below are step-by-step instructions on how to send a vCard on the iPhone:

1. Open the Phone or Contacts app:

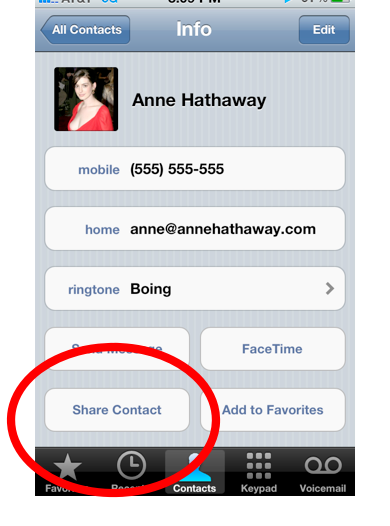
2. Select a contact, then tap the Share Contact button toward the bottom of the screen:

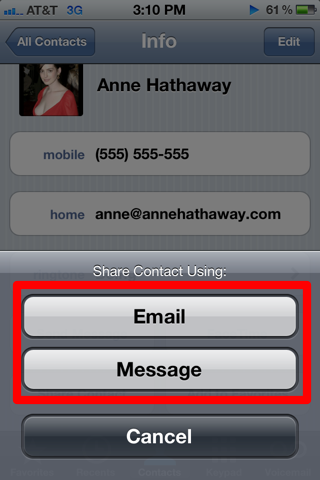
3. Select Mail or Message (text message):

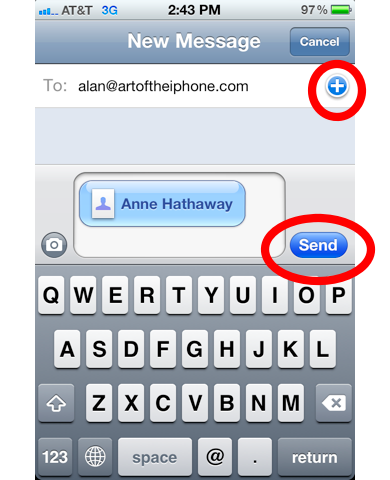
4. Choose your recipient(s), then tap Send:

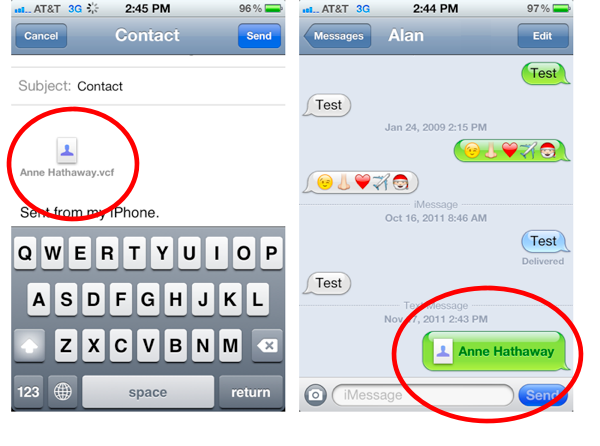
5. When your recipient receives the vCard, it will look something like this:

Now all the recipient has to do, if on an iPhone, is tap the card to add all the contact’s details to their iPhone as well. Easy as pie!

Notes:

  • vCards can be used to share name, phone number, postal address, email address, and URLs. Some devices also support vCards with logos, photos, and audio clips.
  • Apple was part of the consortium of companies that invented the vCard. The vCard was originally called the Versitcard and was intended for email clients.
  • Extra tip: Create a contact entry for yourself on the iPhone. That way, when someone asks for your details, you can send them a vCard!

How to Launch a Website From Spotlight Search (iPhone & iPad Tip)

You may know the iPhone’s Spotlight Search feature can be used to quickly find and launch apps, but it can also be used to launch your favorite websites. This can save you a lot of typing and frustration. Web clips, which are simply bookmarks you save to your home screen via the iPhone’s Mobile Safari browser, are considered apps by Spotlight Search, and thus will show up when you search for apps. Below are step-by-step instructions on how to create a web clip.

1. Open the iPhone’s Safari browser:

2. Navigate to your favorite website, then tap the arrow button at the bottom of the screen:

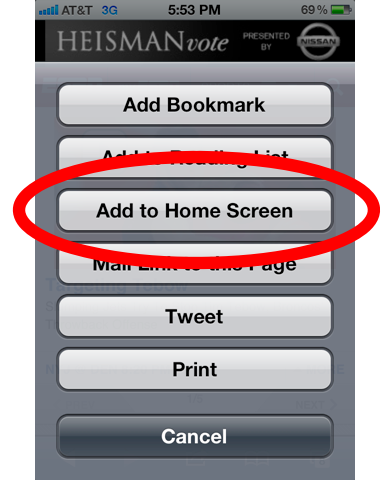
3. Tap Add to Home Screen:

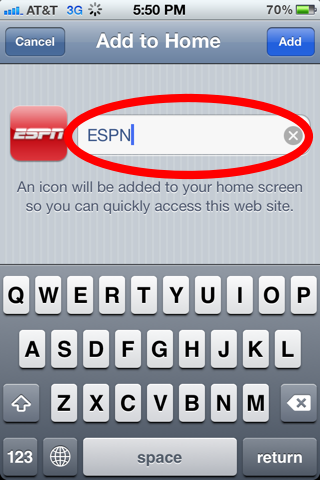
4. Give the webclip a name that you’ll remember when searching for it:

Note: Some websites have an icon that will show up when you create the web clip. For example, ESPN.com will have a nice ESPN logo on the icon.

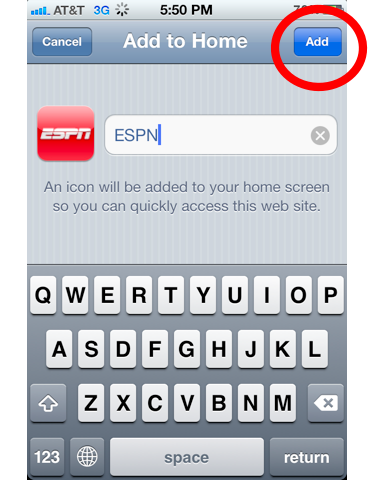
5. Tap Add in the top right corner:

6. The web clip will now have its own icon on the the iPhone’s home screen:

7. To test it out, open up the iPhone’s Spotlight Search and enter the name of the web clip:

Notes and Troubleshooting:

  • Did you know you can create web clips that take you directly to an iPhone Setting like your Wi-Fi connection? It sounds bizarre, but it’s true. Check out our article on this neat little trick.
  • Are web clips and apps in general not showing up in Spotlight Search? You need to make sure the settings for Spotlight Search are set to show apps. Read our instructions here.
  • You can clean up Spotlight Search by preventing emails, contacts, notes, etc, from showing up. Read our instructions here.