Category: iPhone Basics

How to Rent Movies From iTunes and Watch Them on the iPhone

How to Rent Movies Directly on the iPhone

To rent a movie directly on the iPhone, you’ll need to be connected to a WiFi network. Once connected, follow the steps below.

1. Open the iTunes app and click on the videos tab at the bottom:

Rent Movie Directly onto iPhone

2. Browse or search through the selections. Tap one to select it, then tap Rent:

Tap the Rent Button on the iPhone

3. The button will turn green. Tap it again to confirm, then enter your iTunes store password to confirm the purchase.

Once it finished download, launch the iPod app on the iPhone. You’ll find the movies under the Videos tab.

How to Rent Movies in iTunes and Move Them to the iPhone:

1. In iTunes, select iTunes Store in the left sidebar:


Continue reading…

How to Add Prefixes, Suffixes, Middle Names, Etc, to iPhone Contacts

Adding Prefixes Suffixes to iPhone Contact

You can add prefixes (Dr, Mr, Mrs, Ms), suffixes (Jr, III), middle names, and other information to any iPhone contact. To do this, there’s a special option called Add Field. The option can be hard to find though. Here are instructions on how to find it and how to add prefixes, etc, to contacts:

1. Open the Contacts or Phone app:

Open Contacts or Phone

2. Select a contact from the list by tapping his or her name once.

3. Tap Edit in the top right corner:

Edit iPhone Contact

4. Scroll down through the tabs and select Add Field (it won’t be immediately visible. Scroll down by swiping upward):

Add Field to iPhone Contacts

5. You’ll see a list of fields. Tap any of the fields to add that type of information to your contact:

Add Field to iPhone Contacts

6. Enter text into the field and tap Save:

Adding a Prefix to iPhone Contact’s Name

7. If you want to add more information, repeat steps 4-6. Otherwise, tap Done to finish:

Finish Editing iPhone Contact Prefix

And that’s it. Check out all our posts on iPhone Tips and iPhone Basics.

How to Send a Call to Voicemail With the iPhone

We’ve all been in this situation: the iPhone rings, but you can’t take the call. If you want to immediately silence the call (turn off the ringtone and vibration), press the sleep button once.

If you want to send the call directly to voicemail, press the sleep button again. So in other words, to send a call to voicemail after it rings, press the sleep button twice. The sleep button is located on the top of your iPhone on the righthand side.

Send iPhone Call to Voicemail: Press Sleep Button Twice

If you’re using the iPhone headphones, press the headphone button once to answer the call. Press it twice to send it to voicemail.

Check out all of our posts on iPhone Basics.


(Photo via lirent.net)

How to Delete the iPhone’s Safari Browser History

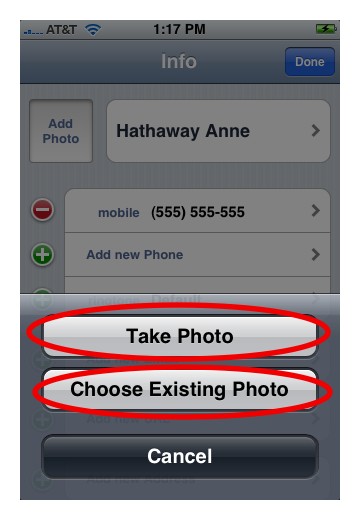
It happens to all of us, you “accidentally” browse to an unsavory website on your iPhone’s browser. Now you want to delete all traces of having visited that site from the browser’s history. How do you do it? Follow these simple instructions:

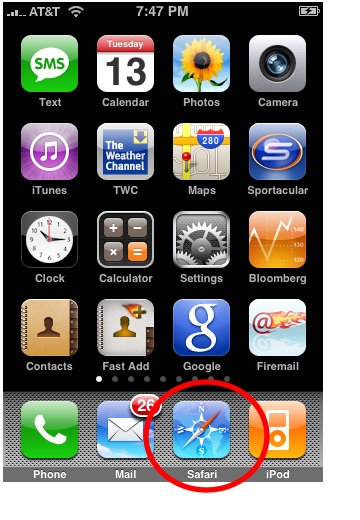
1. Tap the Mobile Safari icon:

Clear iPhone Browser History

2. Tap the Bookmark icon at the bottom of the screen.

Clear the iPhone Browser History Step 2

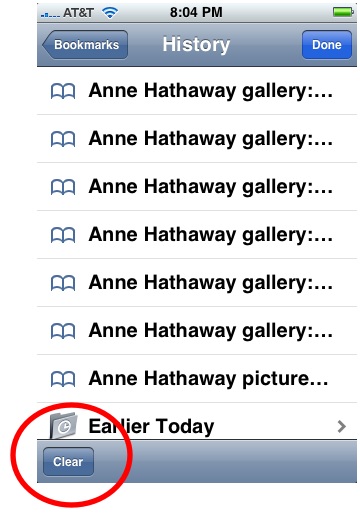
3. If your view is like the one below, tap History, otherwise, skip to next step:

4. Tap the Clear button at the bottom left of the screen:

Clear History Step 3

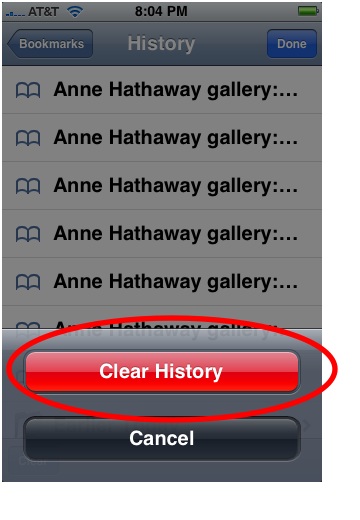
5. Tap Clear History:

Step 3

You have now deleted your history of visited sites. Also note that you have deleted your history of Google searches on the iPhone. Yes, it also keeps a history of search terms too. It does this for the same reason it keeps visited URLs: to save you time. But following the above instructions will delete both types of browsing history, so my, I mean, your habit of visiting AnneHathawayPictures.com need not be revealed.

Note: You may still continue to see some URLs and other terms in that dropdown list. These are either default bookmarks from Apple or bookmarks you have made, they are not a part of your browser’s history.

Try the iPhone’s New Private Browsing Mode

If you are going to be spending some time browsing unsavory websites on your iPhone, try the new Private Browsing Mode, which won’t save any browsing data (history of websites visited, cache images, etc). See our instructions on How to Turn on the iPhone’s Private Browsing Mode.

A Clear History Option in the iPhone’s Settings

What about the Clear History option in the iPhone Settings? What does that do?

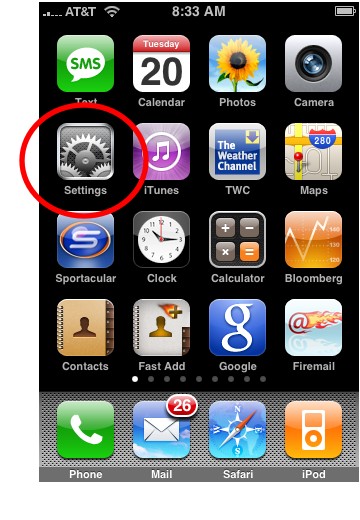
Yes, there is an alternative method of deleting Mobile Safari’s history in the iPhone ‘s Settings menu (see picture below). However, it’s not as effective, as it doesn’t also clear your Google searches. For example, if you searched for Anne Hathaway Pictures in Google, the next time someone entered the letter A in the Google search bar, your search keywords for the sexy young starlet would show up in a dropdown list. Busted!

Clear History in iPhone Settings

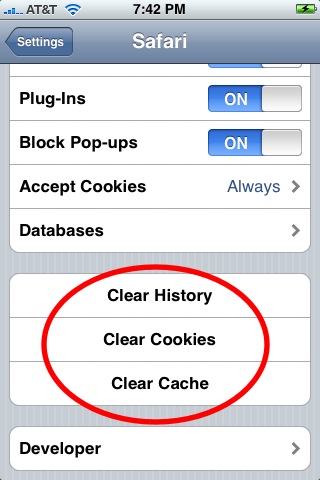
What about Clear Cache and Clear History in the Settings menu? What do those do?

You can clear two other types of data in the iPhone Settings menu: cache and cookies. It sounds like a snack, but really the cache and cookies are data your browser keeps to make your web browsing experience more fluid.

A cache is saved data from websites (eg, buttons, icons, banners, etc) that helps websites load quicker. Clearing your cache is way to clear some of your iPhone’s memory and may improve speed performance.

Cookies hold your online “personality” so websites can know something about you when you visit. An example of this is visiting Amazon.com and seeing that annoying “Hello, John Smith!” at the top. Clear your cookies to avoid such irritation.

iPhone Basics: Turn the iPhone Calculator Into a Scientific Calculator

Scientific Calculator

You may know the iPhone comes with a basic calculator app. But did you know, if you rotate the iPhone to landscape mode, it will turn into a scientific calculator? Doing so will create a whole new row of buttons to appear, including cos, sin, tan, square roots, and more.

Here’s the forumula for compound interest to get you started:

M = P( 1 + i )n

P=principal amount.

i=rate of interest per year.

n=number of years invested.

M=final amount including the principal.

Check out all of Art of the iPhone‘s coverage of iPhone Basics.

How to Add Photos to Your iPhone Contacts

Instructions for Adding Photos to iPhone Contacts:

1. Tap on the Contacts app, or tap Contacts in the Phone app:

Add Photos Step 1

2. Scroll to the person or business you want to add the photo to, and tap their name.

3. Tap Edit in the top right corner:

Edit a Contact

4. Tap Add Photo.

Add Photo to iPhone Contact

5. Tap Choose Existing Photo if you have a photo on your iPhone that you want to use. Or, tap Take Photo if the person is in photo range:

Choose Photo for iPhone Contacts

6. Selecting Choose Exising Photo will open up the iPhone’s Photo Albums. Navigate through your pictures and select the one you want.

7. You can edit the size and orientation of the photo. This comes in handy if you want to use just the face of a person, or if there are multiple people in a photo. You edit by zooming in and out using pinching gestures or by dragging the photo left, right, up, or down:

Move and Scale iPhone Photos

8. When you are finished, tap Set Photo.

9. Tap Done in the top right corner, and you’ve successfully added a photo to your contact.

Done Adding Picture to iPhone Contact

And that’s it. The next time the contact calls, you can see their bright smiling face lit up on your iPhone.

Check out all our iPhone Tips.

How to Add Photos to iTunes For Synching to iPhone or iPod

Warning: Please be sure to transfer (backup) the photos currently on your iPhone to your computer first before following the instructions below. Windows users can do this with the Camera and Scanner wizard. Mac users can use iPhoto.

1. Connect the iPod/iPhone to your computer and launch iTunes.

Connect the iPhone to Computer

2. Click on your iPod/iPhone icon in the left sidebar:

Add Photos to iTunes Step 2a

3. Click the Photos tab at the top center:

Select the Photos Tab

4. Make sure the “Sync photos from” box is checked, then click on the drop-down menu:

Add Pictures to iTunes

5. Select the source of your photos, such as the folder in which they are located:

Add Pictures to iPhone

Once you select a folder, you can sync all the photographs in that folder to your iPhone or iPod. You can also use subfolders to help organize and sync only certain photos you want on the iPhone/iPod. Note that this works for only one level of subfolders. If you create a sub-subfolder, it will not show up in Tunes.

Subfolders will show up as individual photo albums in iTunes, You can then check or uncheck each folder in order to sync them or not.

Tip: Give your subfolders names, like “Family”, to help keep your images organized.

Notes:

  • Windows users can also sync from Adobe Photoshop Album 1 or Adobe Photoshop Elements 3.0. If you have these programs installed, they will automatically show up in the iTunes dropdown menu under the Photos tab.
  • Mac users can sync from iPhoto. Any albums created in iPhoto will show up in iTunes under the Photos tab.
  • An alternative way to put a photo onto your iPhone is to email it yourself. Access the email on the iPhone, open the photo by tapping on it, then hold your finger on the photo for a few seconds until a menu pops up. Choose Save Image.