Art of the iPhone

iPhone & iPad Tip: Use iOS 5’s Reader Feature to Automatically Load the Next Page of an Article

Multipage articles on the web can be annoying, especially when you have to click to the next page every few hundred words. It’s a dirty trick websites use to inflate pageviews for advertisers, all at the expense of user experience. Apple has your back though with the new built-in Reader feature, which can load the next page of an article without you having to do anything.

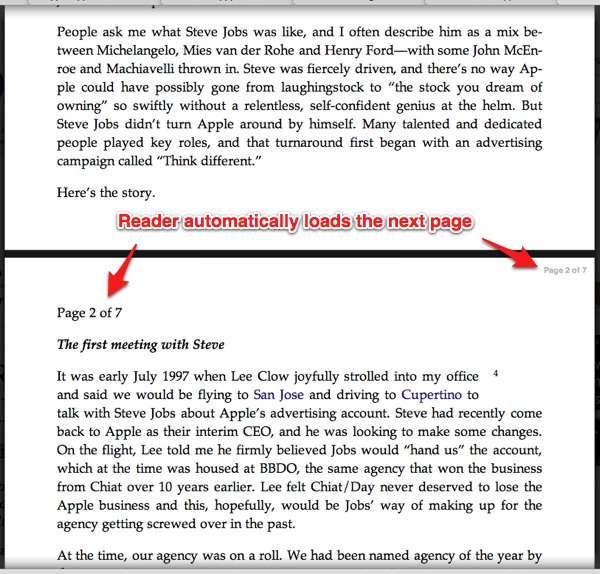
To see it work, simply tap the Reader button in Mobile Safari’s URL bar and then scroll down to the end of a multi-page article. When the end comes into view, the next page will load automatically. Oh Apple, you clever bastards, you.

What Is Reader?

New to the iPhone/iPad and don’t know what I’m talking about? No problem, Reader is simply a button that (sometimes) appears in Mobile Safari’s address bar when you browse to an individual article on the web. Whether the button appears or not depends on different factors, but it’s supposed to appear on articles and not on things like home pages, etc.

When you tap the Reader button, Reader strips away advertising and extraneous formatting and presents just basic text to you for a more comfortable reading experience. On a multi-page article, when you scroll down to the end of one page, it should begin loading the next one. Reader doesn’t always work perfectly though, as some sites can break the feature and/or Reader won’t recognize an article as more than one page.
Notes:

  • The Reader button doesn’t always appear after loading individual web articles, as the coding on some sites isn’t compatible with Reader, but it should appear most of the time.
  • The next page won’t load until the end of the current page becomes visible in Reader’s window.
  • Reader lets you adjust font size. Just tap the two letter A’s in the top left corner to increase/decrease font size.

Review: Zippy BT-500 Wireless Bluetooth Keyboard With iPad

If you’re looking to write the next Great American Novel on the iPad, good luck using the iPad’s touchscreen keyboard. You’re going to need a physical keyboard. And wireless bluetooth keyboards are the current solution for connecting a traditional tactile keyboard to the iPad to get some serious typing done.
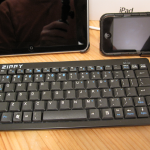
The Zippy BT-500 ($50) is such a bluetooth keyboard that can connect to the iPad, although with its cramped keys, it doesn’t end up improving much upon the touchscreen typing experience.
The Zippy BT-500 is an ultra-compact keyboard: just under 9 inches in length and 4 inches from top to bottom. It is much smaller than a normal desktop keyboard. The compromise the Zippy BT-500 makes for this smaller size is that its keys are smaller and more cramped than a normal keyboard. And that is where the rub lies with the Zippy BT-500.

At times, I found using the Zippy BT-500 only a slightly better experience than using the iPad’s touchscreen keyboard itself. The BT-500’s keys are too close together, and my fingers (which are pretty slender for man hands, by the way) too wide to accurately hit the keys. I found myself making just as many mistakes with the Zippy as with the iPad’s touchscreen keyboard. I was, however, able to increase my accuracy by using a slower hunt-and-peck method—where you use just your index fingers to slowly select and hit each key.

I can’t recommend the Zippy over the Apple’s own wireless bluetooth keyboard, which I’ve reviewed in the past for use with the iPad. The Zippy is cheaper at around $50 or less, compared to $70 for Apple’s bluetooth keyboard, but with Apple’s keyboard you get full-size keys, and at around 10 ounces compared to the Zippy’s 11+ ounces, the Apple is a little lighter as well.

That’s not to say the Zippy BT-500 doesn’t have some redeeming characteristics. It has the full 82 keys, including a Windows key that doubles as the Apple key—sacrilege for all the Mac users out there.

The BT-500’s signature feature is that it allows you to instantly switch to up to 6 bluetooth devices. For example, with just a press of a few keys, the keyboard can switch between the iPad and iPhone. A neat feature, but likely only useful to a handful of people.

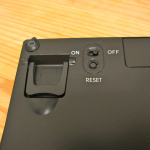
The Zippy is powered by two AA batteries, which can easily be replaced via a removable access panel on its back. There is also an on/off switch next to the panel as well as a reset button.

Review Summary:

The Zippy BT-500 ($50) Wireless Bluetooth keyboard is impressively compact but makes too many sacrifices in the size and spacing of its keys to be comfortable to use. I found myself making just as many typing errors with the BT-500 as I did with the iPad’s own touchscreen keyboard. For just $20 more, you can get the Apple Wireless keyboard, which gives you full-size keys and a much more accurate and comfortable typing experience.

Review: Motorola SD10-HD Bluetooth Headphones

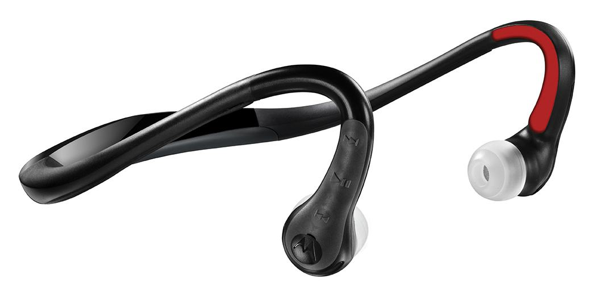
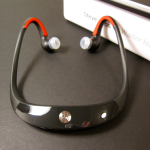
As a runner who runs with his iPhone, I purchased the “sweat proof” Motorola S10-HD ($85) wireless bluetooth headphones hoping they’d be a great solution for my long runs. Being wireless and sweat proof made the SD10’s seem like the holy grail of headphones for athletes. Sadly, they’re not as advertised, and certainly not sweat proof, as after only my fifth sweat-drenching run, one of the headphones shorted out.

And I’m not the only athlete to have the SD10-HD’s short out on them. Reviews on Amazon.com are filled with stories of the “sweat proof” SD10-HD’s conking out after a few workouts.

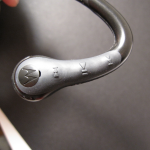
I had other problems with the SD10’s. The controls, which are located near the eartips, require you to blindly grope for the buttons. The buttons themselves are difficult and awkward to press and can lead to annoying moments when you accidentally call somebody during a run or skip a song when you didn’t mean to.

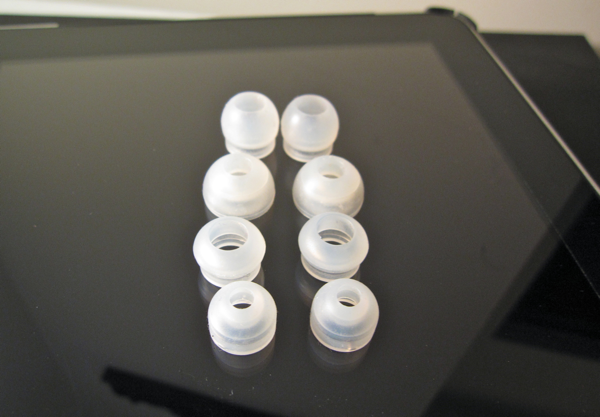
The SD10-HD’s also do not use normal eartips. The headphones come with 4 sets of gigantic, clear rubber eartips that rest on the outside of the ear canal; thus, the SD10’s aren’t true in-ear headphones.

This outside-the-ear-canal design, while comfortable, led to problems when exercising. When sweat runs into the ear canal, it becomes trapped by the ear tips, creating an unpleasant water-in-the-ear feeling. You know that feeling just after you step out of the pool? That’s what it feels like 20 minutes into a run with the SD10-HD’s.

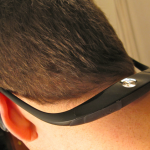
And it’s a shame too, as the headphones have a few attributes that work well for runners. For example, I was surprised how steady and comfortable the headphones stayed during runs—I was expecting them to flop all over the place. And the fact that they are wireless means no awkward cord bouncing or snagging.

The sound quality of the SD10’s is also pretty good considering they’re both bluetooth and not true in-ear headphones. I would stop short of calling the sound quality great though. They were adequate in bass levels as well as with mids and highs. I did experience some problems with volume levels not being loud enough. The max volume falls short of what even the cheapest headphones are capable of. For most music and podcasts, it wasn’t be a problem, but if you have audio that is quiet to begin with, you will have problems compensating with the SD10-HD’s volume levels.

I also experienced many problems with getting the headphones to turn off. I’m not sure if I received a faulty on/off button, but 80% of the time I could not get the headphones to shut off by pressing the on/off button and instead just had to let the battery run out.

Review Summary

The Motorola SD10-HD bluetooth wireless headphones did not live up to their athlete-friendly billing nor their high price tag. Motorola advertises them as “sweat proof,” but I and many others found them anything but. With its frustrating controls, poor sound levels, and an uncomfortable problem with trapping sweat in the ear, I can’t recommend the SD10-HD’s to athletes.

The Motorola SD10-HD currently sell for around $60 on Amazon or can be found at Apple Stores for around $85.

iPhone Tip: Full Song Title Not Visible? Hold Your Finger On It

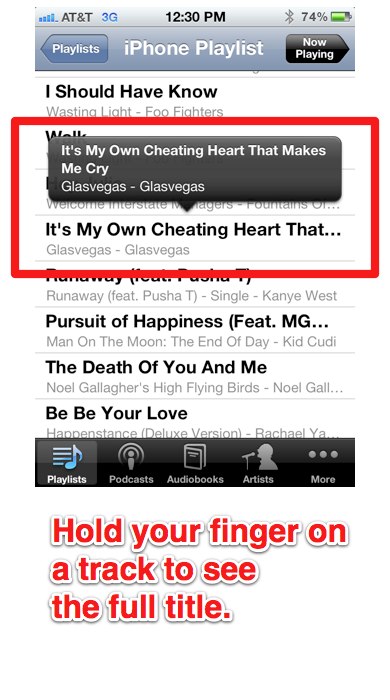
One major annoyance for me on the iPhone is when long song titles, podcasts, videos, etc, don’t fit on the screen and are cut off. Thankfully, Apple offers a simple solution to see the full title, just hold your finger on the track, and the full title will appear in a pop-up (see image below):

How to Sort Your Photos Into Albums on the iPhone

Photo albums are a new feature introduced in iOS 5. Sorting your photos into albums is not only a way to give order to the chaos that is the Photos app, but it also makes it easier to show off all the pictures of your new baby, latest vacation, or new car.

Another cool feature of albums is slideshows. With one tap, you can also easily play the album as a slideshow and use any music on your iPhone as background music.

Below are step-by-step instructions on how to organize your photos in albums on the iPhone (works for the iPad too).

How to Sort Photos Into Albums on the iPhone:

1. Open the Photos app:

2. Tap Edit in the top right corner:

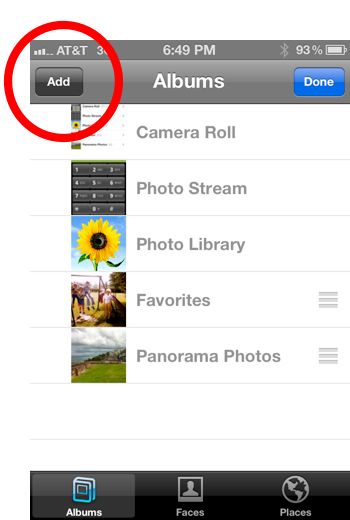
3. Tap Add in the top left corner:

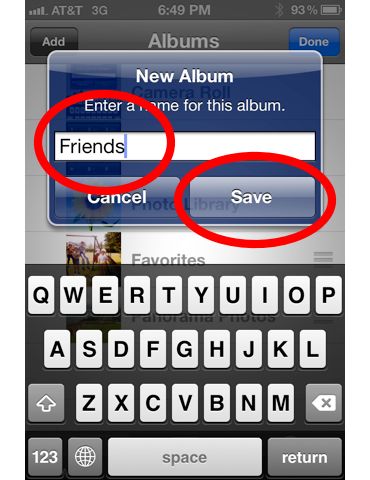
4. Enter in a name for your album, then tap Save:

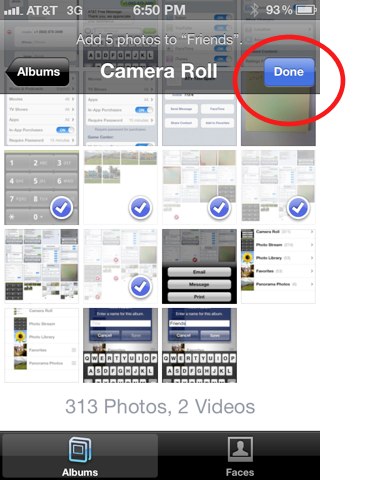
5. Tap the photos you want to place in the album, a blue and white checkmark will appear when you select them. Note that photos can be placed into more than one album. Tap Album in the top left to navigate to other albums and select the photos within:

6. Tap Done in the top right corner:

And that’s it, you’ve created a photo album.

Extra Tip: How to Move a Photo Into an Existing Album

Let’s say you’ve already have created an album called Friends, and you want to move a new picture into that album. Here’s how (hat tip to Michelle in the comments). Important: note that this only works for albums created on the iPhone. If you created an album on your computer and synced it to the iPhone, the instructions below won’t work.

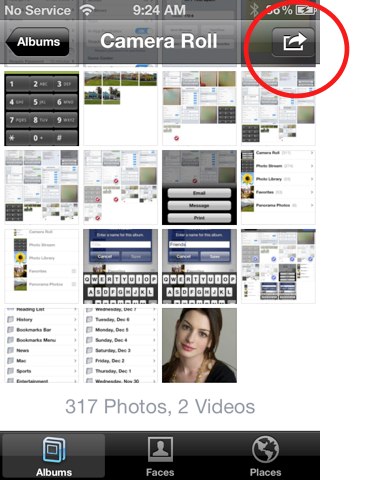
1. In the Camera Roll or in any album, tap the arrow in the top right corner:

2. Tap the photo(s) you want to move into an album, then tap Add To:

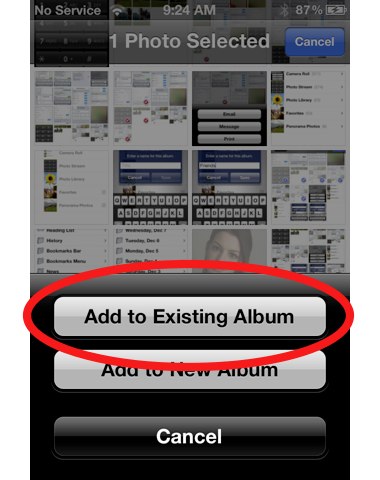
3. Tap Add to Existing Album:

4. Tap the album you want to move the photo(s) into:

And that’s it.

Notes:

  • Deleting an album does not delete the photos inside. They photos will stay on your iPhone even though the album has been deleted. Think of it as throwing away the folder but keeping the images.
  • Photo albums created on the iPhone don’t currently sync back to iTunes/your computer. Here’s hoping Apple fixes that in the future.
  • If you own an AppleTV, you can wirelessly play albums as slideshows from your iPhone to your TV via the built-in AirPlay feature. And it’s easy—just a few taps.

Tips for Child Proofing Your iPhone and iPad

1. Binder Clip

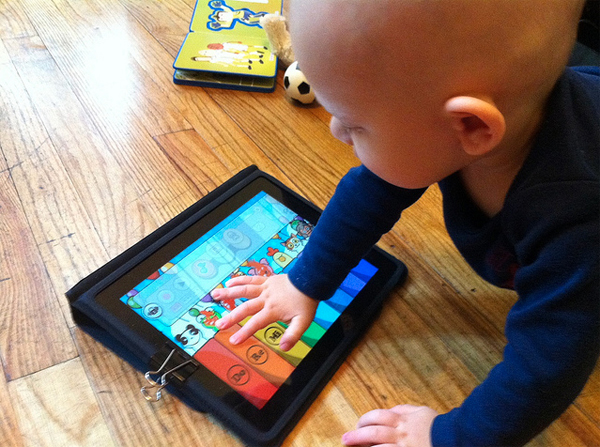
Childprooding iPad with Binder Clip

Image via Make.

A common binder clip is a simple solution for preventing kids from pressing the home button and quitting out of apps—a huge source of frustration for parents and kids alike. Best of all, you may already have a binder clip around the house. It’s awkward looking but effective, especially for toddlers.

If you’ve ever used a binder clip, you’ll know that it requires a good amount of wrist strength to remove, especially when the binder is already attached to a thick object, so young kids will have trouble removing it.

Binder clips are cheap too. Amazon has a box of 12 for $1.99.

This tip comes via Make Magazine.

2. BubCap

The BubCap is a more elegant solution for preventing kids from pressing the home button. The BubCap is a thin but rigid piece of plastic that fits over the home button via strong adhesive and prevents a toddler from pressing the home button. The adhesive is strong enough that young children will lack the coordination and strength to remove it, yet adults can remove it without adverse effects to the iDevice.

BubCaps are mainly designed for toddlers, as older children and adults will still be able to push the button through the plastic and remove the BubCap itself.

BubCaps sell for $6 on Amazon for a set of four Bubcaps, which includes two different rigidities.

3. Child-Friendly Cases

If it makes you nervous to hand over your expensive iDevice to a child, a good protective case can be an insurance policy against damage.

BigGrips are thick, colorful iPad cases that will give the device a softer, kid-friendly feel. They are available for the iPad 2 and original iPad for around $35.

If you don’t like the bright colors and would rather have a full-time protective case you’re not embarrassed to carry around yourself, we recommend checking out a company called Otterbox, which is known for its ultra-protective cases that even the US military uses to protect its iDevices. Their MSRP is usually over $60, but you can find them at deep discounts on Amazon.

4. Restriction Settings

iPhone Restrictions

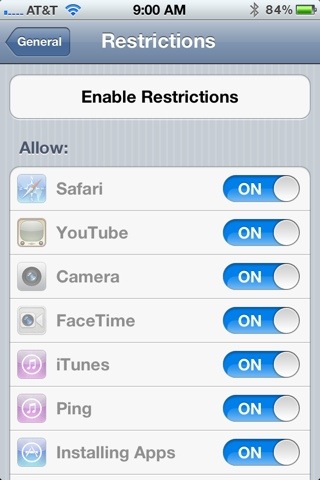
In the iPhone’s Settings, a feature called Restrictions can prevent kids from accessing certain apps and features. Once Restrictions are turned on, they are passcode protected, so kids can’t change them without the passcode. Restrictions are mainly meant for older kids, but there are a few that could come in handy for toddlers too, preventing them from:

  • Deleting apps
  • Installing apps
  • Making in-app purchases

To access Restrictions, open up the Settings app and go to General–>Restrictions. Apple has made it easy to turn off restrictions with one tap. You can find out more about Restrictions on Apple’s site here.

5. Passcode

Kids may try to play with Mommy’s iPhone when Mommy isn’t around, which can lead to trouble. It’s recommended that everyone, parents and nonparents alike, use a passcode to protect their iPhone from unwanted intrusions.

Sure, passcodes can be annoying if you access your iPhone a lot, but you can change the amount of time that must pass before your iPhone passcode locks itself to make it less annoying. For example, my iPhone is set to require a passcode after 1 hour of non-use.

How to Easily Share an iPhone Contact’s Details Via Text Message or Email

You can easily share any of your iPhone contact’s details with just a few taps. The iPhone is compatible with the vCard format, which is essentially a digital version of a business card. iPhone vCards can be exchanged via text message or email, and all the recipient has to do is tap the vCard to add that contact and their details to their iPhone’s address book. Below are step-by-step instructions on how to send a vCard on the iPhone:

1. Open the Phone or Contacts app:

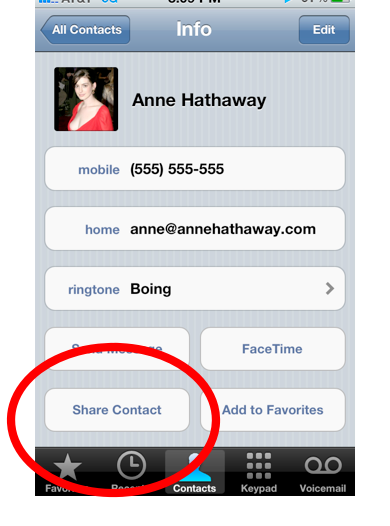
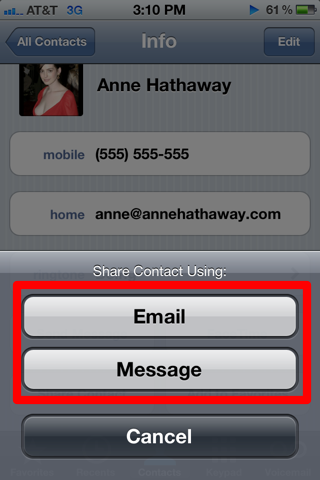
2. Select a contact, then tap the Share Contact button toward the bottom of the screen:

3. Select Mail or Message (text message):

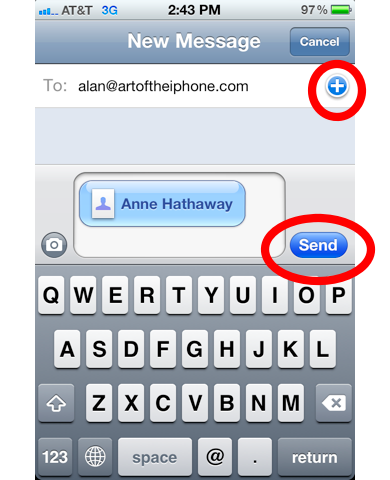
4. Choose your recipient(s), then tap Send:

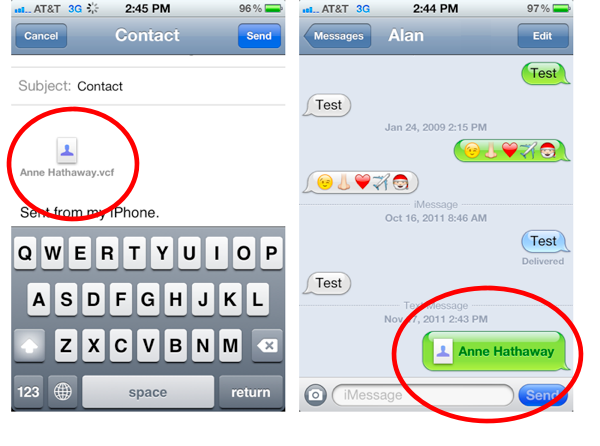
5. When your recipient receives the vCard, it will look something like this:

Now all the recipient has to do, if on an iPhone, is tap the card to add all the contact’s details to their iPhone as well. Easy as pie!

Notes:

  • vCards can be used to share name, phone number, postal address, email address, and URLs. Some devices also support vCards with logos, photos, and audio clips.
  • Apple was part of the consortium of companies that invented the vCard. The vCard was originally called the Versitcard and was intended for email clients.
  • Extra tip: Create a contact entry for yourself on the iPhone. That way, when someone asks for your details, you can send them a vCard!

How to Launch a Website From Spotlight Search (iPhone & iPad Tip)

You may know the iPhone’s Spotlight Search feature can be used to quickly find and launch apps, but it can also be used to launch your favorite websites. This can save you a lot of typing and frustration. Web clips, which are simply bookmarks you save to your home screen via the iPhone’s Mobile Safari browser, are considered apps by Spotlight Search, and thus will show up when you search for apps. Below are step-by-step instructions on how to create a web clip.

1. Open the iPhone’s Safari browser:

2. Navigate to your favorite website, then tap the arrow button at the bottom of the screen:

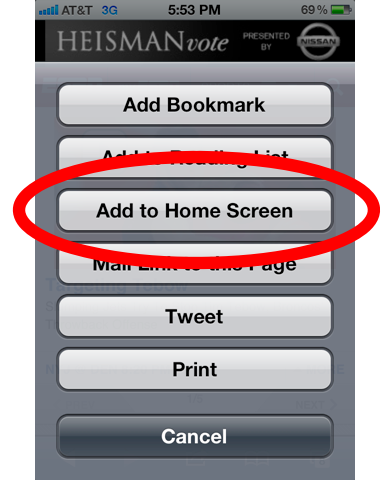
3. Tap Add to Home Screen:

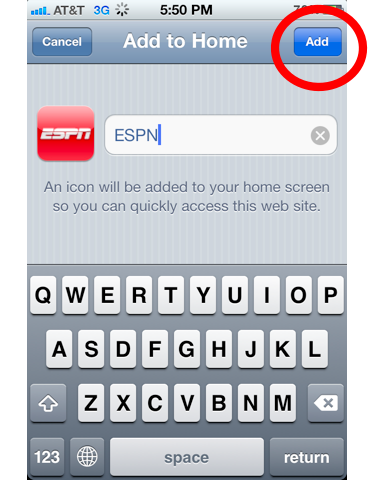
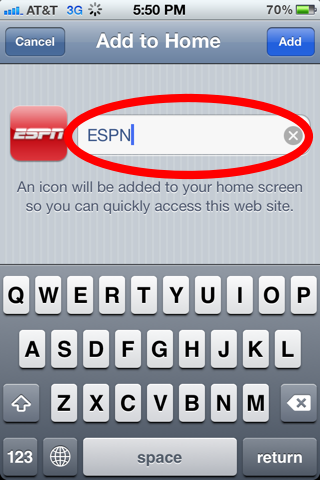
4. Give the webclip a name that you’ll remember when searching for it:

Note: Some websites have an icon that will show up when you create the web clip. For example, ESPN.com will have a nice ESPN logo on the icon.

5. Tap Add in the top right corner:

6. The web clip will now have its own icon on the the iPhone’s home screen:

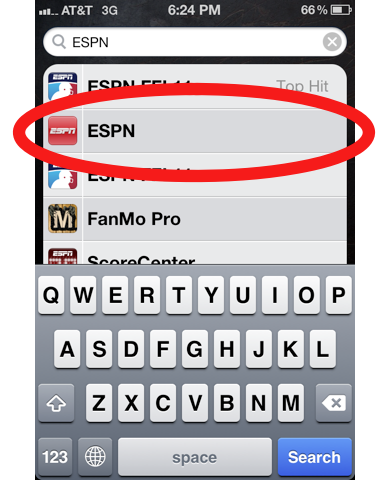
7. To test it out, open up the iPhone’s Spotlight Search and enter the name of the web clip:

Notes and Troubleshooting:

  • Did you know you can create web clips that take you directly to an iPhone Setting like your Wi-Fi connection? It sounds bizarre, but it’s true. Check out our article on this neat little trick.
  • Are web clips and apps in general not showing up in Spotlight Search? You need to make sure the settings for Spotlight Search are set to show apps. Read our instructions here.
  • You can clean up Spotlight Search by preventing emails, contacts, notes, etc, from showing up. Read our instructions here.

Tip: Quickly Insert Emoji Using iPhone Text Shortcuts

Everyone loves emoji, the cute little icons most commonly used in text messages. But inserting them can be a lumbering, multistep process. Here’s a much quicker way to insert emoji using the new text shortcuts feature on the iPhone. Just follow the step-by-step instructions below for a one-time setup. Then you’ll be able to instantly insert emoji by typing just a few characters.

1. Make sure you have emoji activated. They are not turned on by default (you only have to activate them once). Follow our instructions on activating them.

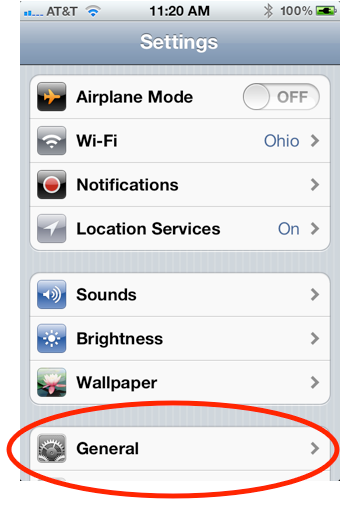
2. Once emoji are activated, open the iPhone’s Settings and tap General:

General in iPhone Settings

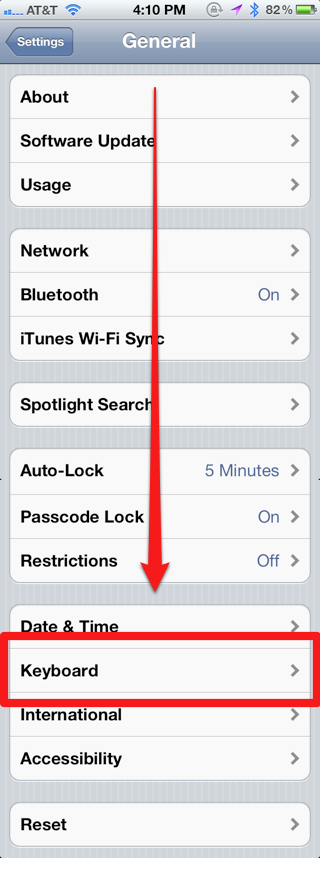
3. Scroll down and tap Keyboard:

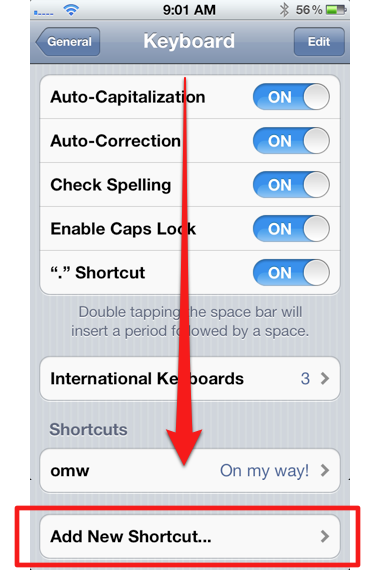
4. Scroll down and tap: Add New Shortcut…:

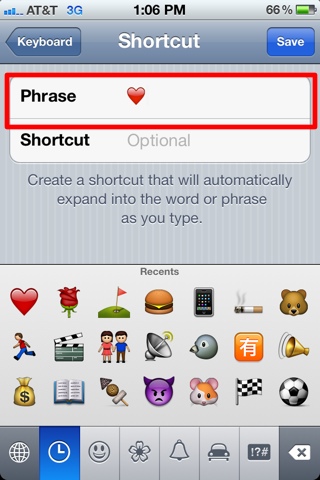
5. In the field labeled Phrase, insert the emoji. (You can access the emoji keyboard by tapping the globe icon on the keyboard):

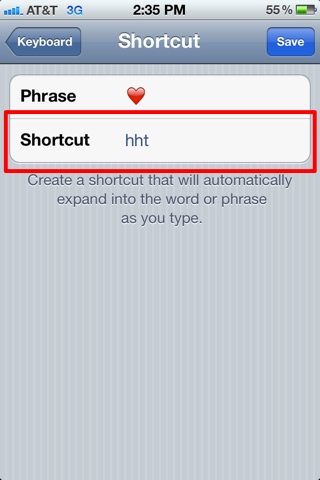
6. Now, in the shortcut field, type in a combination of characters that will turn into the emoji. Pick an uncommon combination of characters to help prevent accidental auto-correction from occuring, but also pick something that will help you remember the shortcut. For example, for a shortcut for the heart emoji, you may want to use the letters hht, as it’s not a common combination of letters and the two H’s will allow you to quickly type the characters.

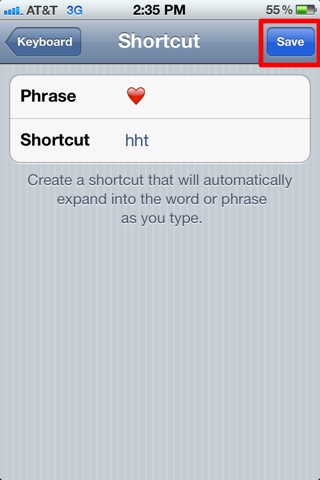
7. To finish, tap Save:

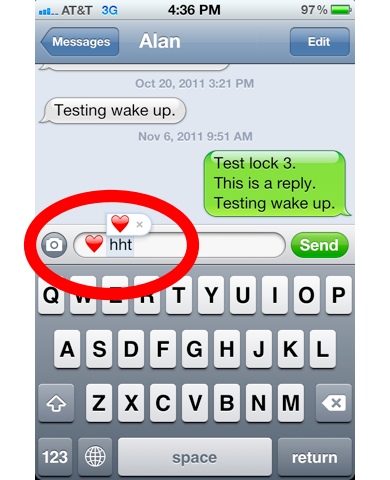
And that’s it. To test your new emoji shortcut, type in your shortcut anywhere you can enter text on the iPhone, tap spacebar, and your cute little emoji will appear!

Notes:

  • Emoji first gained popularity in Japan, but thanks to the iPhone, they are growing in use in the US. Even Gmail now supports them.
  • Did you know that you can use emoji in the names of your app folders? For example, you could use the hamburger emoji to label a folder of restaurant apps.

How to Add Words to the iPhone’s Dictionary

You can add words to the iPhone’s spelling dictionary to prevent the iPhone’s auto-correct feature from automatically fixing them. To do this, however, you must add the words to a very unobvious place on the iPhone: in the iPhone’s “text shortcuts.” Below are step-by-step instructions on how to add words to the iPhone’s dictionary.

1. Open Settings:

2. Tap General:

General in iPhone Settings

3. Scroll down and tap Keyboard:

4. Scroll down and tap: Add New Shortcut…:

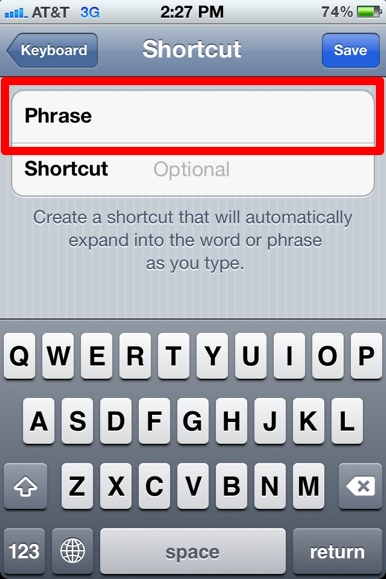
5. In the field labeled Phrase, type in the word. Do not type in anything in the Shortcut field.

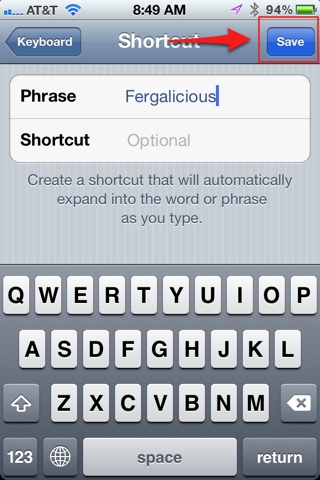
6. Tap Save:

And that’s it, you’ve added a word to the iPhone’s spelling dictionary. Now the word will no longer trigger autocorrect.

Notes:

  • The feature that automatically fixes the spelling of words is called Auto-Correction. You can turn the feature off in Settings–>General–>Keyboard, then swipe the Auto-Correction tab to Off.
  • You can find tons of funny (and embarrasing) auto-correct mistakes at the Damn You Auto-Correct blog.