Category: iPad

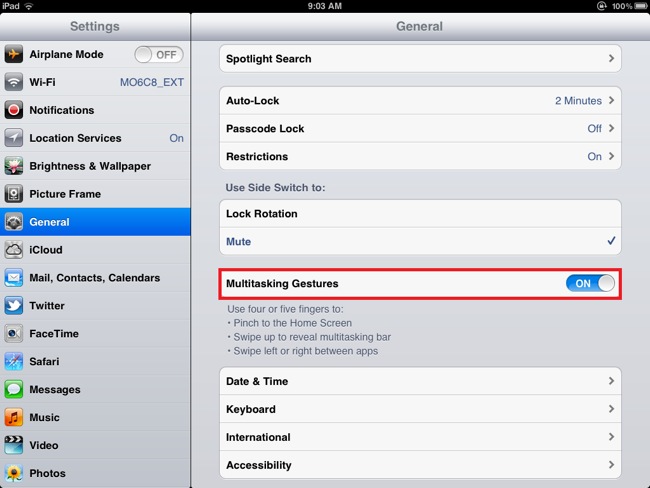
iPad Basics: Multitasking Gestures Using Four or Five Fingers

Multitasking gestures are a relatively new iOS feature (introduced in iOS 4.3) that currently work only on the iPad due to its larger screen. Once activated, multitasking gestures allow you to use four- or five-finger swipes to quickly switch between apps and thus improve your multitasking performance on the iPad.

Note that these gestures will not work on the first-gen iPad, only the iPad 2, iPad 3, and newer.

How to Turn on Multitasking Gestures

To activate multitasking gestures, go into the iPad’s Settings–>General and slide the Multitasking Gestures to On.

The Four-Finger Swipe

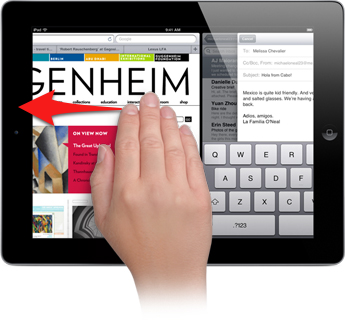
Swipe Left. While in an app, swipe to the left with four fingers and the entire screen will slide over, switching to the second most recently used app. Keep swiping to the left, and you’ll cycle through your most recently used apps.

Then Swipe Right. After four-finger swiping to the left, you can then swipe to the right and you’ll cycle the other way through your apps.

One thing to note is that once you switch to another app using a four-finger swipe and use that app, you can once again swipe left or right again; however, if you switch to another app without using multitasking gestures, you’ll no longer be able to four-finger swipe to the right until your first swipe left—in other words, the recently-used-app-order resets itself with your current app at the front of the line.

Swipe Up. Swipe up with four fingers and you’ll bring up the task bar, just like double-clicking the home button.

Swipe Down. After swiping up to bring up the task bar, you can swipe down to close. Easy peasy.

The Four-Finger Pinch

Pinch. While in an app, if you pinch the screen with four or five fingers, you’ll “close” the app and be taken to the home screen. A four-finger pinch has the same effect as a single-click of the home button.

Basics: How to Save Pictures From the Web on the iPhone (and iPad)

If you see a picture you like while browsing the Internet on your iPhone, you can easily save those photos to your iPhone’s Camera Roll. Here’s how.

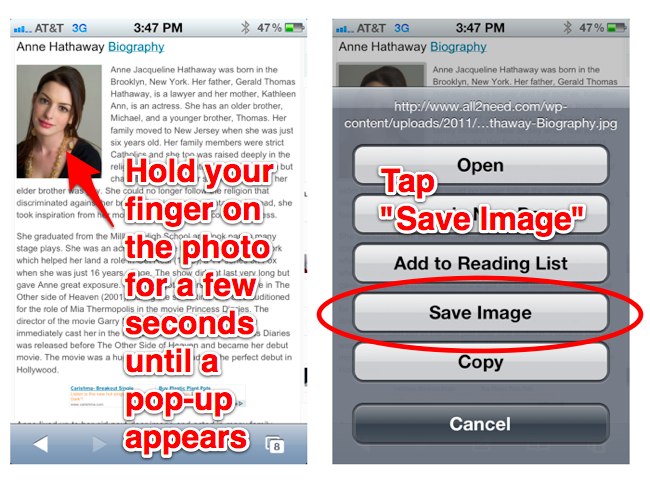
While using the iPhone’s web browser, you can save a photo simply by holding your finger on the photo for a few seconds. A pop-up box will appear with a few options, one of which will read Save Image, as seen below:

To save the photo, tap Save Image. It will be saved to the iPhone’s Camera Roll alongside your other photos.

Endnotes:

  • Note that you can also tap Copy. You can then paste the photo into any app that will allow you to insert photos, like in an email (in the Mail app) or in Pages (Apple’s word processor). To paste, simply hold your finger down on the insertion point, then from the pop-up menu that appears, tap Paste.
  • If a website prevents you from saving the photo, just take a screenshot instead by pressing the sleep and home buttons at the same time.

Review of the new iPad’s LTE Connectivity and Personal HotSpot Feature

iPad Personal Hotspot

Although the Retina Display has deservedly received most of the attention for the new iPad, LTE is, to me, an almost-as-exciting addition to Apple’s growing tech arsenal. Apple’s introduction of LTE has implications not only for current new iPad owners but possibly for inclusion in the next iPhone as well, assuming Apple can improve battery performance enough. The sheer speed of LTE could change the way people use bandwidth-intensive services like streaming video that currently choke and sputter on 3G networks.

I’ve been giving the new iPad with Verizon LTE a spin the fast few days, and below are my observations and notes about LTE performance and the iPad’s Personal Hotspot feature that allows you to share that bountiful LTE bandwidth with others.

How Fast Is Verizon LTE?
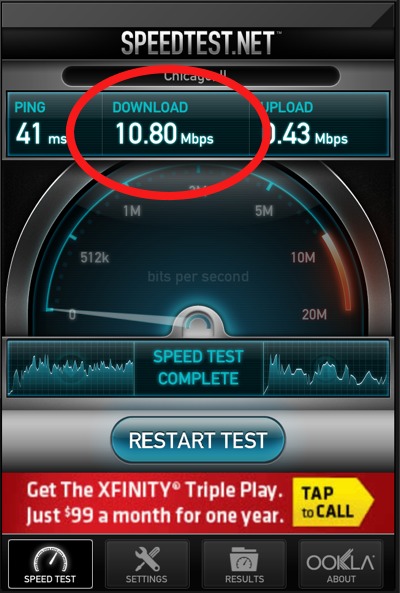
When it comes to advertising the speeds of their networks, the wireless carriers like to either be vague or exaggerate about the speed of their networks. Well, the good news for Verizon LTE is that, here in Chicago at least, I’ve been averaging 10 Mbps. This is the fastest Internet connection I’ve ever had, and I’ve been using Clear’s 4G WiMax technology in Chicago the past two years, which sporadically gives me a disappointing 1-3 Mbps connection. Verizon’s LTE is, as you can see in the image above, much faster.

CNET, who tested both the AT&T and Verizon LTE iPads in San Francisco, found even faster speeds than I did.

Upload speeds have been more erratic, ranging from a poor 0.5 Mbps up to 2.6 Mbps. My tests were conducted both in central downtown Chicago (aka, the Loop), and in Wicker Park, a residental area just northwest of the city.

Overall, LTE is a huge step up in performance over not only 3G wireless networks, but also over most home wire-based Internet services. Granted, my tests are only for one city, and those speeds could change once LTE networks become more clogged with, say, the introduction of an LTE iPhone. But for now, the speeds are smoking fast.

The iPad as Personal Hotspot

The Personal Hotspot feature allows the new iPad to share its LTE/3G Internet connection wirelessly over Wi-Fi or Bluetooth, or via the iPad’s USB cord. But wireless carriers have to allow it. In the US, currently only Verizon allows the iPad to function as a Personal Hotspot (AT&T is still “considering” it).

Verizon offers the Personal Hotspot feature for free—with free meaning at no additional cost over the basic data plan fee. This was a nice surprise given that, for their iPhone data plans, Verizon charges an extra $20 to turn on Personal Hotspot.

Here are a few things I observed about Personal Hotspot:

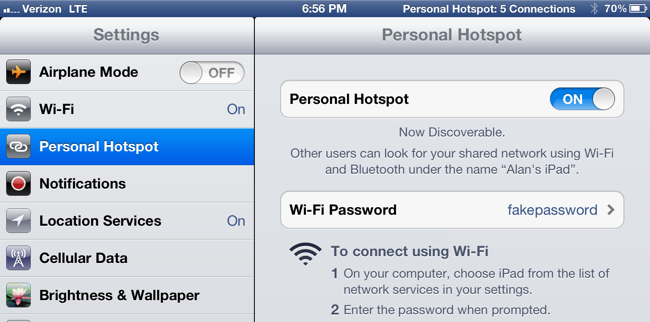
Easy Setup. Getting the Personal Hotspot setup is a breeze. In the Cellular Data settings, you simply slide the Personal Hotspot switch to On, and that’s it. The iPad will supply you with a default network password to give to others in order to sign in. You can also create your own password.

Connecting to the iPad’s Personal Hotspot feature works just like connecting to any Wi-Fi network. For example, with my iPhone I went into Settings–>Wi-Fi and tapped on Alan’s iPad, which was the name Personal Hotspot assigned. I typed in the password and was connected.

Multiple Connections. I had 5 Wi-Fi devices simultaneously connected to the new iPad before I ran out of devices, so I can’t confirm the limit, nor could I find any documentation about a maximum amount of connections. But 5 is pretty good.

A Big Downside. One of the problems with using the iPad 3 as a hotspot is that you have to maintain an active connection with another device or else the hotspot will shut off. For example, if you’re using the iPad’s LTE connection to listen to online radio on your iPhone but you stop for 5 minutes and your iPhone goes to sleep, the personal hotspot will shut off. You must then go to your iPad and turn it off and on again. A huge annoyance. This means you can’t, say, turn on the hotspot, put it in your bag, then walk around and use the hotspot off and on throughout the day. Every time you stop using it, you must restart the hotspot.

iPad Personal Hotspot vs Verizon’s MiFi LTE Hotspot
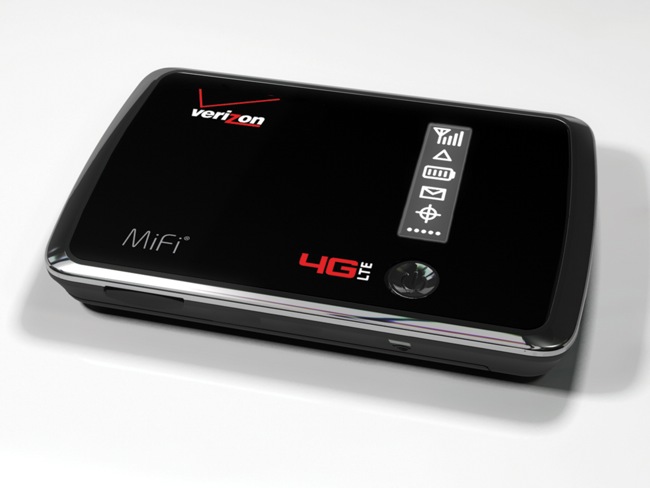
Verizon also sells portable LTE hotspot devices called MiFi’s (or Jetpacks). MiFi’s run around $269 without a contract (or free with 2-year contract). I don’t own and have never tested a MiFi, but a little research shows that iPad does have a few advantages over the MiFi:

Better battery life. The guts of the iPad are mostly battery, so you’re looking at around 8-9 hours of LTE web browsing (Update: Website AnandTech discovered the iPad’s battery will last approximately 25.3 hours while functioning as an LTE HotSpot), while the Mi-Fi offers around 4 hours.

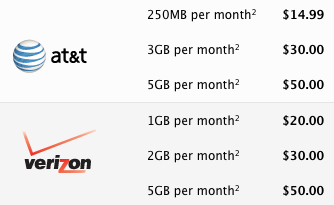
Cheaper data plans. Verizon’s iPad LTE plans start off cheaper than the MiFi, with a $20 for 1 GB/month plan and $30 for 2 GB plan. After that, the iPad and Mi-Fi plans match: $50 for 5 GB and $80 for 10 GB.

The main advantage of owning a MiFi over the new iPad is that the MiFi can fit into a shirt pocket. The 10-inch iPad, not so much.

A Tale of Two LTE iPads: AT&T vs Verizon

I’m a longtime AT&T Wireless customer, but I went with the Verizon iPad because their LTE network is currently more widespread and mature. The Verizon iPad’s other advantages are that there is no fee to use the iPad’s Personal Hotspot feature (heck, AT&T doesn’t even allow the Personal Hotspot feature yet) and the fact that an AT&T sim card can fit into the Verizon iPad and allow it to connect to AT&T’s 3G service.

The AT&T iPad does have one advantage over the Verizon version: cheaper data plans and better value on a per-gigabyte basis.

Below is a table showing the new iPad’s LTE data plans for both Verizon and AT&T (pulled from Apple.com).
Conclusion

While the iPad’s LTE data plans are too expensive on a per-gigabyte basis for LTE to be used for regular home Internet purposes like Netflix and YouTube, the speeds, which averaged over 10 Mbps in Chicago, are pretty much as advertised: fast. This makes the LTE iPad perfect for small bursts of Internet usage, say, if your regular Internet goes down or you’re a traveler.

This was my first experience with LTE, and it’s definitely made me hungry for an LTE iPhone. If LTE can maintain these speeds with tens of millions of iPhones connecting to it, and the carriers make LTE data cheaper on a per-gigabyte basis, then the iPhone, iPad, and the mobile universe in general can be taken to the next level. Let’s just hope that an LTE iPhone won’t destroy network performance. I could get used to these 10 Mbps speeds.

Note: Updated article 4/9 with details about how the personal hotspot shuts itself off after a few minutes if not being used.

Chicago Sun-Times Reviews Wireless iPad Keyboards

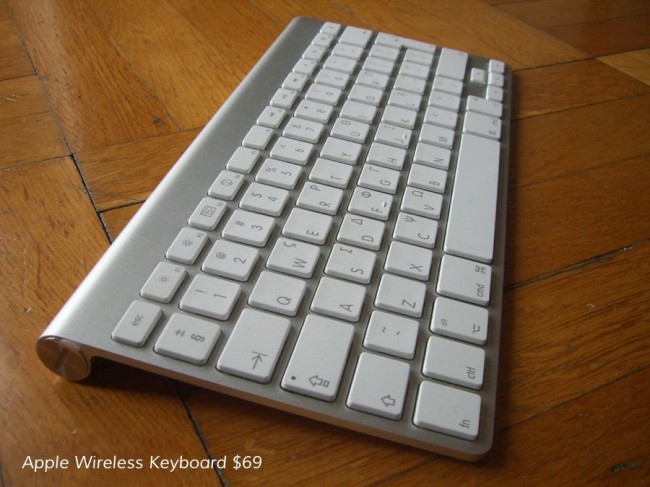
Andy Ihnatko of the Chicago Sun Times recently published a nice roundup of recommended wireless keyboards for the iPad. Although he breaks his recommendations down into some pretty vague categories (see below), his top recommendation seems to be the Apple Wireless Keyboard, which I also reviewed for this site and can recommend. The Amazon Basics keyboard is also interesting as a cheaper clone of the Apple Wireless, in case you wanted to save $30.
Ihnatko’s list:

Gallery:

Buying the 16-GB Version of the New iPad? Consider the Retina Display Means Bigger File Sizes. A Lot Bigger.

Buyers of the 16-GB version of new iPad may find themselves running out of memory a lot faster thanks to the new Retina Display. According to Vietnamese site Tinhte, who got their hands on a new iPad a little early, file sizes for Apple’s own iWork apps have increased up to fivefold:

…[F]or example with Keynote (iWork software sets), this application previously only 115MB capacity but its latest version is 327MB. Numbers from 109MB or 283MB up to, from 95MB to 269MB Pages, iMovie from 70MB to 404MB.

It’s a shame that Apple couldn’t find a way to bump up the minimum memory size from 16 GB to 32 GB, and maybe top off the range with a new 124 GB model. What type of user experience will a 16 GB iPad provide if users have to keep shuffling apps on and off it?

Why AppleCare+ for iPad May Be Worth Buying

I recently wrote an article about why AppleCare+ for iPhone isn’t worth buying, basically because repair costs aren’t that much more expensive without it than with it. But now, Apple has introduced AppleCare+ for iPad, and while I still feel the same about the iPhone version, AppleCare+ for iPad could be worth buying.

The Basics of AppleCare+ for iPad

AppleCare+ for iPad costs the same as the iPhone version ($99) and offers basically the same terms: a two-year warranty (the iPad by default comes with a 1-year warranty), coverage for accidental damage that includes a $49 fee to fix each time for up to two times, and free technical phone support.

So if the terms are similar, why is the iPad version of AppleCare+ worth it where the iPhone version isn’t? Because a broken iPad will cost you a lot more to fix without AppleCare+ than a broken iPhone, especially if you purchase one of the more expensive iPad models. What are the costs to fix a broken iPad? Read on.

What It Costs to Fix the iPad Out of Warranty

Below are the non-warranty costs to fix the iPad 1 and iPad 2 from Apple’s own website (Apple hasn’t updated the charts to take into account the 3rd-gen iPad yet, but costs will likely to be the same).


iPad Wi-Fi
iPad 2 Wi-Fi
Out-of-Warranty Service Fee
16GB $269
32GB $299
64GB $349
iPad Wi-Fi + 3G
iPad 2 Wi-Fi + 3G
Out-of-Warranty Service Fee
16GB $319
32GB $369
64GB $419

When you compare the $269 non-warranty cost to fix the cheapest iPad (16GB version) to AppleCare+’s $99 + $49 pricetag, AppleCare+ supplies a savings of $121. It goes up to $271 in savings for the most-expensive iPad. And that’s only if you break the iPad once (AppleCare+ covers you for up to two accidental damage repairs). Break it twice, and it’s a savings of $341 to fix the cheapest iPad.

So, Is It Worth It?

The gamble of AppleCare+ is that of any insurance: you may never break your iPad and you’re still out the initial $99 cost. And $99 is still a lot of money to most people. But seeing as the iPad is a mobile device, the chances of breaking it are much more than, say, a home computer or HDTV, but maybe less than an iPhone. It may all come down to how you plan to use the iPad. Are your small children going to be playing with it? Is it never going to leave your home?

Me? I’m buying it for my $829 64 GB iPad 3, But I am a heavy iPad user who travels with it.

Endnotes:

  • According to the official legal terms, AppleCare+ for iPad doesn’t cover theft, loss, fire, earthquake, cosmetic damages like scratches and dents that don’t affect the iPad’s functionality, or abuse (so talk nice to your iPad).
  • AppleCare+ for iPad doesn’t cover damage that occurs before you buy AppleCare+, so make sure you tell them the damage occurred after (but don’t lie, never lie).
  • You must purchase AppleCare+ for iPad within 30 days of your iPad purchase.
  • If you don’t live near an Apple Store, Apple will pay for the shipping to mail in the iPad for service.
  • AppleCare+ for iPad also covers repair or replacement coverage for an Apple Time Capsule or Airport device. Why? I have no idea. You just have to have purchased the device within two years of the iPad.
  • While the cost to fix an iPad off-warranty ranges from $269-$419, the iPhone 4S costs only $199 to fix out of warranty, and older iPhones even less, only $149. If you have AppleCare+ for iPhone, it’s $149 to fix a broken iPhone 4S, saving you only $49. Not much of a savings.

*Updated 3-14-2012 to fix factual error about when you must purchase AppleCare+ for iPad. Previously the articled claimed you could wait up to a year, but Apple’s page says it must be within 30 days.

iPhone & iPad Tip: Use iOS 5’s Reader Feature to Automatically Load the Next Page of an Article

Multipage articles on the web can be annoying, especially when you have to click to the next page every few hundred words. It’s a dirty trick websites use to inflate pageviews for advertisers, all at the expense of user experience. Apple has your back though with the new built-in Reader feature, which can load the next page of an article without you having to do anything.

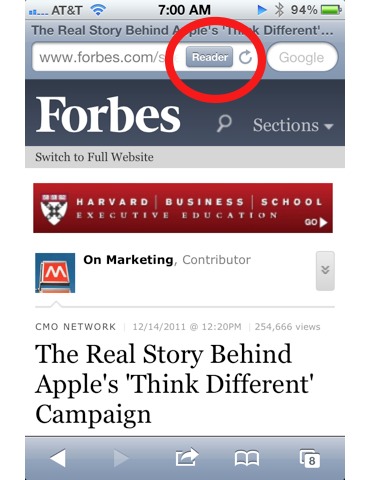
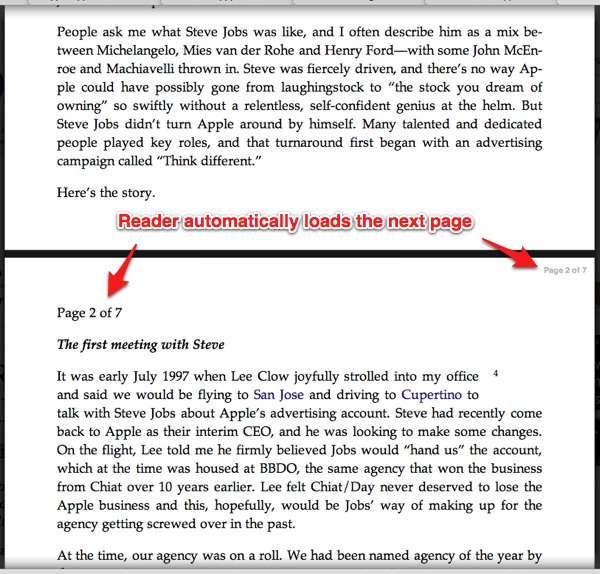
To see it work, simply tap the Reader button in Mobile Safari’s URL bar and then scroll down to the end of a multi-page article. When the end comes into view, the next page will load automatically. Oh Apple, you clever bastards, you.

What Is Reader?

New to the iPhone/iPad and don’t know what I’m talking about? No problem, Reader is simply a button that (sometimes) appears in Mobile Safari’s address bar when you browse to an individual article on the web. Whether the button appears or not depends on different factors, but it’s supposed to appear on articles and not on things like home pages, etc.

When you tap the Reader button, Reader strips away advertising and extraneous formatting and presents just basic text to you for a more comfortable reading experience. On a multi-page article, when you scroll down to the end of one page, it should begin loading the next one. Reader doesn’t always work perfectly though, as some sites can break the feature and/or Reader won’t recognize an article as more than one page.

Notes:

  • The Reader button doesn’t always appear after loading individual web articles, as the coding on some sites isn’t compatible with Reader, but it should appear most of the time.
  • The next page won’t load until the end of the current page becomes visible in Reader’s window.
  • Reader lets you adjust font size. Just tap the two letter A’s in the top left corner to increase/decrease font size.

Review: Zippy BT-500 Wireless Bluetooth Keyboard With iPad

If you’re looking to write the next Great American Novel on the iPad, good luck using the iPad’s touchscreen keyboard. You’re going to need a physical keyboard. And wireless bluetooth keyboards are the current solution for connecting a traditional tactile keyboard to the iPad to get some serious typing done.

The Zippy BT-500 ($50) is such a bluetooth keyboard that can connect to the iPad, although with its cramped keys, it doesn’t end up improving much upon the touchscreen typing experience.

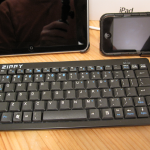
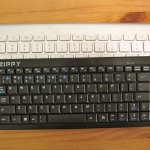
The Zippy BT-500 is an ultra-compact keyboard: just under 9 inches in length and 4 inches from top to bottom. It is much smaller than a normal desktop keyboard. The compromise the Zippy BT-500 makes for this smaller size is that its keys are smaller and more cramped than a normal keyboard. And that is where the rub lies with the Zippy BT-500.

At times, I found using the Zippy BT-500 only a slightly better experience than using the iPad’s touchscreen keyboard itself. The BT-500’s keys are too close together, and my fingers (which are pretty slender for man hands, by the way) too wide to accurately hit the keys. I found myself making just as many mistakes with the Zippy as with the iPad’s touchscreen keyboard. I was, however, able to increase my accuracy by using a slower hunt-and-peck method—where you use just your index fingers to slowly select and hit each key.

I can’t recommend the Zippy over the Apple’s own wireless bluetooth keyboard, which I’ve reviewed in the past for use with the iPad. The Zippy is cheaper at around $50 or less, compared to $70 for Apple’s bluetooth keyboard, but with Apple’s keyboard you get full-size keys, and at around 10 ounces compared to the Zippy’s 11+ ounces, the Apple is a little lighter as well.

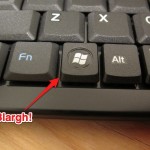
That’s not to say the Zippy BT-500 doesn’t have some redeeming characteristics. It has the full 82 keys, including a Windows key that doubles as the Apple key—sacrilege for all the Mac users out there.

The BT-500’s signature feature is that it allows you to instantly switch to up to 6 bluetooth devices. For example, with just a press of a few keys, the keyboard can switch between the iPad and iPhone. A neat feature, but likely only useful to a handful of people.

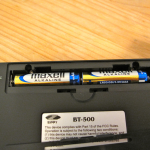
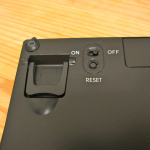
The Zippy is powered by two AA batteries, which can easily be replaced via a removable access panel on its back. There is also an on/off switch next to the panel as well as a reset button.

Review Summary:

The Zippy BT-500 ($50) Wireless Bluetooth keyboard is impressively compact but makes too many sacrifices in the size and spacing of its keys to be comfortable to use. I found myself making just as many typing errors with the BT-500 as I did with the iPad’s own touchscreen keyboard. For just $20 more, you can get the Apple Wireless keyboard, which gives you full-size keys and a much more accurate and comfortable typing experience.

Tips for Child Proofing Your iPhone and iPad

1. Binder Clip

Childprooding iPad with Binder Clip

Image via Make.

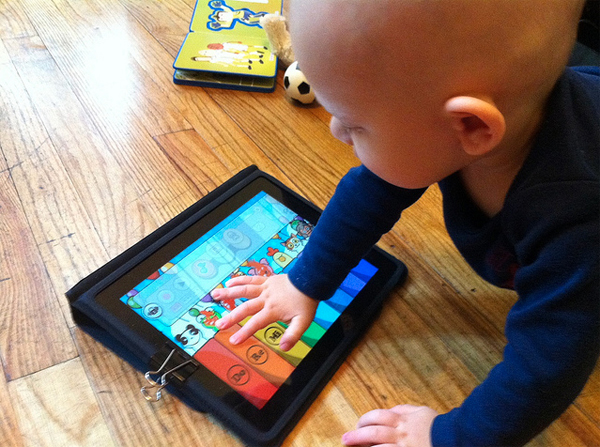
A common binder clip is a simple solution for preventing kids from pressing the home button and quitting out of apps—a huge source of frustration for parents and kids alike. Best of all, you may already have a binder clip around the house. It’s awkward looking but effective, especially for toddlers.

If you’ve ever used a binder clip, you’ll know that it requires a good amount of wrist strength to remove, especially when the binder is already attached to a thick object, so young kids will have trouble removing it.

Binder clips are cheap too. Amazon has a box of 12 for $1.99.

This tip comes via Make Magazine.

2. BubCap

The BubCap is a more elegant solution for preventing kids from pressing the home button. The BubCap is a thin but rigid piece of plastic that fits over the home button via strong adhesive and prevents a toddler from pressing the home button. The adhesive is strong enough that young children will lack the coordination and strength to remove it, yet adults can remove it without adverse effects to the iDevice.

BubCaps are mainly designed for toddlers, as older children and adults will still be able to push the button through the plastic and remove the BubCap itself.

BubCaps sell for $6 on Amazon for a set of four Bubcaps, which includes two different rigidities.

3. Child-Friendly Cases

If it makes you nervous to hand over your expensive iDevice to a child, a good protective case can be an insurance policy against damage.

BigGrips are thick, colorful iPad cases that will give the device a softer, kid-friendly feel. They are available for the iPad 2 and original iPad for around $35.

If you don’t like the bright colors and would rather have a full-time protective case you’re not embarrassed to carry around yourself, we recommend checking out a company called Otterbox, which is known for its ultra-protective cases that even the US military uses to protect its iDevices. Their MSRP is usually over $60, but you can find them at deep discounts on Amazon.

4. Restriction Settings

iPhone Restrictions

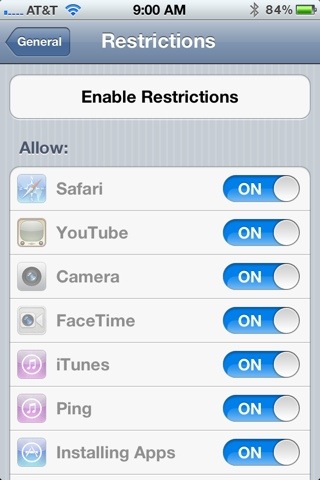
In the iPhone’s Settings, a feature called Restrictions can prevent kids from accessing certain apps and features. Once Restrictions are turned on, they are passcode protected, so kids can’t change them without the passcode. Restrictions are mainly meant for older kids, but there are a few that could come in handy for toddlers too, preventing them from:

  • Deleting apps
  • Installing apps
  • Making in-app purchases

To access Restrictions, open up the Settings app and go to General–>Restrictions. Apple has made it easy to turn off restrictions with one tap. You can find out more about Restrictions on Apple’s site here.

5. Passcode

Kids may try to play with Mommy’s iPhone when Mommy isn’t around, which can lead to trouble. It’s recommended that everyone, parents and nonparents alike, use a passcode to protect their iPhone from unwanted intrusions.

Sure, passcodes can be annoying if you access your iPhone a lot, but you can change the amount of time that must pass before your iPhone passcode locks itself to make it less annoying. For example, my iPhone is set to require a passcode after 1 hour of non-use.

How to Easily Share an iPhone Contact’s Details Via Text Message or Email

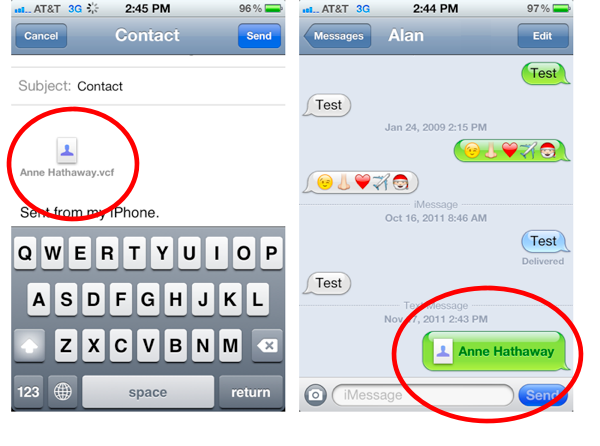
You can easily share any of your iPhone contact’s details with just a few taps. The iPhone is compatible with the vCard format, which is essentially a digital version of a business card. iPhone vCards can be exchanged via text message or email, and all the recipient has to do is tap the vCard to add that contact and their details to their iPhone’s address book. Below are step-by-step instructions on how to send a vCard on the iPhone:

1. Open the Phone or Contacts app:

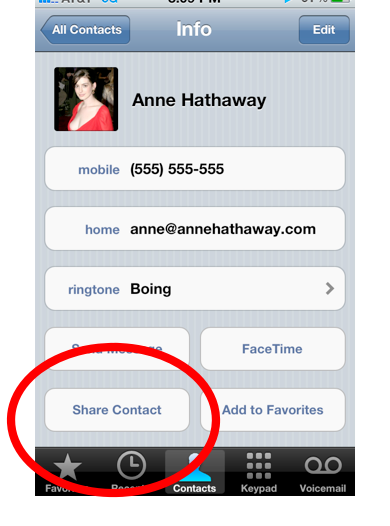
2. Select a contact, then tap the Share Contact button toward the bottom of the screen:

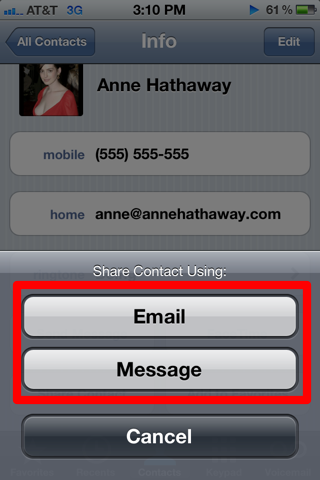
3. Select Mail or Message (text message):

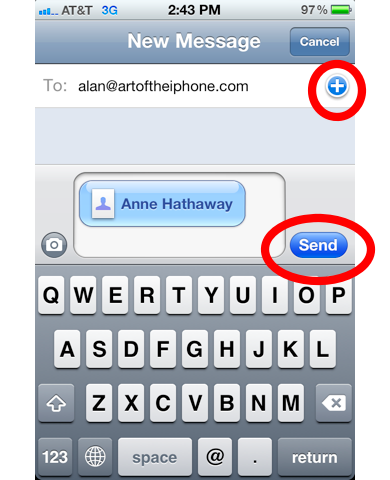
4. Choose your recipient(s), then tap Send:

5. When your recipient receives the vCard, it will look something like this:

Now all the recipient has to do, if on an iPhone, is tap the card to add all the contact’s details to their iPhone as well. Easy as pie!

Notes:

  • vCards can be used to share name, phone number, postal address, email address, and URLs. Some devices also support vCards with logos, photos, and audio clips.
  • Apple was part of the consortium of companies that invented the vCard. The vCard was originally called the Versitcard and was intended for email clients.
  • Extra tip: Create a contact entry for yourself on the iPhone. That way, when someone asks for your details, you can send them a vCard!