Author: Alan

Review of the new iPad’s LTE Connectivity and Personal HotSpot Feature

iPad Personal Hotspot

Although the Retina Display has deservedly received most of the attention for the new iPad, LTE is, to me, an almost-as-exciting addition to Apple’s growing tech arsenal. Apple’s introduction of LTE has implications not only for current new iPad owners but possibly for inclusion in the next iPhone as well, assuming Apple can improve battery performance enough. The sheer speed of LTE could change the way people use bandwidth-intensive services like streaming video that currently choke and sputter on 3G networks.

I’ve been giving the new iPad with Verizon LTE a spin the fast few days, and below are my observations and notes about LTE performance and the iPad’s Personal Hotspot feature that allows you to share that bountiful LTE bandwidth with others.

How Fast Is Verizon LTE?
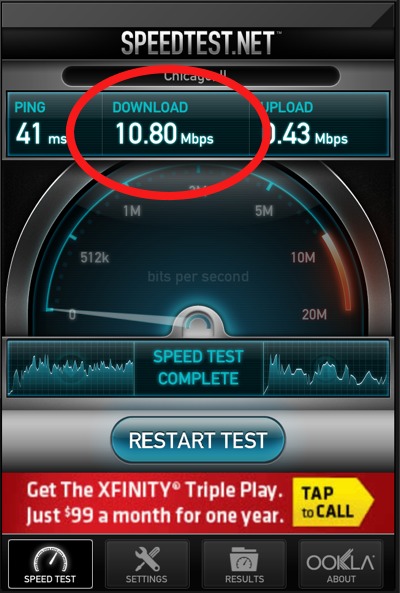
When it comes to advertising the speeds of their networks, the wireless carriers like to either be vague or exaggerate about the speed of their networks. Well, the good news for Verizon LTE is that, here in Chicago at least, I’ve been averaging 10 Mbps. This is the fastest Internet connection I’ve ever had, and I’ve been using Clear’s 4G WiMax technology in Chicago the past two years, which sporadically gives me a disappointing 1-3 Mbps connection. Verizon’s LTE is, as you can see in the image above, much faster.

CNET, who tested both the AT&T and Verizon LTE iPads in San Francisco, found even faster speeds than I did.

Upload speeds have been more erratic, ranging from a poor 0.5 Mbps up to 2.6 Mbps. My tests were conducted both in central downtown Chicago (aka, the Loop), and in Wicker Park, a residental area just northwest of the city.

Overall, LTE is a huge step up in performance over not only 3G wireless networks, but also over most home wire-based Internet services. Granted, my tests are only for one city, and those speeds could change once LTE networks become more clogged with, say, the introduction of an LTE iPhone. But for now, the speeds are smoking fast.

The iPad as Personal Hotspot

The Personal Hotspot feature allows the new iPad to share its LTE/3G Internet connection wirelessly over Wi-Fi or Bluetooth, or via the iPad’s USB cord. But wireless carriers have to allow it. In the US, currently only Verizon allows the iPad to function as a Personal Hotspot (AT&T is still “considering” it).

Verizon offers the Personal Hotspot feature for free—with free meaning at no additional cost over the basic data plan fee. This was a nice surprise given that, for their iPhone data plans, Verizon charges an extra $20 to turn on Personal Hotspot.

Here are a few things I observed about Personal Hotspot:

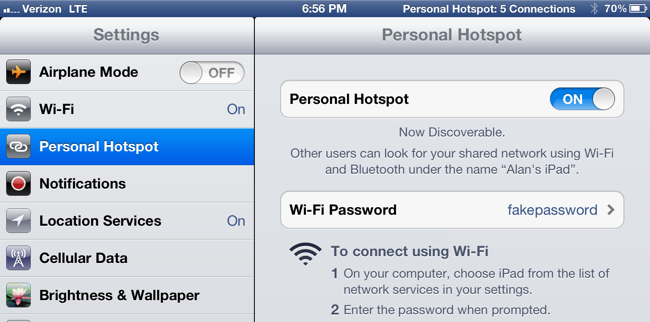
Easy Setup. Getting the Personal Hotspot setup is a breeze. In the Cellular Data settings, you simply slide the Personal Hotspot switch to On, and that’s it. The iPad will supply you with a default network password to give to others in order to sign in. You can also create your own password.

Connecting to the iPad’s Personal Hotspot feature works just like connecting to any Wi-Fi network. For example, with my iPhone I went into Settings–>Wi-Fi and tapped on Alan’s iPad, which was the name Personal Hotspot assigned. I typed in the password and was connected.

Multiple Connections. I had 5 Wi-Fi devices simultaneously connected to the new iPad before I ran out of devices, so I can’t confirm the limit, nor could I find any documentation about a maximum amount of connections. But 5 is pretty good.

A Big Downside. One of the problems with using the iPad 3 as a hotspot is that you have to maintain an active connection with another device or else the hotspot will shut off. For example, if you’re using the iPad’s LTE connection to listen to online radio on your iPhone but you stop for 5 minutes and your iPhone goes to sleep, the personal hotspot will shut off. You must then go to your iPad and turn it off and on again. A huge annoyance. This means you can’t, say, turn on the hotspot, put it in your bag, then walk around and use the hotspot off and on throughout the day. Every time you stop using it, you must restart the hotspot.

iPad Personal Hotspot vs Verizon’s MiFi LTE Hotspot
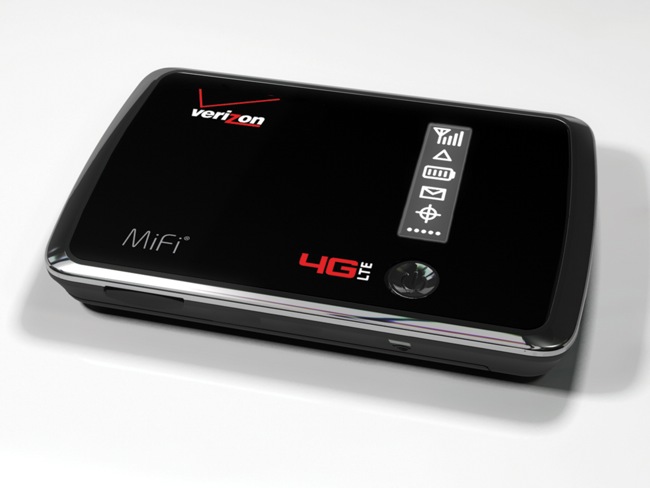
Verizon also sells portable LTE hotspot devices called MiFi’s (or Jetpacks). MiFi’s run around $269 without a contract (or free with 2-year contract). I don’t own and have never tested a MiFi, but a little research shows that iPad does have a few advantages over the MiFi:

Better battery life. The guts of the iPad are mostly battery, so you’re looking at around 8-9 hours of LTE web browsing (Update: Website AnandTech discovered the iPad’s battery will last approximately 25.3 hours while functioning as an LTE HotSpot), while the Mi-Fi offers around 4 hours.

Cheaper data plans. Verizon’s iPad LTE plans start off cheaper than the MiFi, with a $20 for 1 GB/month plan and $30 for 2 GB plan. After that, the iPad and Mi-Fi plans match: $50 for 5 GB and $80 for 10 GB.

The main advantage of owning a MiFi over the new iPad is that the MiFi can fit into a shirt pocket. The 10-inch iPad, not so much.

A Tale of Two LTE iPads: AT&T vs Verizon

I’m a longtime AT&T Wireless customer, but I went with the Verizon iPad because their LTE network is currently more widespread and mature. The Verizon iPad’s other advantages are that there is no fee to use the iPad’s Personal Hotspot feature (heck, AT&T doesn’t even allow the Personal Hotspot feature yet) and the fact that an AT&T sim card can fit into the Verizon iPad and allow it to connect to AT&T’s 3G service.

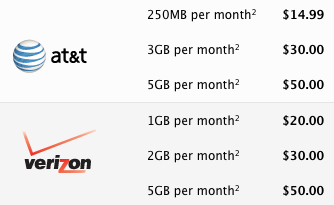
The AT&T iPad does have one advantage over the Verizon version: cheaper data plans and better value on a per-gigabyte basis.

Below is a table showing the new iPad’s LTE data plans for both Verizon and AT&T (pulled from Apple.com).
Conclusion

While the iPad’s LTE data plans are too expensive on a per-gigabyte basis for LTE to be used for regular home Internet purposes like Netflix and YouTube, the speeds, which averaged over 10 Mbps in Chicago, are pretty much as advertised: fast. This makes the LTE iPad perfect for small bursts of Internet usage, say, if your regular Internet goes down or you’re a traveler.

This was my first experience with LTE, and it’s definitely made me hungry for an LTE iPhone. If LTE can maintain these speeds with tens of millions of iPhones connecting to it, and the carriers make LTE data cheaper on a per-gigabyte basis, then the iPhone, iPad, and the mobile universe in general can be taken to the next level. Let’s just hope that an LTE iPhone won’t destroy network performance. I could get used to these 10 Mbps speeds.

Note: Updated article 4/9 with details about how the personal hotspot shuts itself off after a few minutes if not being used.

Chicago Sun-Times Reviews Wireless iPad Keyboards

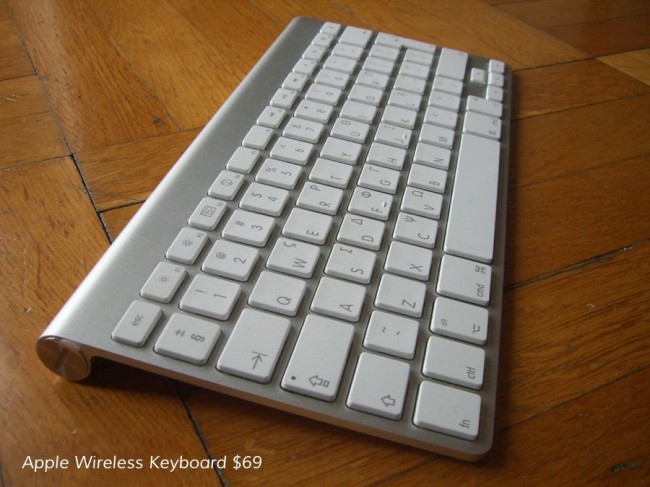
Andy Ihnatko of the Chicago Sun Times recently published a nice roundup of recommended wireless keyboards for the iPad. Although he breaks his recommendations down into some pretty vague categories (see below), his top recommendation seems to be the Apple Wireless Keyboard, which I also reviewed for this site and can recommend. The Amazon Basics keyboard is also interesting as a cheaper clone of the Apple Wireless, in case you wanted to save $30.

Ihnatko’s list:

Gallery:

Buying the 16-GB Version of the New iPad? Consider the Retina Display Means Bigger File Sizes. A Lot Bigger.

Buyers of the 16-GB version of new iPad may find themselves running out of memory a lot faster thanks to the new Retina Display. According to Vietnamese site Tinhte, who got their hands on a new iPad a little early, file sizes for Apple’s own iWork apps have increased up to fivefold:

…[F]or example with Keynote (iWork software sets), this application previously only 115MB capacity but its latest version is 327MB. Numbers from 109MB or 283MB up to, from 95MB to 269MB Pages, iMovie from 70MB to 404MB.

It’s a shame that Apple couldn’t find a way to bump up the minimum memory size from 16 GB to 32 GB, and maybe top off the range with a new 124 GB model. What type of user experience will a 16 GB iPad provide if users have to keep shuffling apps on and off it?

Why AppleCare+ for iPad May Be Worth Buying

I recently wrote an article about why AppleCare+ for iPhone isn’t worth buying, basically because repair costs aren’t that much more expensive without it than with it. But now, Apple has introduced AppleCare+ for iPad, and while I still feel the same about the iPhone version, AppleCare+ for iPad could be worth buying.

The Basics of AppleCare+ for iPad

AppleCare+ for iPad costs the same as the iPhone version ($99) and offers basically the same terms: a two-year warranty (the iPad by default comes with a 1-year warranty), coverage for accidental damage that includes a $49 fee to fix each time for up to two times, and free technical phone support.

So if the terms are similar, why is the iPad version of AppleCare+ worth it where the iPhone version isn’t? Because a broken iPad will cost you a lot more to fix without AppleCare+ than a broken iPhone, especially if you purchase one of the more expensive iPad models. What are the costs to fix a broken iPad? Read on.

What It Costs to Fix the iPad Out of Warranty

Below are the non-warranty costs to fix the iPad 1 and iPad 2 from Apple’s own website (Apple hasn’t updated the charts to take into account the 3rd-gen iPad yet, but costs will likely to be the same).


iPad Wi-Fi
iPad 2 Wi-Fi
Out-of-Warranty Service Fee
16GB $269
32GB $299
64GB $349
iPad Wi-Fi + 3G
iPad 2 Wi-Fi + 3G
Out-of-Warranty Service Fee
16GB $319
32GB $369
64GB $419

When you compare the $269 non-warranty cost to fix the cheapest iPad (16GB version) to AppleCare+’s $99 + $49 pricetag, AppleCare+ supplies a savings of $121. It goes up to $271 in savings for the most-expensive iPad. And that’s only if you break the iPad once (AppleCare+ covers you for up to two accidental damage repairs). Break it twice, and it’s a savings of $341 to fix the cheapest iPad.

So, Is It Worth It?

The gamble of AppleCare+ is that of any insurance: you may never break your iPad and you’re still out the initial $99 cost. And $99 is still a lot of money to most people. But seeing as the iPad is a mobile device, the chances of breaking it are much more than, say, a home computer or HDTV, but maybe less than an iPhone. It may all come down to how you plan to use the iPad. Are your small children going to be playing with it? Is it never going to leave your home?

Me? I’m buying it for my $829 64 GB iPad 3, But I am a heavy iPad user who travels with it.

Endnotes:

  • According to the official legal terms, AppleCare+ for iPad doesn’t cover theft, loss, fire, earthquake, cosmetic damages like scratches and dents that don’t affect the iPad’s functionality, or abuse (so talk nice to your iPad).
  • AppleCare+ for iPad doesn’t cover damage that occurs before you buy AppleCare+, so make sure you tell them the damage occurred after (but don’t lie, never lie).
  • You must purchase AppleCare+ for iPad within 30 days of your iPad purchase.
  • If you don’t live near an Apple Store, Apple will pay for the shipping to mail in the iPad for service.
  • AppleCare+ for iPad also covers repair or replacement coverage for an Apple Time Capsule or Airport device. Why? I have no idea. You just have to have purchased the device within two years of the iPad.
  • While the cost to fix an iPad off-warranty ranges from $269-$419, the iPhone 4S costs only $199 to fix out of warranty, and older iPhones even less, only $149. If you have AppleCare+ for iPhone, it’s $149 to fix a broken iPhone 4S, saving you only $49. Not much of a savings.

*Updated 3-14-2012 to fix factual error about when you must purchase AppleCare+ for iPad. Previously the articled claimed you could wait up to a year, but Apple’s page says it must be within 30 days.

Review: Agenda Is a Nice Replacement for the iPhone’s Calendar App

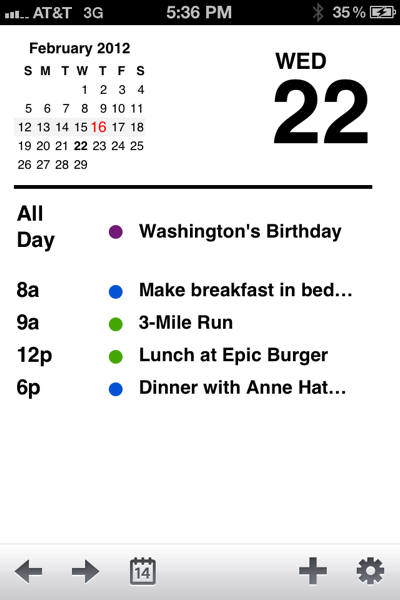
It wasn’t until I tried the Agenda ($0.99) calendar app that I realized the iPhone’s default Calendar app is kind of annoying to use, especially when it comes to its interface. Where Calendar forces the user to tap tiny buttons to move through dates, Agenda relies on finger swipes, which prove less frustrating for navigation through small or large amounts of time within the calendar. With Agenda, all it takes is one swipe to move between various calendar views (6 months, 1 month, 7 days, 1 day), where with Calendar it takes several button taps.

Another advantage of using Agenda is that it lets you infinitely scroll through your weekly calendar with a swipe of your finger. In the weekly calendar view, you can swipe up or down to infinitely scroll through the days. While it may not seem like a big deal, when comparing Agenda’s easy scrolling to Calendar’s tapping a touchscreen button a few dozens times, Agenda just provides a more pleasant experience.

Agenda has all the functionality of the default Calendar app; in fact, the screen for adding an event looks exactly the same, with all the same options like alerts for events and invitees for meetings, etc. So there’s not much of a learning curve to switching over to the app. I don’t do anything fancy with my iPhone calendar like creating multi-invite meetings, but Agenda does have those advanced features, including the ability to SMS or email all invitees to a meeting and inserting links to Google Maps in events.

Overall, I found that Agenda, with its swipe-based interface, is just a much smoother experience than the iPhone’s default Calendar app, which relies more on touchscreen buttons. And that’s why I’ve switched away from Calendar and replaced its icon in the coveted spot of my iPhone’s first homescreen with Agenda.

iPhone Tips: How to Block SMS Text Message Spam

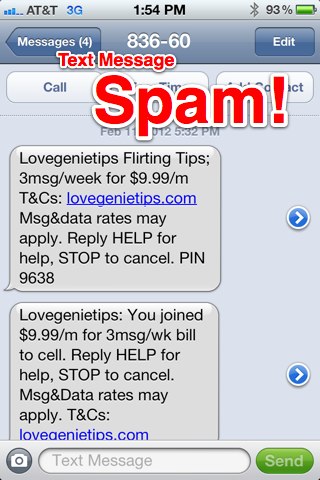
Text-message spam is not only annoying, it can hurt you in the wallet when each message costs you money. With the help of wireless carriers though, there are a few ways for iPhone users to combat SMS text-message spam.

Text Message Spam Comes Mostly From…Email?!

A little-known fact is that every cell-phone number is also an email address (example, 555555555@mms.att.net). And most, but not all, text-message spam comes from email spammers simply guessing your cell phone’s email address and sending email spam (which shows up as a text message). So how do you prevent that from happening? Most major carriers let you block text messages sent from an email address (see the next section).

Harder to block is spam sent from another telephone number. You can combat spam from telephone numbers by forwarding the spam to the carrier (see the How to Stop Spam Sent From Telephone Numbers section below).

How to Turn Off Text-Message Spam From Email Addresses

AT&T Wireless, Verizon Wireless, and Sprint all let customers turn off text-messages sent from email addresses. Below are instructions, in a nut shell, for each.

AT&T Wireless:

1. Go to mymessages.wireless.att.com.
2. Register your cell phone.
3. Choose Blocking Options.
4. Select Block all text messages sent to you as email.
5. Save your options.

You can also choose to block all messages sent to your xxx-xxx-xxxx@txt.att.net email address, period. Simply choose Block from the drop-down menu.

Official SMS text-message spam instructions for AT&T Wireless can be found here.

Verizon Wireless:

1. Log in (or register) at verizonwireless.com
2. Under Plan, select Block Calls & Messages.
3. Click on the Internet Spam Blocking tab.
4. Choose Block All Text Messages from Email and Block All Text Messages from the Internet.

Sprint:

1. Create a text message.
2. Type in: block email.
3. Send it to short code 9999.

Official instructions for Sprint can be found here.

How to Stop Spam Sent From Telephone Numbers

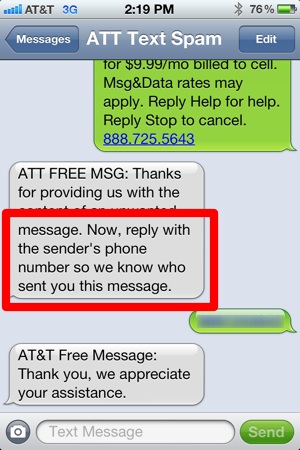
More tricky to stop is spam sent from other telephone numbers. All the major carriers in the US (AT&T, Verizon, and Sprint) let you forward the spam to 7726 (short code for SPAM on your phone’s keyboard). By doing this, you won’t have to pay for the spam text message. It also helps carriers block spam coming from those numbers. After you forward the spam, the carrier will text you again asking for the phone number it came from. To find that number on your iPhone, simply tap on the blue and white circle on the right side of the spam text message to view the number it came from.

To forward a text message on the iPhone, tap Edit in the top right corner, select the message by tapping the circle on the lefthand side, then tap Forward. If the spam came from a telephone number, they will ask you to reply with that number (at no cost to you).

Tip: To make it easier to forward spam, create a contact on the iPhone, give it the phone number 7726, and name it Spam. Next time you want to forward spam to your carrier, you won’t have to remember the number, just SPAM!

Endnotes:

  • Not all text messages sent via email are bad or spam. For example, Google Maps lets you send a URL link to a set of directions via text message. If you block all text messages from email, you also won’t receive these messages either.
  • Both AT&T and Verizon let you create new “alias” email addresses for your cell phone to help fool spammers. For example, you can create a new email address, like ArtOfTheiPhone@txt.att.net, and have text messages sent to that instead.
  • Text message spam cost consumers over $300 million in fees a year, according to some studies.

Is AppleCare+ for the iPhone Worth It? (It Covers Accidental Damage)

A lot of people are interested in insuring their iPhone for accidental damage. Until last year, only third-party companies offered insurance for the iPhone. But in 2011, Apple stepped up to the plate and now offers AppleCare+ for iPhone. In a nutshell, AppleCare+ for iPhone costs $99 for a two-year extended warranty that covers accidental damage like broken screens and water damage. The kicker is that is has a $49 additional fee for each time you need your iPhone fixed (for up to two times).

So, is it worth paying $99 up front for a chance to pay $49 to get your iPhone fixed or replaced in the future? What are the costs to get your iPhone fixed if you don’t have insurance? Read on.

What It Costs to Fix Your iPhone Without Insurance

Most major damage to your iPhone, like cracked front screens and water damage, will cost you $200 to get it “fixed” by Apple, with fixed really meaning you’ll likely get a whole new iPhone. The $200 uninsured repair cost is only $50 more than the $150 AppleCare+ cost (the $99 up-front price plus the $49 repair fee). Sure, you are saving $50 with AppleCare+, but then again, you may end up paying $99 for AppleCare+ and never have a need for it.

Where AppleCare+ starts to pay off is if you break your iPhone again. Without insurance, it’s $400 to “fix” your iPhone twice, compared to AppleCare+’s $200 total fee for two repairs.

Oh, and if you’re uninsured and only break the iPhone’s rear glass screen, count yourself lucky. Apple only charges $29 to replace it.

Should You Buy AppleCare+ for iPhone?

For most people, AppleCare+ for iPhone is likely not worth it, but some people in unique situations might find it useful. For example, do you have a history of breaking iPhones multiple times or are in a situation where that could happen (kids like to throw things or work in a hazardous environment)? Then AppleCare+ might be totally worth it. Are you completely new to the iPhone and want phone tech support at home for how to work the darned thing? AppleCare+ might be worth it.

I don’t purchase AppleCare+ for iPhone for a few reasons. First, I’ve kept my previous generation iPhones as backups in case the new one breaks. Even then, I would likely pay the $200 for a new one—that is, if it wasn’t rumored a new iPhone was just a few months away. I also don’t need the phone tech support (there’s the Internet and a few Apple Stores in my city as well).

Overall, AppleCare+ for iPhone is a tough sell, and if you can afford the expensive monthly phone carrier fees, you can likely afford to go without it. Then again, if you are abusive to your iPhone, it may be worth it in the end.

Notes:

  • AppleCare+ for iPhone does not cover losing your iPhone or having it stolen.
  • If you don’t live near an Apple Store, you can send in your iPhone via mail to get it fixed. They’ll even send you a loaner iPhone while you wait. You just need to supply a credit number for authorization as security for the retail price of the replacement iPhone or any shipping costs.
  • If you want to know all the ins-and-outs of AppleCare+ for iPhone, you can find Apple’s legal documents in PDF form here.
  • Apple introduced AppleCare+ for the iPad ($99) in March 2012, and unlike the iPhone version, it may actually be worth buying.
  • Best Buy’s insurance for the iPhone costs $15 a month. That’s $360 total over a course of two years.

Basics: The iPhone’s Screen Brightness Settings, Explained

The iPhone has a feature called Auto-Brightness that is turned on by default and will automatically control the brightness of your iPhone’s screen. Auto-Brightness will dim or brighten the screen depending on ambient light levels. It uses a sensor behind the iPhone’s screen to measure light levels and dim the screen in dark surroundings and brighten in bright surroundings. By lowering screen brightness when it’s not needed, Auto-Brightness also works to conserve battery life. However, you can manually set the brightness of the iPhone’s screen. Here’s how.

How to Change the iPhone’s Screen Brightness

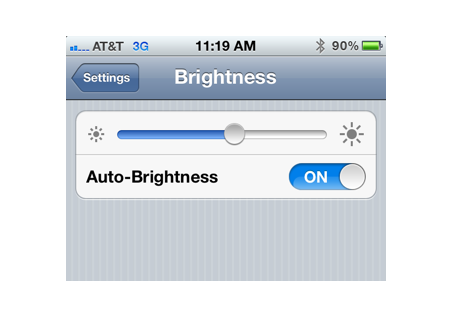
If you go into the iPhone’s Settings–>Brightness, you’ll see the following:

The Brightness Slider lets you manually set the screen’s brightness. If you’d like the screen to always stay at a specific brightness level, you should turn Auto-Brightness off.

However, if you have Auto-Brightness turned on and manually adjust the screen’s brightness, Auto-Brightness will use your brightness setting as a baseline and dim/brighten the screen based around that. For example, if you manually increase brightness by 25%, then Auto-Brightness will continue to dim/brighten, only 25% brighter.

Notes:

  • The brighter the screen, the shorter the iPhone’s battery life. Keep this in mind when manually adjusting brightness levels.
  • While the iPhone’ screen is often used as a makeshift flashlight, the iPhone 4 and newer models have a much brighter light in the form of the camera flash, located on the iPhone’s back. There are many great free apps, like Flashlight by Rik, that let you use the flash as a flashlight or strobe light.

Basics: The iPhone’s Separate Volume Controls for Ringtones and General Audio

A little-known and somewhat confusing fact about the iPhone is that it has two different volume levels: one for ringtones/alerts, and one for general audio. And the confusing part is that both can be controlled with the iPhone’s volume buttons. Here’s how to set which of the two the iPhone’s volume buttons control.

How to Switch the iPhone’s Volume Buttons to Control Ringtone Volume or General Audio Volume

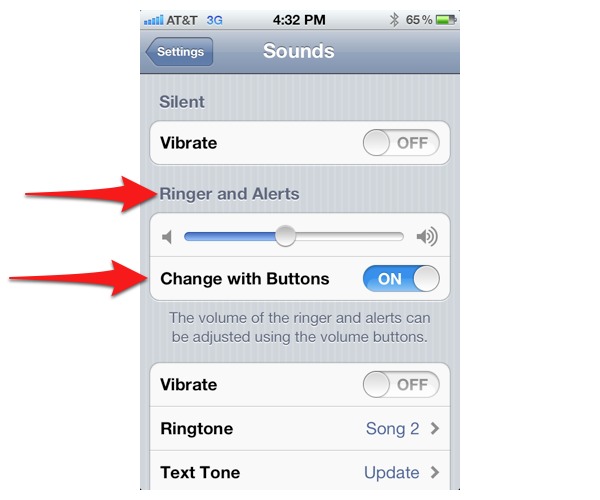
If you go to into the iPhone’s Settings and tap Sounds, you’ll see the following:

The slider for Ringer and Alerts does what you’d expect: it adjusts the volume level for ringtone/alerts. But it’s the Change With Buttons switch where things get confusing.

If the toggle is set to Off, the volume of ringtones/alerts cannot be changed with the volume buttons (with an exception).

If the toggle is set to On, then the volume buttons will change the volume of the ringer when other audio isn’t playing.

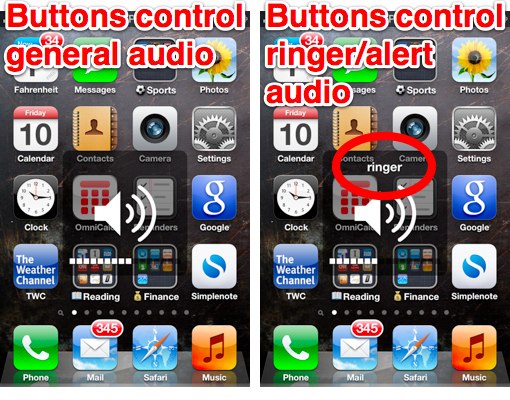
Whenever you press the iPhone’s volume buttons, you’ll know which of the volumes the buttons are changing via one of two graphics that can appear:

To Confuse You Even More…

There are a few exceptions to the above.

When a ringtone/alert is actually playing, you can lower/raise the volume of the ringtone/alert with the volume buttons, regardless of your iPhone’s settings. If you change the volume while the ringtone is playing, the ringtone’s volume will remain at that level until you change it again by either going into the iPhone’s Settings (if the Change With Buttons switch is set to Off) or via the volume buttons (if the switch is set to On).

Likewise, if you are listening to general audio (like music), the volume buttons will always change the audio’s volume, regardless of your iPhone’s settings.

Basics: What Does the iPhone Ringer Switch Mute (And Not Mute)?

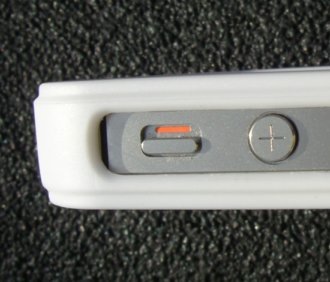
The iPhone’s ringer switch seems like it should be a simple thing. You move the iPhone’s ringer switch to the “mute” position, and all sound is muted, right? Wrong. Just ask the gentleman who infamously brought the New York Philharmonic to a standstill because his iPhone’s ringtone started playing even though he had the ringer switch set on mute. How could that happen? Because the ringer switch only mutes some sounds but not others. What exactly does the ringer switch mute and not mute? It’s complicated, but let’s start with what it doesn’t mute.

What the Ringer Switch Doesn’t Mute

  • Alarms from the Clock app (example, setting an alarm to go off at 6 am).
  • Timers from the Clock app (example, setting a 15-minute countdown timer).
  • Audio from the iPhone’s Music app (example, playing the Beatle’s “Hey Jude”).
  • Audio from the iPhone’s Video app (example, playing an episode of Lost).
  • Some audio from third-party apps like streaming radio, video, and music (examples, playing a radio station via the TuneIn Radio app or a video in the YouTube app).
  • Tones when tapped in the iPhone’s various settings (for example, when changing your ringtone or text-message alert tone) and in the Clock app (for example, when selecting what sound the iPhone will make when the timer runs down to zero).
  • Tones when changing the volume of Ringer and Alerts in Settings–>Sounds
  • A sound alert when sent from the Find My iPhone service.

Basically, Apple’s rationale for the ringer switch not muting these sounds is that if a user does something and expects the iPhone to make a sound, like tapping the play button for a song or setting an alarm to wake them up, the iPhone should make that sound regardless of the ringer switch’s position. Apple has this advice for developers in their developer guidelines:

The Ring/Silent (or Silent) switch does not silence sounds that result from user actions that are solely and explicitly intended to produce sound.

So what exactly does the ringer switch mute then? Basically, everything else.

What the Ringer Switch Does Mute:

  • Phone-call ringtones
  • Text-message alert tones
  • Notification alert tones (from iPhone apps and third-party apps)
  • Calendar alerts
  • Reminders
  • Camera sounds (snapping a photo)
  • Game music

There’s been much debate about whether this is the best way for the ringer switch to behave. Some feel there is no perfect solution and that Apple has reached the right balance. Others feel that the ringer switch should simply mute all sound and the burden of error should fall on the user (eg, my alarm didn’t wake me up because I had my phone on mute…my bad!). I’m on the side that Apple has made the correct compromises.

Notes and Interesting Facts:

  • By law, iPhones in Japan must make a sound when a picture is taken, even if the ringer switch is on mute. This is because men snapping photos up women’s skirts and down their shirts have become a big problem in Japan.
  • The iPad’s switch is not called a “ringer” switch. Apple simply refers to it as the “side” switch. The iPad’s side switch can either mute alert sounds or function as an orientation lock, depending on what the user selects in the iPad’s settings.
  • The iPhone has separate volume levels for ringtones and for general audio (music, videos, etc.). You can find and change the separate ringtone/alert volume in Settings–>Sounds
  • Using the volume buttons, you cannot decrease the ringer volume to zero (0), it will only go to 1. To completely silence tones, you must use the ringer switch.
  • The ringer switch does not effect sound through headphones. For example, even if the ringer switch was set to mute, you will still hear your phone ring through your headphones.