Author: Alan

Apple Builds Support for Audiobus, a Third-Party App, Into Garageband (Audiobus Now 50% Off in Celebration)

Audiobus icon

Independent developers A Tasty Pixel have just received the rarest of honors from Apple today. Apple has built in support for their app Audiobus ($9.99, on sale for $4.99) into the latest version of Garageband for iOS ($4.99), essentially making Audiobus the standard for piping sound from one music app into another.

Audibus

Audiobus is a middleman app for music-making on the iPhone and iPad. It essentially functions as a pipeline for moving sound created in, say, a synthesizer app like Animoog into another like Garageband so you can record it, or manipulate it with more filters, etc. It also makes it easier to switch between music apps with just a tap, and to start/stop recording in app while playing in instrument in another.

To non-musicians, it may sound a bit benign, but it solves a lot of issues on iOS for making and recording music. Without a doubt, Audiobus is currently the most powerful music-creation app for iOS out there, even more so now that Apple seems to recognize it as a protocol—highly unusual because Apple usually likes to control these things. Developers have to build support into their apps for Audiobus (the long list can be found in the official app description in iTunes here), so it’s a little funny to see Apple join the crowd. Apple must be Audiobus fanboys, too.

Audiobus announced via Twitter (see the tweet below) that the app is currently half off ($4.99) in celebration of Apple’s move.

We recently chose Audiobus as one of our Most Essential iPad Music-Creation Apps, which you can view as a slideshow here (Part 1, Part 2) with example videos.

10 More Essential iPad Apps for Music Creation (With Video Examples)

Make sure to check out Part 1 here. Musicians are quickly discovering that iPad apps are some of the best values in music creation tools today. Where it can costs hundreds of dollars for a real-life hardware synthesizer, the iPad’s multitouch screen can recreate all the knobs, switches, and other features without the cost of manufacturing, leading to ultra-cheap apps that deliver nearly identical sound—hook up a MIDI keyboard and you get the same playing experience as well. The iPad is a pretty amazing revolution in music creation and recording tools. Check out my list of 10 More Essential iPad Music-Creation apps below to get an idea of some of the best apps available.

[iframe src=”https://artoftheiphone.com/wp-content/uploads/Hype/MoreiPadMusicApps/MoreiPadMusicApps.html” width=”100%” height=”600″]

Tip: How To Add Your Favorite MLB Team’s 2013 Schedule to Your iPhone’s Calendar

If you’re on an iPhone or iPad and want to easily add your favorite Major League Baseball team’s schedule to your calendar, just tap your team’s name in the list below, then tap Subscribe from the pop-up box. These are the official schedules from MLB’s website. Please note that you can easily hide all 162 games from view, as all those games can clog up your calendar (see instructions at end of post).

Arizona Diamondbacks
Atlanta Braves
Baltimore Orioles
Boston Red Sox
Chicago Cubs
Chicago White Sox
Cinncinnati Reds
Cleveland Indians
Colorado Rockies
Detroit Tigers
Houston Astros
Kansas City Royals
Los Angeles Angels of Anaheim
Los Angeles Dodgers
Miami Marlins
Milwaukee Brewers
Minnesota Twins
New York Mets
New York Yankees
Oakland Athletics
Philadelphia Phillies
Pittsburgh Pirates
San Diego Padres
San Francisco Giants
Seattle Mariners
St. Louis Cardinals
Tampa Bay Rays
Texas Rangers
Toronto Blue Jays
Washington Nationals

How to Hide the Games in Your Calendar

To hide the games from your calendar, go to the Calendar app, tap the Calendars button in the top left, then tap the checkmark next to the team-schedule calendar to uncheck the calendar and remove it from view. You can delete the calendar by going into the Settings app > Mail, Contacts, Calendar > Subscribed Calendars, tap the calendar and then tap Delete Account.

Siri Tip: Say “Google” First for the Quickest Way to Launch a Web Search on the iPhone & iPad

Siri icon

For the fastest way to search for something on the web, simply speak the word Google first to Siri, followed by whatever you want to search for. This method is, by far, the fastest way to do a web search in iOS. And, it can improve your overall experience with Siri.

Here’s an example: if you ask Siri, “Ten best Hawaii beaches,” Siri will bizarrely respond with a weather forecast. Begin that same question with Google and the browser will quickly and automatically launch and point to several great articles listing the ten best beaches in Hawaii. By starting off with Google, I avoid having to repeat myself or navigating to the browser app.

Another reason to say “Google” first is that Google is also great at correcting mistranslated words or phrases and figuring out what you’re really looking for. Compare this to Siri, which often takes correctly translated words and delivers incorrect info. Don’t get me wrong, Siri is great for creating reminders, text messages, alarms, & timers, and a handful of other things, but Siri is not so great at answering most questions.

Also note you can say Bing or Yahoo to automatically launch searches in those engines as well.

10 Essential iPad Music-Creation Apps (With Video Examples)

Also check out Part 2 here with 10 more apps. Musicians are quickly discovering that iPad apps that help create music are an incredible value in the world of professional music making. Never before has it been so cheap to own professional-quality software tools, and it’s all thanks to the miracle device known as the iPad. Below are my picks for the 10 Best and most useful apps for creating music on the iPad, with video examples.

[iframe src=”https://artoftheiphone.com/wp-content/uploads/Hype/iPadMusicApps/iPadMusicApps.html” width=”100%” height=”600″]

6 Cars That Are Getting Siri Eyes Free Integration in 2013

Apple first announced Siri Eyes Free for cars in June 2012, but its appearance in actual cars has been glacially slow (it’s still not available as of this writing except for a few lucky beta testers). Below is a list of cars Siris Eyes Free will supposedly make a 2013 appearance in (via software updates).

[iframe src=”https://artoftheiphone.com/wp-content/uploads/Hype/SiriCars/SiriCars.html” width=”100%” height=”700″]

Siri Eyes Free is a special version of Siri designed for use in cars, but it requires carmakers to update their infotainment systems to be compatible with it. It should be noted that regular old Siri (the non-Eyes Free version) does work over bluetooth in cars, but Eyes Free offers a few benefits, which I’ll get to in a sec. There are several cars destined to receive Siri Eyes starting in late spring of 2013, but it isn’t likely until 2014 when Eyes Free will be available widely.

So what’s the benefit of Siri Eyes Free over using activating regular Siri with your current car’s bluetooth system? Well, first off, it will just work better—currently, Siri + bluetooth in cars is not a great experience. Probably the biggest benefit performance wise is that Eyes Free will take into account a car’s background noise (engine and wind noise) when listening for commands, thus you’ll be understood by Siri better in noisy situations.

Another benefit of Eyes Free is it will be safer to use than non-Eyes Free Siri while you’re driving, as it won’t prompt you to look at your iPhone’s screen (for example, she won’t say “Here are your results” and display info on the screen). The side effect of this safety feature is that its removes some of Siri’s functionality, such as Siri doing web searches for you or looking up data via Wolfram Alpha.

Another differentiating aspect of Eyes Free is that car makers can determine a specific type of button press to activate Eyes Free to keep it separate from their own voice command systems. For example, Chevy will require you to hold the button for 2 seconds to activate Siri Eyes Free.

Good Deal: Monoprice and Amazon Selling Cheap, Apple-Certified Lightning Cables

Amazon Lightning to USB

Both Monoprice and Amazon.com are now selling bargain-priced Lightning cables that work with the iPhone 5 and the new iPads, and the cables are MFi certified (Made for iPod, Made for iPhone, and Made for iPad), meaning Apple has approved them for use with their devices.

Monoprice:

Screen Shot 2013-02-13 at 10.03.54 PM

Monoprice has 3 versions of the Lightning to USB cables:

  • A regular 3-foot cable ($11.77)
  • A regular 6-foot cable ($12.56)
  • A “Slimfit” 3-foot cable ($12.73) where the connector heads are slightly slimmer that the regular version, and thus slightly more expensive (hoo-ahh!).

Of course, with Monoprice, the more you buy, the less they cost. Apple’s Lightning cable costs $19.99, so Monoprice saves you around $6-$8 per cable. Apple’s official cable is 3 feet 3 inches long, so if you ask me, the best deal is Monoprice’s 6-foot cable (although too much cable can be annoying in some situations).

Amazon:

Lightning Cable at Amazon

Amazon is selling its Apple-certified AmazonBasics Lightning to USB Cable for $14.99 (Prime eligible), although it should be noted that Amazon is also discounting Apple’s official Lightning cable from $19.99 to $16.99 (at least they are when I’m logged into Amazon—they sometimes show different prices to different people).

It’s possible to find non-Apple-certified cables for even cheaper, but you’re rolling the dice with your expensive iPhone/iPad.

Both Monoprice and Amazon’s cables are black, while Apple’s official cable is apple-core white. Is it worth the few extra bucks to stay Apple white? Yes! I mean, No!

Review: Incipio KickSnap iPhone Case With Built-In Stand


Review Summary


Price: $35

Art of the iPhone’s Rating: ★★☆☆☆
(2 stars out of 5)

Review Summary: The Incipio KickSnap has a poorly designed built-in stand, an easily scratched glossy surface, and very little shock absorption. It makes for a poor choice of case for the iPhone 5.

Certain themes emerge after years of reviewing iPhone cases, and one of those themes is that glossy style hard plastic cases exhibit poor durability and soon degrade into scratch-covered messes. And so it was with the Incipio KickSnap ($35 suggested, bought for $10 on Amazon), which after just a day’s use, looked liked it had been worked over with sandpaper. But the KickSnap does have another key selling point, its built-in stand. Too bad it’s poorly designed as well.

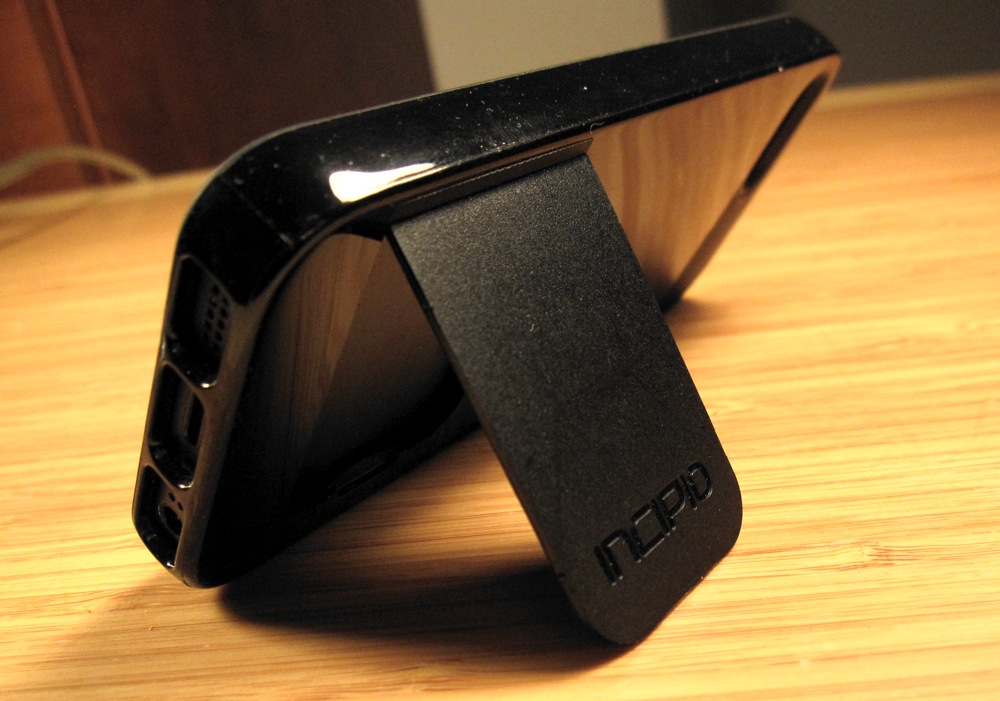
The Stand. The Kicksnap’s “stand” really is just a loose rectangular strip of plastic that you pull out with your fingernail. The “stand” flaps about like a broken wing—there is no hinge or other mechanism to provide resistance. To use it as a stand, you simply lean the plastic flap and iPhone against each other—a sloppy design that shows a total lack of imagination. The stand gives you a grand total of 1 viewing angle for the iPhone (about a 70-degree landscape viewing angle).

Incipio KickSnap Case for iPhone 5

Protection. On its website, Incipio says the the KickSnap provides “excellent shock absorption.” Well, in my testing, not really. The KickSnap is a thin hard plastic case, which means most of the energy from an impact will transfer into the iPhone. That is not “excellent shock absorption.” The KickSnap does have a thin soft rubber inner lining, but there’s only enough for preventing the hard plastic of the case from scratching the iPhone itself, not enough for shock absorption duties. In terms of protection, the Incipio KickSnap is only good for everyday wear and tear—too bad the case itself will look worn and tired with just a few days use.

Buttons & Ports. There is one element of the KickSnap that is well designed, its buttons. The case’s buttons cover the iPhone’s own volume and sleep/wake buttons, and they work accurately when pressed. In fact, they are very clicky and responsive when pressed—I like them more than the iPhone’s own buttons. The case has cutouts for the iPhone’s lightning and headphone ports, leaving plenty room to plug in your earphones and charging cords. Likewise, a cutout for the iPhone’s camera leaves plenty of room to take photos. Overall, the KickSnap gives you excellent access to all the iPhone’s buttons and features.

Fit & Feel. The KickSnap is a slim-style case, and thus adds barely any thickness and weight to the already slim profile of the iPhone 5. The case feels very solid and tight, with no creakiness to the plastic or looseness to the fit. Unfortunately, the glossy surface is also quite slippery, meaning you’ll have a bit more difficult time keeping a firm grip on the iPhone with the case on. Another reason to avoid the “glossy” style of iPhone cases.

Looks. Glossy hard-plastic cases almost always look great coming out of the package, and so it was with the KickSnap. But due to durability issues, they don’t look so great after a few hours of use. So it was again with my “Obsidian Black” version of the KickSnap, which is also available in Optical White / Charcoal Gray. Scratches and scuffs will soon cover the delicate surface, making the case look worn even though it’s barely been used. The KickSnap is a slim case, so it maintains the iPhone 5’s slim profile, which is nice visually, but again, a closer look will reveal the scratches and worn look. The stand, too, is a bit of an eyesore, even though it snaps flat when not in use.

Conclusion

The glossy plastic of the Incipio KickSnap case for iPhone 5 ($35) is easily scratched, and its built-in stand is poor designed. Add in poor shock-absorption, and you’ve got a dud of an iPhone case, even at the discounted $10 I found it it for on Amazon.com. Not recommended.

Review: Speck PixelSkin HD Case for iPhone 5


Review Summary


Price: $30

Art of the iPhone’s Rating: ★★☆☆☆
(2 stars out of 5)

Review Summary: The Speck PixelSkin is a thin hard-plastic case that doesn’t offer much shock absorption, but is a tight-fitting case that won’t get in the way of using the iPhone’s various features. Still, there are a million thin cases like the PixelSkin out there, and no reason to buy this one.

The Speck PixelSkin HD ($30) falls into the herd of cheaply made, thin hard-plastic cases that really aren’t much of a benefit to your iPhone other than wrapping another layer of material around it, and not a very protective one at that.

Protection. The PixelSkin is made from thin hard plastic, a combination that does little to protect your iPhone in the area of shock absorption. If you drop your iPhone inside this case, the energy of the impact from the iPhone hitting the ground is easily transferred through the plastic into your iPhone. If you want a case that will lower the odds of a smashed, cracked, or broken phone, this ain’t it.

Fit and Form, and Accessibility.The PixelSkin HD is the kind of case where I often see people say they are completely satisfied with product because, well, it fits perfectly around the iPhone, and it feels slim and barely adds any weight. Yes, it’s true that the PixelSkin HD is well-designed in the area of fit and form. Well, “well-designed” in that it doesn’t generally interfere with using the iPhone’s various buttons and ports. The PixelSkin HD hugs the iPhone like a glove, feeling solid with no creakiness.

I found the texture of the PixelSkin HD to be very unpleasant to hold in the hand. The edges of this plastic are sharp, creating an unpleasant scraping feeling against my skin. The back of the case has a texture of raised squares (thus the name “pixel”) that also have sharp edges and also scrape against my skin.

Conclusion

The PixelSkin HD is a thin, hard-plastic case that offers very little in the way of protection for your iPhone 5 inside. Sure, it fits well and doesn’t interfere with your iPhone’s various functions, but the truth about this case along with a thousand rushed-to-market, cheaply made, thin, hard-plastic cases like is that there is nothing truly compelling enough that you should spend your hard-earned cash on it compared with other, much better cases out there.

Review: iStabilizer, an Inexpensive Way to Use Your iPhone With Standard Camera Tripods


Review Summary


Price: $15

Art of the iPhone’s Rating: ★★★★★
(5 stars out of 5)

Review Summary: The iStabilizer is a handy tool that provides a quick and hassle free way to attach the iPhone to a tripod. Highly recommended for its ease of use and versatility. It works with any 1/4″ x 20 tripod screw (which is standard).

The iStabilizer ($15) is an inexpensive solution for attaching your iPhone to a tripod, and you can do so without removing your iPhone case or using any special equipment other than the iStabilizer itself. The iStabilizer is a simple clamp-like tool that can screw into any standard tripod and hold any current or past version of the iPhone in its pinchers, as well as a bunch of other small devices (iPods, small cameras, etc). It’s a great idea because the iPhone’s camera is capable of taking high quality photos and videos. But does the iStabilizer perform well in the field? Read on to find out.

In a nutshell, the iStabilizer works great. I tested it with my iPhone 5 and my camera tripod (which I bought for $25 from Amazon and which I can recommend if you’re looking for a cheap tripod). The iStabilizer’s best characteristic is how quickly and easily the iPhone can be taken in and out of its clamps. In fact, I wish most cameras could be attached/detached from tripods so easily.

iStabilizer iPhone camera tripod mount

How It Works. The iStabilizer will work with any 1/4″ x 20 tripod screw (the standard for modern tripods). You simply screw the iStabilizer onto the tripod and its ready for the iPhone to be inserted.

To place the iPhone inside the iStabilizer, you pull up on a tab, raising one of the iStabilizer’s clamps enough to slide the iPhone inside, then you let go and the iStabilizer clamps down on the iPhone with a firm grip. The grip is tight enough that you can move the tripod around and not have any fears the iPhone will slip out. You can even hold it horizontal or upside down, and the iPhone stays in it (view examples of this in my video review).

iStabilizer with iPhone in case inside

In a nice design touch, the clamps are padded with rubber so that they won’t damage the iPhone, in case you aren’t using a case. Which leads me to another nice element of the iStabilizer: it will work with just about any iPhone case, no matter how thick.

The iStabilizer pinchers can stretch to hold objects with a 2.75″ width or less. The iPhone 5 has a width of 2.31 inches, so that leaves an extra 0.44 inches, which is plenty for an iPhone case. The extra room also means the iStabilizer can work with other devices as well, like iPods, other smartphones, or even small cameras (it worked with my Canon PowerShot SD960 camera). There is also a iStabilizer Mount XL for larger smartphones, and they’re working on an iPad version.

Another nice aspect of the iStabilizer is that it leaves the iPhone’s screen unobstructed, meaning you can still tap and swipe the screen to utilize the features of whatever camera/video app you’re using to film.

Conclusion

The iStabilizer ($15) is a great, inexpensive solution for attaching your iPhone and other small devices to a tripod. It holds fast to any device in its grasp and won’t damage the device thanks to protective padding on its pinchers. My favorite feature was how quickly and easily the iPhone can be removed from the tripod, which is nice because the multitasking iPhone is more than just a camera, and even while taking photos I’ll need access to it for other functions as well.