Want to make an iPhone ringtone with your own music? Just follow the step-by-step instructions below. Make sure to start out with songs that are mp3s or are otherwise DRM-free. *Updated for iTunes 11*
How to Make an iPhone Ringtone in iTunes:
1. Open iTunes.
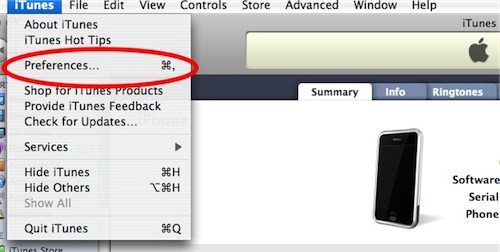
2. Open Preferences in the iTunes menu at the top (it may be under Edit for Windows users):
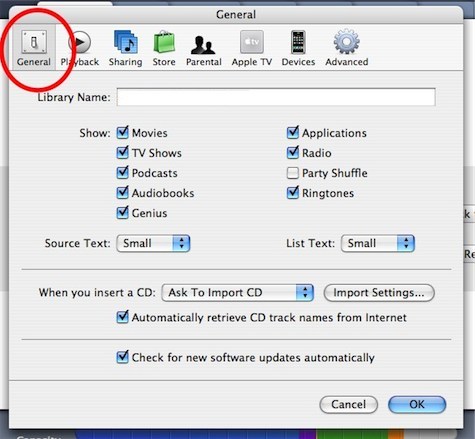
3. Select the General tab:
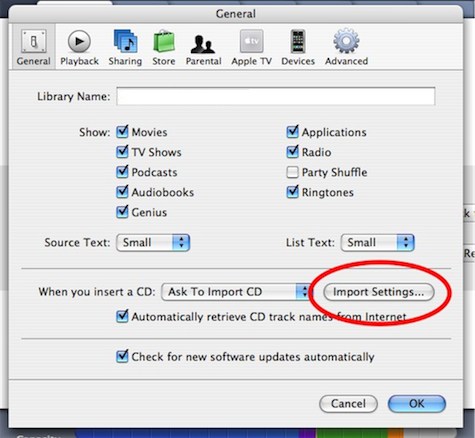
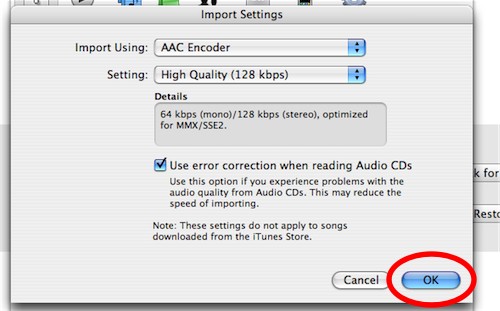
4. Select Import Settings:
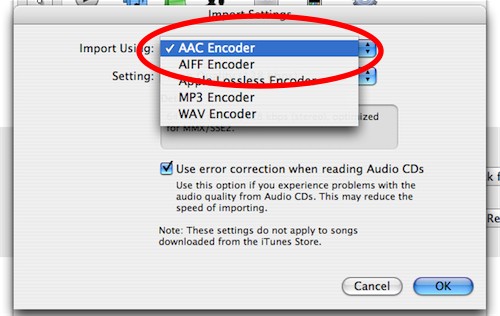
5. Click on the dropdown list after Importing Using:

6. Select AAC Encoder (it may already be the default):
7. Select OK to go back to the Preferences, then select OK again.
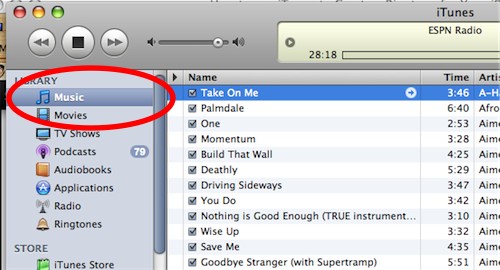
8. Select Music in the left iTunes sidebar and find a song you want to make into a ringtone:
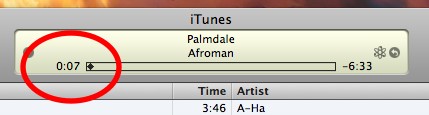
9. You’ll need to find a 40 second or less section of the song to turn into a ringtone. Note (or write down) the starting and stopping point of the section of the song. You can see the time of the song in the play window at the top of iTunes:
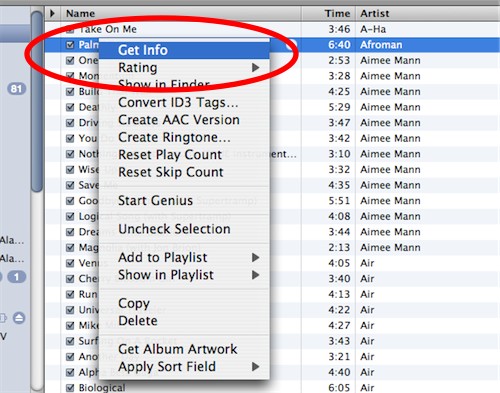
10. Right click on the song, and select Get Info:
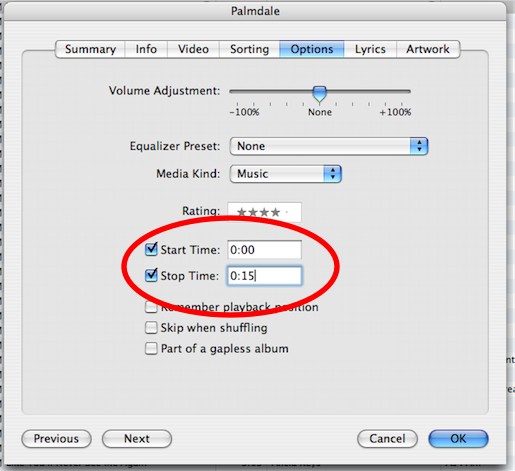
11. Select the Options tab at the top:
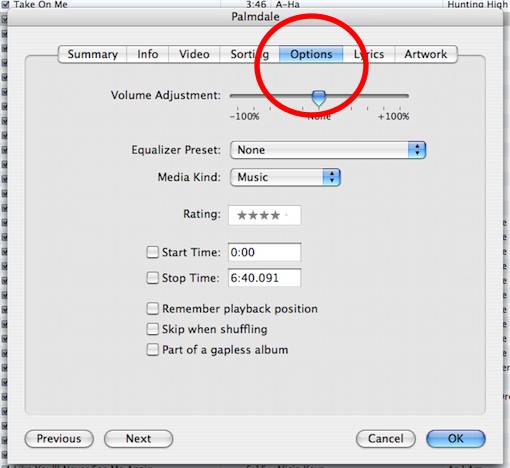
12. Enter the start and stop time of the clip in the corresponding boxes and make sure the checkboxes are checked when you are finished:
13. Click OK in the bottom right.
14. In the iTunes menu at the top, click Advanced, then Create AAC Version from the drop-down menu (in iTunes 11, it’s File –> Create New Version –> Create AAC Version):

15. You should see a second version of the song appear in iTunes, only with the shorter play time. Click to play to make sure it sounds how you’ll want the ringtone to sound.

16. We aren’t quite finished yet! Now we have to change the file format so that it will appear as a ringtone in iTunes.
17. Navigate to the folder where the new clip is stored on your computer (it will be in the same folder as the original version of the song). To find it in Windows, right-click the clip in iTunes, then choose Show in Explorer. For Mac, right-click and select Show In Finder.
18. Copy the song (press Control and C for Windows, Command and C for Mac), and paste the song in the same folder (Control and V or Command and V) so that a third version appears.

19. Now, change the file extension of the third version from .m4a to .m4r.
Troubleshooting: Don’t see the file extension? Windows 7: click the Start button, Control Panel–>Appearance and Personalization–>Folder Options–>View tab–>and uncheck Hide Extensions for known file types. For Windows XP: in the Explorer window, go to Tools –> Folder Options –> View and uncheck Hide extensions for known file types. For Vista: Organize –> Folder and Search Options and uncheck Hide extension for known file types.
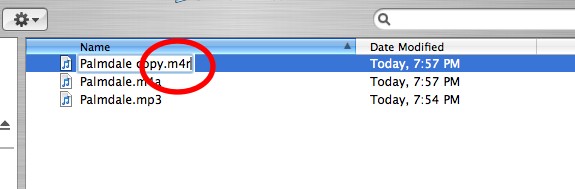
20. Rename the file, if you want (for example, CoolRingtone.m4r). Note: If there are symbols such as underscores or hyphens in the name, you must remove them.
21. Important: In iTunes, delete the first AAC clip you made by right-clicking on the clip and selecting delete (if you don’t do this, iTunes might not accept the new ringtone):

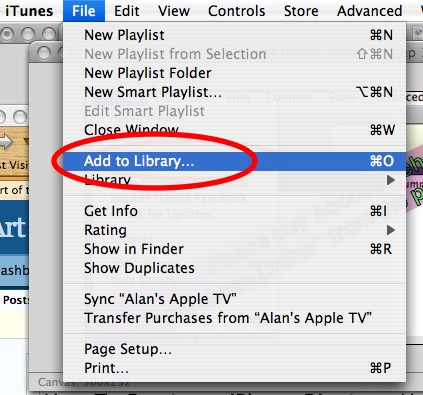
22. Go back to the folder with the new ringtone file (.m4r file). Drag and drop the file into iTunes. Or import it by opening iTunes, select File, and select: Windows XP/Vista: Add File to Library, Mac: Add to Library.
23. Now we need to sync the ringtone to your iPhone. Connect the iPhone to the computer.
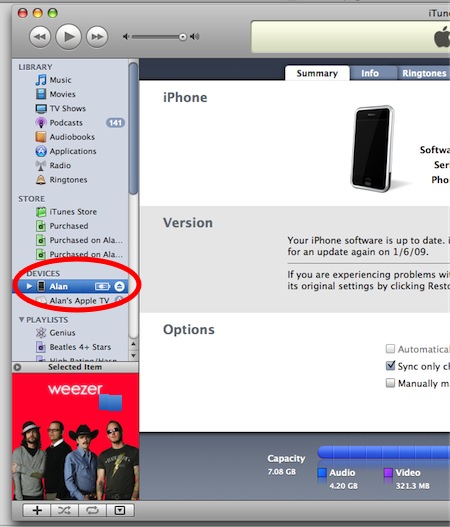
24. Click on your iPhone in the left sidebar in iTunes (Note: for iTunes 11, your iPhone can be found under Devices at the top right):
25. Click on the Tones tab, check the Sync tones checkbox, then check either All tones or Selected tones. If you choose Selected ringtones, make sure your new ringtone is also checked so it will sync:


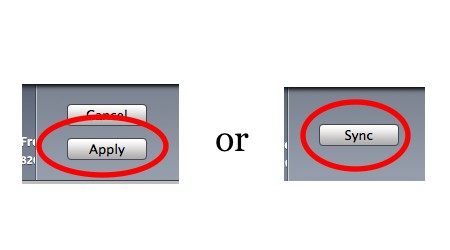
26. Now click the Apply button in the bottom right (it may also say Sync. Click Sync if it does).
And that’s it. You’ve done it! The ringtone is now on the iPhone. Got to Settings on your iPhone, tap Sounds, and you can change to your new ringtone. If the ringtone doesn’t show up on the iPhone, follow the Troubleshooting steps below, else go to the Clean Up section for one important last step.
Troubleshooting
Did the ringtone not appear on your iPhone? Follow these steps.
1. Click on the Summary tab for your iPhone in iTunes:

2. See if the checkbox labeled Manually manage music and video is checked. If not, check it.

3. Click on Tones in the left sidebar (older versions of iTunes may say Ringtones instead) and find the ringtone:

4. Drag and drop the ringtone onto your iPhone in the left sidebar. The iPhone should begin synching immediately, and the ringtone will appear shortly on your iPhone:

More Troubleshooting
Problem: I don’t see Tones or Ringtones in the iTunes Sidebar.
Go into Preferences–>General, and under Show make sure the Tones checkbox is checked.
Problem: You get a scary message “All existing songs, movies and TV shows on the iPhone will be removed.”
You likely received this message because you’ve never synced your iPhone with iTunes before and therefore don’t have a back-up of your iPhone data. Cancel the current sync. Unplug your iPhone and plug it back in again. Right click on your iPhone in the left sidebar and select Back Up:

Now that iTunes has an image of your current iPhone to work from, right click on it again in the left sidebar and select Sync.
Clean Up
You made the ringtone, but there’s one clean-up task to do. We need to fix the Start/Stop time of the original song. Otherwise, the next time you play the song, it won’t play the whole thing. In iTunes, right click the original song, select Get Info –> Options and reset the Start/Stop time by deleting the numbers and leaving the fields blank. All done!


This website is awesome!!! Thank you so much!!
I followed the steps to personalised ringtones, but after changing the file name m4r i couldn’t upload to the itunes. could you please help me out.
Thanx
In iTunes, delete the first m4p ringtone clip you made. iTunes will not accept the ringtone if it has the same as the first clip (ie, Afroman.m4a and Afroman.m4r).
may i knw the version of yr itunes? Mine does not have the itune button which you click mine starts from file, edit etc :(
I followed your instructions and like Mahesh it would not drop into iTunes even after I made a copy. Why would it be doing this? Please, please, please help, I am desperate for this to work. I have iTunes 8 would this be why?
Hey guys, I just re-tried my instructions and it works. Did you check the “Ringtones” tab to make sure it actually didn’t drop in iTunes? It may seem like nothing happens, but it actually drops in. Also, make sure you are starting with DRM-free music.
…The reason it wont ‘drop in’ is cos you haven’t ticked/checked the ringtones box as described in point 3 (see above). Hope that helps!
Alan, many thanks bro!
Hi, I tried this method and everything seemed to be working. The songs showed up under ringtones and I checked them off and synced my phone but they never showed up on my phone. What might I be doing wrong?
Yes, the ringtone actually was in iTunes, he just didn’t look in the right place.
Mike: After you’ve synched the ringtone to the iPhone, on the iPhone, tap Settings, then Sounds, and then scroll around until you find it. It should be under a header called “Custom.” You may have to scroll upward.
you didnt reply me:( may i knw the version of yr itunes? Mine does not have the itune button which you click mine starts from file, edit etc :(
I use a Mac, that’s why it says “iTunes” at the top left in the iTunes menu. However, the Mac and Windows version have the same menu commands, they just may be rearranged a little differently.
thank alot!i got it!:D
I tried this method and went into my settings on my iphone and it’s not there….it’s under ringtones in itunes but not on my phone after syncing….any help???
Worked like a charm and synched onto iPhone. Thanks dude! Snoop Dogg is my new ringtone.
(I have iTunes 8.1 btw, still works!)
Laurie, make sure you check the checkbox for “All Ringtones” in iTunes for your iPhone. Also, make sure there are no symbols like underscores or hyphens in the name.
it works! thanks, I owe you a buck!
Anyone know if this still works? I tried this with itunes 8.1.0.52 and if I try it on something I got from itunes it says I cant convert the file because its a protected file. Any way to get around that?
It has to be a DRM-free song, meaning it can’t have copy protection on it. Burn it to a CD, then rip it to iTunes again as an mp3. Then you can turn it into a ringtone.
The editing fuction in iTunes is really easy to use. But being a stubborn Mac user, I prefer the export function of Quicktime.
What I do is I simply select the song I want in my iTunes and then create a copy of it (Advanced -> Create MP3 version). I think use that song to edit with, so I won’t harm the original MP3.
I then drag the song out of iTunes on to my desktop and open it with Quicktime. In Quicktime I then choose to export the song to an MPEG-4. (File -> Export). The dialog lets you chose from a variety of options, but you want Movie to MPEG-4.
Then simply rename the *.mp4 to m4r. Chose to open it with iTunes and it will be listed in your ringtones.
Et voila ;)
Does this still work? I completed all the steps and got the ringtone to appear in my iTunes ringtones. There are no underscores or hyphens in the file name. I have the sync to import all ringtones. But, the ringtone still does not appear on my iphone.
It’s work, even with the latest iTunes version. Just be sure to follow those steps above EXACTLY.
Thanks a lot, great blog!
I did everythinguntil it gets to iphone and i checked it is no where under settings or ringtones or custom i checked all ringtones and i made sure there was no hyphens any ideas?
I’ve created the ringtone, and have it on my ringtones folder in itunes. I then plug the iphone and open the ringtones tab. when I check the ‘sync ringtones’ in order to download it onto my phone, a warning comes up saying if I sync ringtones, all the songs, movies, etc on my iphone will be cleared.
what’s up with that!!?
thanks buddy…i was looking for this from so long time..one more thing i want..can u help me to find how to forward sms in i phone 3g?
I am having trouble with step 18. I try to copy it but then I can’t paste…
Jen: make sure the song is free of DRM (copy protection).
I completed all the steps and got the ringtone to appear in my iTunes ringtones. There are no underscores or hyphens in the file name. I have the sync to import all ringtones. But, the ringtone still does not appear on my iphone.
Jen: On your iPhone, go to the Settings, then tap Sounds, then tap Ringtone. Now try scrolling upwards (not down). Sometimes the custom ringtones section is hidden from view. Confirm that it’s not there?
nope it isn’t. I have other custom ringtones but the one I made isn’t on the list
Nope it’s not there…
Jen: Make sure the ringtone isn’t over 40 seconds in length (see step 9). If it is over 40 seconds, the ringtone will show in iTunes but won’t sync onto the iPhone.
no it’s only 24 seconds. Sorry I am being so frustrating..
hey the other day i was making ringtones using these instructions and it was working fine and they uploaded onto my iphone, but tonight i tried doing it and when i go to my music directory, it doenst come up as an extension..its just like a normal file for my VLC player. the other day when i was doing it it was coming up as an unknown file and then once i changed it to m4r. it changed into a VLC file.. but now its already a VLC file and when i cahnge it to m4r it doesnt drop into my ringtone folder.. it just goes into my itunes like a normal file… would this have anything to do with me downloading the newer version of VLC player? cos when i had the old version i could make ringtones.. now i can’t..
Thank you for this step by step process. I ran across a problem. I was able to put the songs into my “Ringtone” column in iTunes but when I try to sync the songs into my iphone it doesnt show up in my iphone? Do you know why this could happen? Thanks again for this information.
worked like a charm! not ta first, but i figured it out! thank you for this VERY informative tutorial!!!
awesome worked the first time took a bit to find where the everything went but awesome Thanks
I got everything working here almost, it shows up on my iTunes in the ringtone folder. After syncing it even shows up on my itunes, device under ringtones, but on my iPhone under sounds, ringtone, it isnt there, up or down and nothing named custom.
If it is not showing up on your iPhone after the sync, make sure it us under 30 seconds!!!!!!!!!!!!!!!!!!!
This worked a treat, AMAZING, thank you x
Thanks for this! Your directions are very precise and helpful and I was able to get it done first try. You’d think they would make it easier than this.
Same issue as Scott above – shows up on my iTunes in the ringtone folder. After syncing it even shows up on my itunes, device under ringtones, but on my iPhone under sounds, ringtone, it isnt there, up or down and nothing named custom.
What am I missing?
i cant even get it into my ringtone folder? help
okay, i did everything like you said, and i can’t get the thing to drop into my itunes. it just gets the little 0 with a / through it. any help pleasee?
I’m using ver 8.1.1 (10) on a Mac and if you follow the steps Alan gives to the letter they work.
Are you using non-CRM files,
Are you making an AAC copy of the file,
Did you save a copy of the AAC somewhere not in the iTunes Library,
Did you change the extension of the copy from *.m4a to *.m4r on the file not in the iTunes Library,
Did you delete the AAC copy that is still in the iTunes Library,
Are you using iTunes\file\add to library to add the file
If so it will not show up in the iTunes Library, it will be in your iTunes Ringtone directory.
I have the latest version of Itunes, and I see the song in my itunes ringtone folder, I can check it. It syncs and adds the ringtone to my phone, But I can’t select it. Any ideas?
excellent website. clear instructions
@Aaron
The first thing that comes to mind is….is your ringtone longer than 30 sec? If it is it wont work.
Other than that, I have no idea.
I had the same problem a lot of the above people had, what was happening was the copy version still had all of the album information from the original song. The fix: when you get to step 15, right click on the ringtone version of the song and select “Get Info”. Then delete all of the information, leaving only the new ringtone name. Now you can continue on with the directions and not have your newly created ringtone continue to revert to the original name. Hope this helps!
GUYS,not all the songs can be ringtones only the one with (bell) next to it (chk itunes)..
Hmm not really working for me. Despite following all instructions and checking it’s not DRM, too long etc etc, it just won’t appear in my Ringtones tab when I try to sync the iPhone. Marimba is driving me bonkers, please help!
Thanks worked great after i removed all the special characters out of the name of the song!!
I could not use a song downloaded from itunes without a bell next to it, but I can take a song from a CD I own and use it. Worked great, EXCEPT, syncing the ringtones delelted all music from my iphone. It’s not a big deal, I guess I can reload it all, but will that happen everytime I try to make a ringtone?
I get an error message that says it cannot be converted because protected files cannot be converted to other formats. any suggestions? Other than this so far the directions are awesome.
I followed the tutorial, and it worked great! I created 2 ringtones, both of which I was able to sync with my iPhone. The only thing is, when I go into the sound settings, I only see one of the ringtones I created. Any idea what that could be from?
Thanks!!! This helped so much. I was getting pretty pissed that apple was making me pay $1.29 for a song to download it then pay $.99 more for the ringtone. Plus there were a bunch of songs i had on my iTunes from CD’s that would make great tunes. Because of this I can. After I read this I have sat here for over 30 minutes making ringtones. I am going to tell all my iPhone buddies about this so the can do it too!
oh and I have my iPhone set to manually manage music and videos. I tried to sync it but it alerted me that all my music would be deleted, so I tried dragging and it worked.
bro Perfect been trying to work that out for ever thanks a bunch
Fantastic instructions!!
I have my first great ringtone :)
Need some troubleshooting help!!!
Used this tutorial yesterday and it worked a treat but am trying to use it again today to create more ringtones and its not letting me change the file extension from a to r or changes to the name or delete anything from the file in finder!!!
Help!!!
IT WORKS!!! THANKS !!!
This article was fantastic. I now have Magic Man by Heart loaded on my new iPhone. Thank you very much for this amazing resource.
Excellent tutorial with clear, concise instructions. Thanks for that. My problem seems to be different than the others. I can sync the ringtone and see it/choose it but I’d like to use new ringtones for text messages. Any ideas how to do that? TIA…
This tutorial is SUPERB!
Ive been paying double to get ringtones from itunes and for some songs they wont even allow me to make them into a ringtone. This helped me so much so THANK you a bunch this made my day.
Mate, thankyou VERY much ! The instructions were very easy to follow, and worked a treat ! Many thanks again :-)
Stuck on step 18??
Using windows..dnt no how to copy n make the 3rd clip of the song then the next step after that??
good stuff…very useful
I did everything and it copied the ringtones to the iphone. I’m using an iphone 3g. The new ringtones didn’t show up as an option to choose. SO, I did what I normally tell my clients to do when their PCs have issues. I restarted the IPhone. BINGO.. the ringtones are there. Try restarting the iphone if your not getting the ringtones in your ringtone list.
Thank you so much for the detailed and clear instructions! Worked out very well! I am so pleased with the outcome. Thanks!