Author: Alan

Review: Amazon Basics Wireless Bluetooth Keyboard for iPad

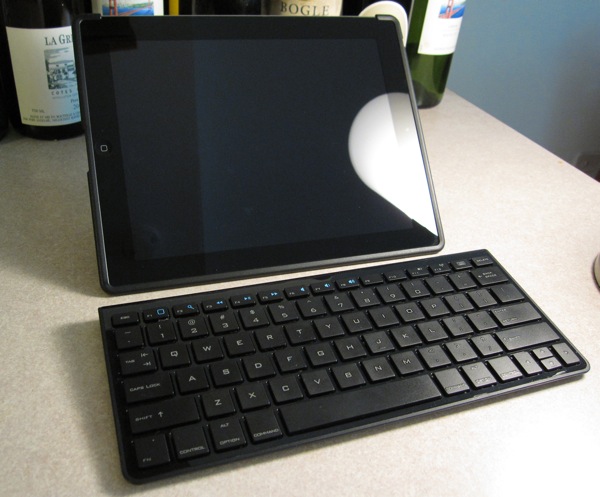
The Amazon Basics Wireless Bluetooth Keyboard for iPad ($45) really is designed “for the iPad” in the sense that it has several iPad-specific keys. A “home button” key works just like the iPad’s home button, bringing up the home screen when pressed and the iPad’s task bar when double pressed. The keyboard’s Spotlight Search key brings up, what else, the iPad’s Spotlight Search. The keyboard’s key arrangement also imitates Apple’s own keyboards, with special Apple keys like Command and Function, so it works great with Macs, too.

At $45, and with a slim, sleek profile, the Amazon Basics Bluetooth Keyboard makes for an inexpensive imitation of Apple’s own popular Wireless Bluetooth keyboard, which costs about $25 more ($69).

I took the Amazon keyboard for a spin for a few weeks with my new 3rd-gen iPad (and wrote most of this article on it), and compared it with the Apple Wireless keyboard, which I use on a daily basis. Check out my video and text reviews below.

Video Review

Text Review
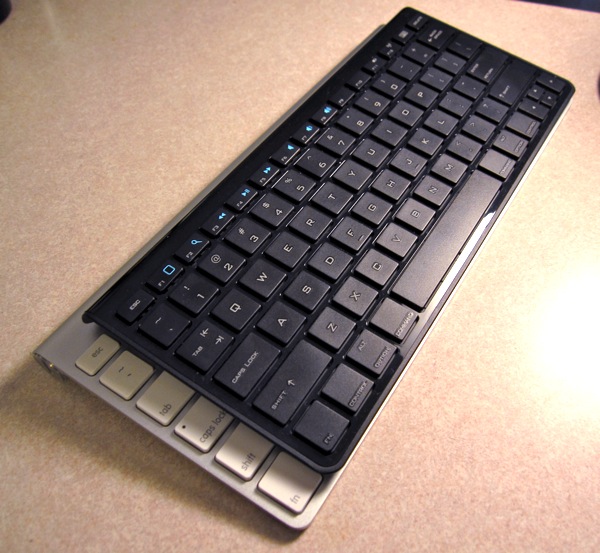
Typing. I found typing on the Amazon Basics Wireless to be comfortable, but not quite as comfortable as a regular desktop keyboard. The keys are slightly smaller and more cramped than the Apple Wireless keyboard, but the tighter spacing did not impede my accuracy or typing speed.

Just like most modern Apple keyboards, the Amazon keyboard keys are very quiet, with none of the reverberating clickity clack of conventional keyboards (although some people do love their old-school clickity clack). If you haven’t used a modern Apple keyboard, the “Scrabble tile” style keys take some getting used to. There’s a flat, dead feel to them at first. But in the long run, you’ll discover the keys require a lighter touch.

Weight. The Amazon Basics Wireless is an extremely lightweight keyboard, the lightest full keyboard I’ve used. It weighs only 9.6 ounces. That’s a few ounces lighter than the Apple Wireless, which weighs around 11.5 ounces.

Size. The keyboard is 10.4 inches wide, 4.6 inches tall, and 0.7 inches in height. For comparison, the Apple Wireless keyboard is 12 inches long, 6 inches wide, and .75 inches tall. Both are small when compared to desktop keyboards. The Amazon Basics keyboard will fit easily into any bag and maybe even a large purse.
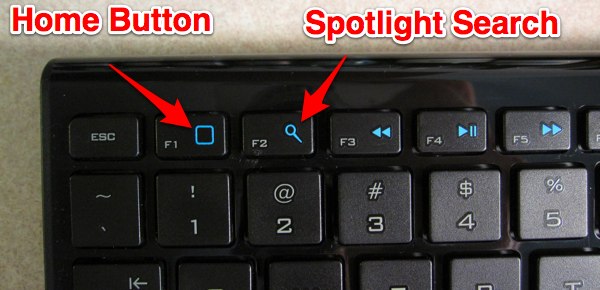
Special iPad Keys: The Amazon keyboard comes with some special iPad keys, each labeled according to their functionality:

  • Home Button key (F1): Pressing the Home Button key (F1) does what pressing the iPad’s home button does: brings up the home screen. You can quickly double press F1 to bring up the iPad’s app-switching task bar. The F1 key is decorated with the same rounded square as the iPad’s home button.
  • Spotlight Search key (F2). Pressing the Spotlight Search key (F2) brings up Spotlight Search on the iPad (are you starting to see a pattern?), where you can search for apps, contacts, etc, depending on what your Spotlight settings are. The F2 key is decorated with a magnifying glass.
  • Music/Video Controls (F3-F8). With this set of keys you can play, pause, skip forward, skip back, mute, increase volume, and lower volume. The keys are decorated with the corresponding track control symbols.
  • Battery Indicator (F11). The Battery Indicator (F11) key has a status light that will briefly glow green when you turn on the keyboard to let you know the battery is good. They key as an image of a battery on it.
  • Bluetooth Indicator (F12). The Bluetooth Indicated key (F12) has a status light that will briefly glow blue to let you know either if it’s searching for a connection or when its connecting.
  • The Keyboard key. Located next to the F12 key, this key simply has an image of a keyboard on it. Pressing it will bring up the touchscreen keyboard on the iPad (when available), and pressing it again will close it.

Key combinations. Some key combinations don’t work with the iPad, and some do. Command + i (italicize) doesn’t work, and Command + b (bold) doesn’t work either. But there are plenty of key combinations that do work. Here are a few.

Key combinations that do work on the iPad:

  • Command + c = copy
  • Command + v = paste
  • Command + z = undo
  • Command + a = select all
  • Command + Shift + arrow = select all text in a line and jump to beginning/end
  • Shift + arrow = select
  • Command + arrow up = move cursor to home
  • Command + arrow down = move cursor to end
  • Command + arrow left/right = move cursor to beginning/end of line
  • Option + arrow = places cursor at end/beginning of a word

Other Notes:

The Amazon keyboard for iPad has a nice on/off switch on the bottom of the keyboard. This is worth mentioning only because, annoyingly, the Apple wireless keyboard’s on/off button is poorly designed and can easily be accidentally pressed when stored in a bag, running down the battery.

The keyboard is powered by 2 AAA batteries. A pair are included with the keyboard.

The keyboard will also work with the iPhone and most computers, basically anything that is HID bluetooth-profile compatible. Because the key configuration is of the Apple (Mac) variety, there will be some awkwardness when used with a Windows computer (although still quite usable).

The keyboard comes with a 1-year warranty.

Gallery:

Review Summary

I can recommend the Amazon Basics Wireless Bluetooth Keyboard for iPad to anyone looking for a cheap, small, lightweight, but still comfortable bluetooth keyboard for the iPad. While the Apple bluetooth keyboard is slightly bigger, roomier, and has larger keys, the Amazon keyboard’s advantages are its cheaper price ($25 or more cheaper), its on/off switch (see my complaint above about the Apple’s on/off switch), and the fact that its keys are labeled with their corresponding iPad functionality (for example, the home button key has the home button symbol on it), which the Apple keyboard lacks.

Pros:

  • Comfortable to type on.
  • Light, thin, and portable.
  • Special iPad keys.
  • Relatively cheap $45 price tag.

Cons:

  • Keys are slightly smaller and more cramped than an Apple Wireless Keyboard

7-2-2012 Update: While everything in my review still stands as concerns using this keyboard with the iPad, I started to use the Amazon keyboard with my iMac when my Apple Wireless conked out and find it to be a terrible keyboard for that purpose. If the keyboard goes to sleep after not being used in a while, there is about a 5-second gap from when you type on the keyboard until the iMac registers anything. Often, what you initially type is lost or becomes jumbled. The Apple Wireless keyboard, on the other hand, always works the instant you start typing, regardless of how long you’ve been away from the keyboard.

The Best Stand for the iPad 3 Is Also a Case: the ZeroChroma Vario-SC (Review with Video)

I’ve tried several stands for the iPad and they’ve all pretty much ended up collecting dust. The problem with most iPad stands is lack of versatility—not enough viewing angles and they’re a hassle to lug around. So why spend 50 bucks on a stand that will mostly sit on your desk and rarely be used? That’s why ZeroChroma makes my favorite stand for the iPad. Except the ZeroChroma isn’t just a stand, it’s also a case.

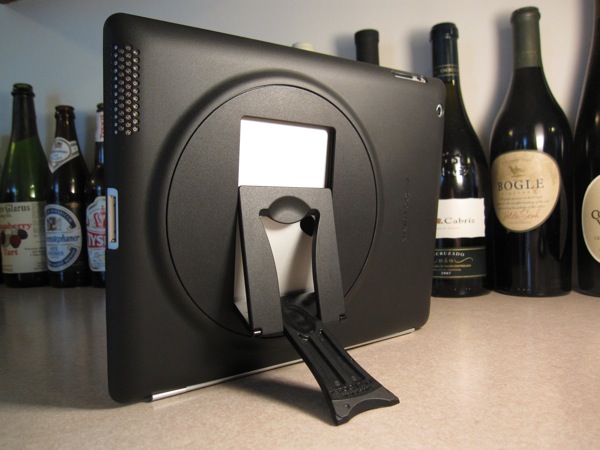
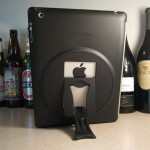
The first thing I did when I got my new iPad was order the ZeroChroma Vario-SC case, which has a sweet built-in rotating stand. The stand can rotate 360 degrees and hold up the iPad in 10 different angles in portrait, landscape, or anything in between. I have used similar ZeroChroma cases with the iPhone 4 and the first iPad and have loved the added functionality the built-in stands bring to the devices. You’ve got to love an accessory that makes a powerfully useful device even more useful. The ZeroChroma Vario-SC is also compatible with Apple’s Smart Cover, hence the “SC” in its name.

Video Review:

Text Review:

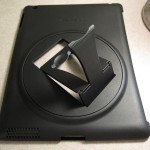
The Stand. The ZeroChroma’s stand is attached to a circular piece of hard plastic that can be rotated 360 degrees. The fact that it rotates comes in handy more than you think, as you can use the stand not only on desks and tables, but also on uneven surfaces like a couch, bed, or pillow.

The stand itself is a hard piece of plastic with two rubber-covered tips. To use the stand, you pull it out with your finger. The stand “clicks” into 10 different angles (ZeroChroma says 11, but I counted 10). The stand is sturdy enough to hold up the weight of the iPad as well as a reasonable amount of pressure from finger taps. Of course, if you apply enough pressure, the stand will collapse, but for general use it’s fine.

Overall, the stand is awesome—the best I’ve ever used thanks to how versatile it is and the fact that it’s always there. Knowing that I can always have the iPad propped up at just the right angle has made me more likely to use the iPad for a variety of tasks, whether it’s propping up the iPad on a seat tray on an airplane or in the kitchen for using the iPad as a cookbook. Whenever I need to prop up the iPad, it’s just there. And at any angle I choose.

Smart Cover. The ZeroChroma is compatible with Apple’s Smart Cover. Both can be attached at the same time. The duo makes a good team, with the ZeroChroma protecting the rear and the Smart Cover the front. And of course you get all the Smart Cover’s benefits (auto-shutoff of the iPad’s screen when you close the cover and the microfiber interior which cleans the screen) in addition to the ZeroChroma’s stand. That’s a lot added functionality.

I did experience a few awkward moments where the Smart Cover interfered with using the ZeroChroma’s stand. Usually I could figure out a way to fold the Smart Cover so that it didn’t get in the way. But most of the time I found it best to temporarily remove the Smart Cover altogether instead of bothering with it.

There is one trick the where the ZeroChroma’s stand and Smart Cover work together to create a “laptop.” If you’re sitting on a chair without a surface to place the iPad on, you can lay the Smart Cover across your lap and prop up the iPad with the ZeroChroma’s stand, all without removing either accessory. I never liked using a laptop on my lap much less the iPad, but it’s nice to have the option.

Materials: Hard Plastic With Soft Plastic When the ZeroChroma isn’t on the iPad, it actually feels thin and kind of flimsy. Most of the case is made of a bendable soft plastic. The case is of the slip-on variety: you slip the case around the edges and corners of the iPad.

The stand section of the case, which includes the circular rotating part and the stand itself, is made of a hard plastic.

Protection? Simply put, the ZeroChroma is not a great case for protection against accidental drops. It’s much too thin to provide any but the smallest amount of shock absorption. Even with the Smart Cover, there’s not much protection there for accidental drops. The duo does, however, provide excellent total protection for other kinds of wear and tear (scratches and scrapes).

Grip. The manufacturer describes the ZeroChroma Vario-SC as being made of “Super-Grip” material. If by “Super-Grip” they mean the case is nearly as slippery as a naked iPad, then yes, you could call it that.

The only really benefit the case provides in this area is that the slightly textured plastic makes the iPad feel a little more comfortable in the hand. I’m not a fan of the new iPad’s sharp edges and cold metal backing, so any sort of material other than metal makes it feel more comfortable to hold.

Small complaints. The case does have a few other minor flaws. It’s a somewhat ugly case, with part of its rim missing to make room for the Smart Cover to be attached. And the protruding circular area for the stand is an awkward eyesore. The matte black color helps hide some of that awkwardness.

I also noticed that sides of the ZeroChroma did not fit as snug as I’d like and would occasionally slip off and have to be tucked back on. This problem is mostly due to the bendable plastic and not that the case is too big. I should clarify that the case itself doesn’t come off, just the side rims will bend so that they slip under the iPad’s sides.

Gallery:

Review Summary

This is actually the third ZeroChroma product I’ve owned. I’ve had their ZeroChroma Teatro for iPhone 4 and the ZeroChroma for the first iPad. So I’ve had years of experience using their case/stand combo (the stand design hasn’t changed much) and have found the added functionality so useful, it was the first thing I bought for my new iPad 3. I won’t say it’s a perfect case. It doesn’t provide great protection, and it’s not a great-looking case. It is, however, the best stand you can buy for the iPad.

Pros:

  • Best, most useful stand for the iPad I’ve come across.
  • Rotating stand means you can hold up the iPad at almost any angle.
  • Compatible with Apple’s Smart Cover.
  • Stand is always there when you need it.

Cons:

  • Not a great case for protection—not much shock absorption.
  • Kind of ugly.
  • Rim of case can occasionally become loose and tucked under iPad’s sides.

Review: JayBird Freedom 3 Sweatproof Sports Bluetooth Earphones

The JayBird Freedom 3 ($99) are sweatproof wireless bluetooth earphones designed for athletes, and they come with a lifetime warranty against damage from sweat. They also have a built-in microphone and three-button music/call controls compatible with the iPhone. As a runner who runs with my iPhone, I was excited to give them a spin, especially since I’ve yet to find a decent bluetooth earphone solution that will stand up to a good sweat drenching. The good news, so far, is that the JF3 look like they’re it.

Durability is perhaps the most important attribute for sports headphones. More specifically, durability against sweat. I’ve been using the JF3 for 3 months now, and I’ve put them through a dozen long, sweat-drenching runs. So far, the JF3 remain unscathed. While the lifetime warranty against sweat damage gives me some peace of mind, it’s still nice to know I won’t be replacing them every 5 workouts, unlike other “sweatproof” earphones I’ve reviewed recently.

The JF3 get around 6 hours of continuous usage battery life (for music/calls) and 250 hours of standby. 6 hours isn’t all that great for bluetooth headphones in general, but a compromise was likely made to keep the headphones lightweight, which they are, weighing around 5 ounces each (which is light for bluetooth earphones, not so much for regular earphones). 6 hours will get you through two maybe three workouts, but after that, you’ll have to charge.

Sound quality is not top priority for sports headphones, but that doesn’t mean they should sound bad either, especially if you’re shelling out your hard-earned money. I’m pleased to say the JF3 are surprisingly good sounding earphones. They push a good level of volume for use in noisier environments and have a meaty lower end that should satisify bass lovers. If I had a complaint, it’s that the mids and highs suffer loss of clarity, which is typical of bluetooth headphones. I’ve used them in both a noisy gym and while running outdoors, and never had a problem hearing music/podcasts nor a complaint for music sounding thin or weak. I would describe the sound quality as on par with the default iPhone earphones.

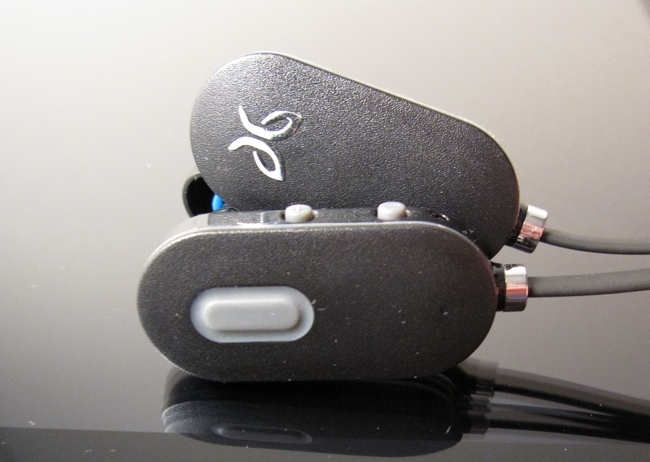
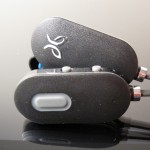
The JF3 have some nice design touches for athletes. The buttons are easy to use while running, meaning they are well located and tactile enough to be used blindly. There are 3 buttons in total, all on the right earphone. There’s a large rubber call/music button in the center of the earphone, and two small volume buttons located on the upper rim.

The JF3’s buttons can do just about everything the default iPhone headphone’s buttons can do, although the functionality of the button presses is a little different. For example, to advance to the next music track with the JF3, you press and hold the volume-down button instead of double clicking, as you would with the default iPhone headphones.

The JF3 aren’t exactly stylish headphones. You won’t win any fashion shows with them on. Each earphone is the size of a large black Lego block. Combine that with the flat fettuccine-like neck cord that runs between them, and you’ve got a pair of awkward-looking headphones. It’s like wearing two sets of bluetooth headsets (the ones designed for phone calls), which essentially you are. But I wouldn’t call the JF3 a total monstrosity—the headphones are small enough that little children won’t point and laugh at you as you run by, but you won’t look cool either.

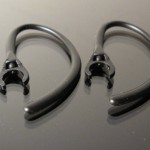
To keep the earphones from falling off while exercising, the JF3 come with a set of detachable earloops and 3 sizes of detachable earfins. The earloops wrap over the ear and won’t allow the earphones to fall off. The earfins tuck inside the crevices of your ear and keep the eartips stable. The earloops are definitely the better performing of the two, and because of the extra weight from the built-in rechargeable battery and electronics, necessary for using the earphones comfortably.

One of the annoyances of the headset is a low battery indicator that will chime in the ear every 20 seconds when the battery is low. This basically makes the earphones impossible to use with a low battery. I’d rather have a more subtle warning and be able to completely drain the headset’s battery.

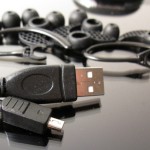
The earphones charge via a USB cord. One end is a regular USB connector, and the other is a mini-USB, which plugs into the earphones. Unfortunately, there is no wall plug (ie, AC adapter, sold separately), so you’ll need to charge it via the USB on your computer or other powered USB source. It takes about two hours to fully charge.
The JF3s come with a nice set of accessories. Included are 3 sets of different size eartips, 3 sizes of earfins, a pair of earhooks, a USB cord for charging, a cool clamshell-style carrying case with a magnetic clasp.

Gallery:

Review Summary

The JF3 are the first bluetooth headphones I’ve come across that I can highly recommend for athletic use. They are durable against sweat (and come with a lifetime warranty against sweat), they sound good for bluetooth earphones, and they get every design element right for use while running and exercising.

Pros:

  • Sweatproof
  • Comes with lifetime warranty against sweat damage
  • Detachable earloops and earfins for sport usage.
  • Good bass and solid level of sound for use in noisy environments.
  • Tactile buttons allow for comfortable use while running.
  • Three-button controls and microphone mean they’re iPhone compatible.
  • Nice hardshell carrying case.

Cons:

  • Awkward looking
  • Average battery life (around 6 hours for music/call usage)
  • Heavier than most non-bluetooth earphones
  • Annoying low battery sound makes earphones impossible to use with low battery
  • Slow to charge

The Verge Reviews Styluses for the iPad

The Verge’s Ellis Hamburger has published a sweet review of several iPad styluses and created a nice video summary review to go along with it. He tested the styluses while using the new Paper iPad note-taking app.

His top picks are the Wacom Bamboo Stylus ($30) and the Adonit Jot Pro ($30), but cautions that no stylus offers a great experience, just mediocre in general, as writing on glass with a pen just wasn’t meant to be.

A Major Downside to the New iPad’s Personal Hotspot Feature

A few weeks ago, I reviewed the LTE connectivity of the new iPad and basically loved everything about it. The speed, the ease of use, all great. I especially loved how the Personal Hotspot was free (after you purchase the data plan, that is). But since writing that review, I found something that I don’t love about the Personal Hotspot feature: the fact that it automatically shuts off when the connection is not being used. A good Wi-Fi network this does not make.
Here’s the problem in a little more detail. If you turn on the iPad’s Personal Hotspot feature, you have around 90 seconds to connect a device to it before it stops broadcasting itself as a Wi-Fi network. Once you do connect a device like an iPhone and start listening to, say, the Pandora Radio app, you have to keep streaming data and never ever stop or else, after a few minutes, the iPad will shut off the Wi-Fi network, and won’t let you reconnect.

Basically, if you stop using the Personal Hotspot for only a few minutes, you have to go through annoying steps to reactivate it. You have to grab your iPad, open up the iPad’s Settings, swipe the Personal Hotspot tab to Off, then swipe it to On again. Each time. Annoying.

The only solution is to continually download data. I found that a radio app with a low-bandwidth radio stream works nicely. For example, a 32 kbps streaming radio stream uses only 14 MB per hour. Still, that adds up over time. If someone knows of apps that sip small chunks of data continually over time and that work in the background, leave a note in the comments.

What’s the reasoning behind making it work this way? From Apple’s perspective, you could argue that it’s battery life, but Anandtech’s tests show that the new iPad can last 25 hours as a Personal LTE Hotspot, probably a lot longer if it is simply in a broadcast mode and not downloading data. It’s more likely that Verizon wants to prevent congestion on their new LTE network. By limiting its functionality, Verizon keeps people from using it like a regular old Wi-Fi network/router. But still, we paid for the 2 GB of bandwidth, we should be able to use it how we want.

iPad Basics: Multitasking Gestures Using Four or Five Fingers

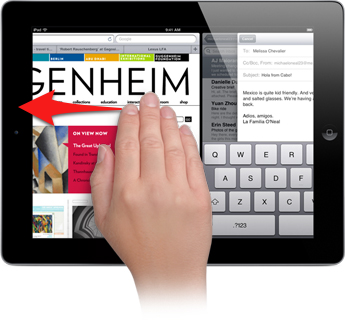
Multitasking gestures are a relatively new iOS feature (introduced in iOS 4.3) that currently work only on the iPad due to its larger screen. Once activated, multitasking gestures allow you to use four- or five-finger swipes to quickly switch between apps and thus improve your multitasking performance on the iPad.

Note that these gestures will not work on the first-gen iPad, only the iPad 2, iPad 3, and newer.

How to Turn on Multitasking Gestures

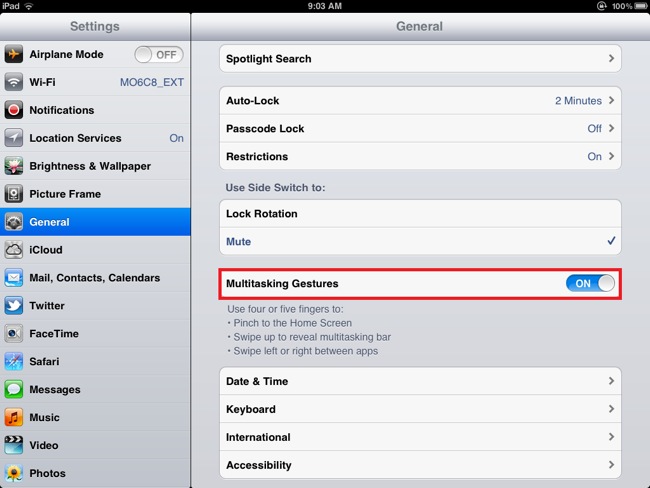
To activate multitasking gestures, go into the iPad’s Settings–>General and slide the Multitasking Gestures to On.

The Four-Finger Swipe

Swipe Left. While in an app, swipe to the left with four fingers and the entire screen will slide over, switching to the second most recently used app. Keep swiping to the left, and you’ll cycle through your most recently used apps.

Then Swipe Right. After four-finger swiping to the left, you can then swipe to the right and you’ll cycle the other way through your apps.

One thing to note is that once you switch to another app using a four-finger swipe and use that app, you can once again swipe left or right again; however, if you switch to another app without using multitasking gestures, you’ll no longer be able to four-finger swipe to the right until your first swipe left—in other words, the recently-used-app-order resets itself with your current app at the front of the line.

Swipe Up. Swipe up with four fingers and you’ll bring up the task bar, just like double-clicking the home button.

Swipe Down. After swiping up to bring up the task bar, you can swipe down to close. Easy peasy.

The Four-Finger Pinch

Pinch. While in an app, if you pinch the screen with four or five fingers, you’ll “close” the app and be taken to the home screen. A four-finger pinch has the same effect as a single-click of the home button.

Tip: How to Add Your Favorite Major League Baseball Team’s Schedule to Your iPhone’s Calendar

It’s that time of year again, the crack of the bat, the smell of freshly cut grass, the steroid-powered home runs. Yes, it’s baseball season again. If you’d like to add your favorite team’s schedule to your iPhone’s calendar, the following are instructions on how to do so. (Also check out my article on how to quickly add Holidays as well).

How to Add a MLB Team’s Schedule to Your Calendar:

1. Open your iPhone’s browser and go to http://www.mysportscal.com/mlb.html

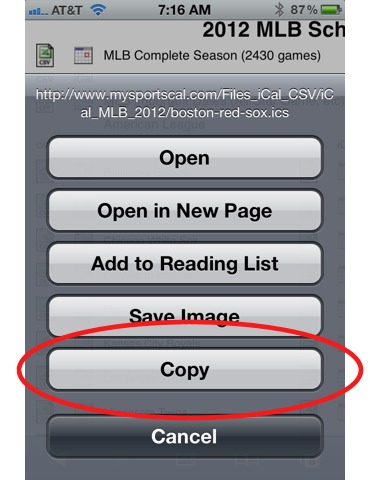
2. Important, Read Carefully: Find your favorite team’s iCal icon and hold your finger on it until a pop-up menu appears, DO NOT tap the icon (adding the schedule that way is quicker but has repercussions. See Notes below).

3. Tap Copy (this will copy the team calendar’s link):

4. Press the home button and open Settings:

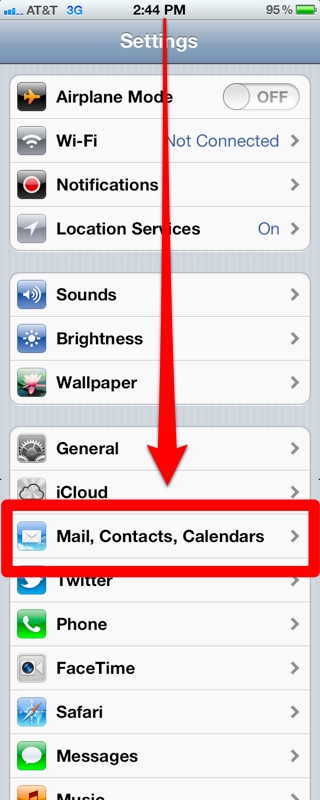
5. Scroll down and tap Mail, Contacts, Calendars:

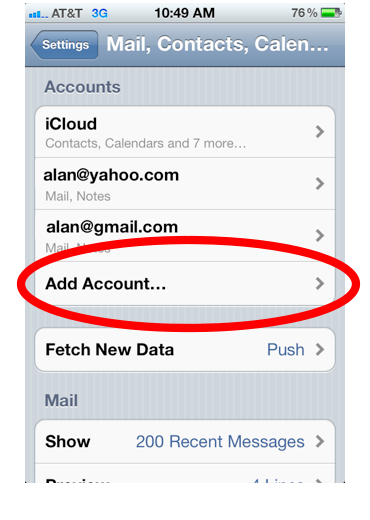
6. Tap Add Account:

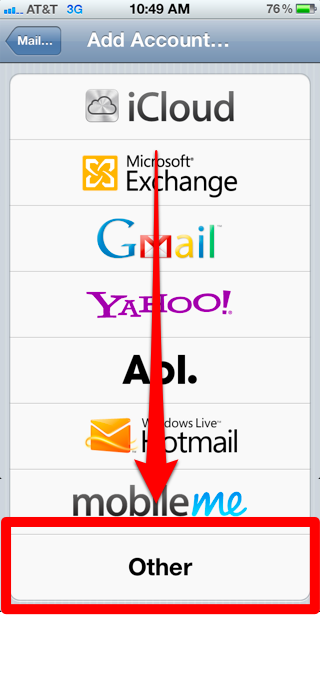
7. Scroll down and tap Other:

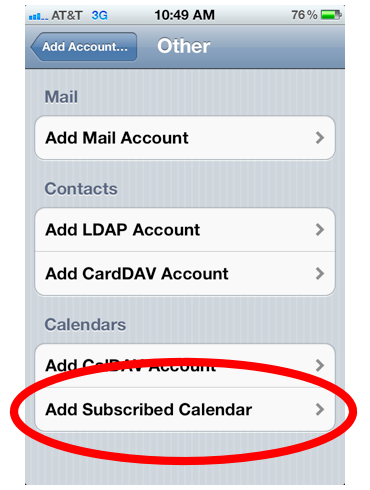
8. Tap Add Subscribed Calendar:

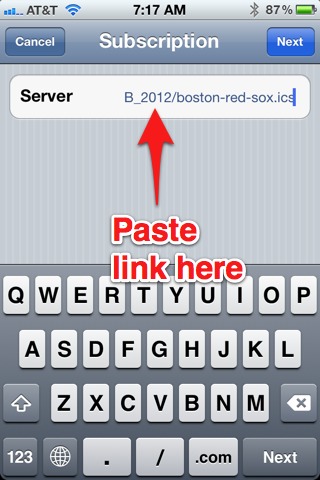
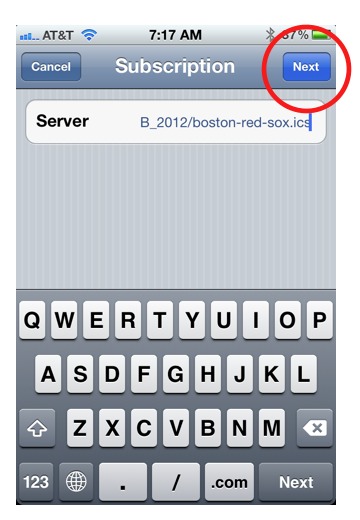
9. In the field next to Server, paste in your iCal link (to paste, hold your finger down in the field until a pop-up box appears with the paste option):

10. Tap Next:

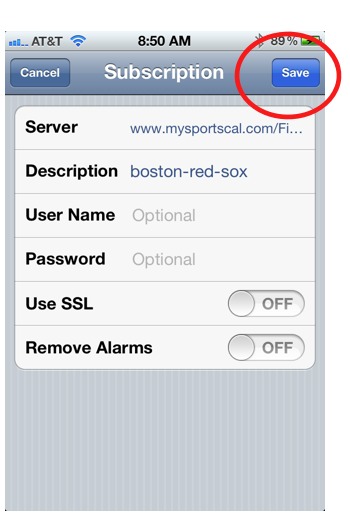
11. Tap Save:

And that’s it, you’ve added your team’s schedule to Calendar. Tap a game and check it out. It shows the game’s start time, probable pitchers, and even a link to the game on mlb.com. You also may note that your calendar is all clogged up with baseball games. Read on for how to quickly hide all those games (and bring them back).

How to Hide the Games

You may quickly notice that all those games clutter up your calendar. You can quickly hide/show the games with the method below:

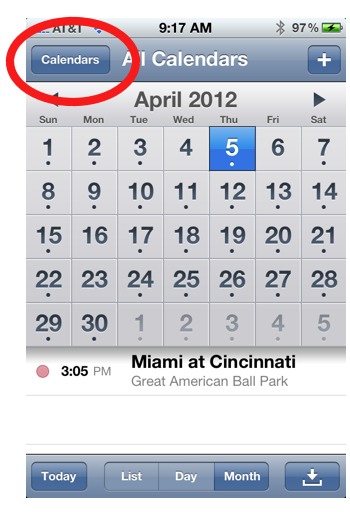
1. In the Calendar app, tap Calendars:

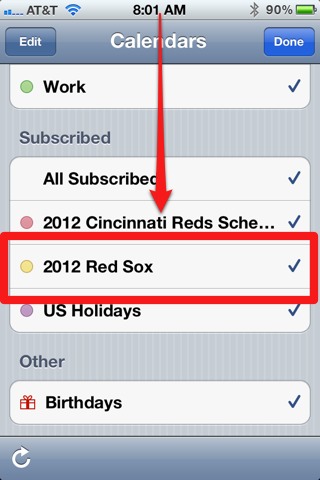
2. Scroll down and uncheck the subscribed team’s calendar by tapping it:

Bam, all the games are now gone from Calendar. Repeat the process to bring them back. You can also completely delete the calendar by going to Settings–>Mail, Contacts, Calendar–>Subscribed Calendars–>Tap the calendar–>Tap Delete Account.

Notes:

  • As noted in Step 2, I advise against simply tapping on the iCal link at MySportsCal.com and quickly adding the schedule that way. Using that method, you’ll have to delete the games one-by-one if they annoy you. My instructions above allow you to remove all the games at once by either deselecting the subscribed calendar or deleting the subscribed calendar all together.

Basics: How to Save Pictures From the Web on the iPhone (and iPad)

If you see a picture you like while browsing the Internet on your iPhone, you can easily save those photos to your iPhone’s Camera Roll. Here’s how.

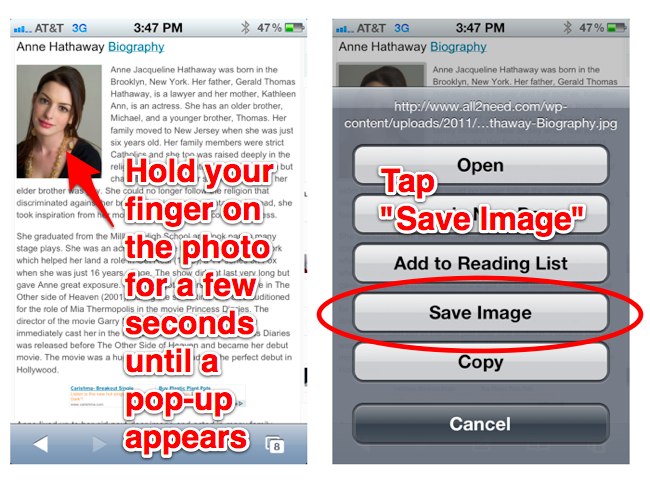
While using the iPhone’s web browser, you can save a photo simply by holding your finger on the photo for a few seconds. A pop-up box will appear with a few options, one of which will read Save Image, as seen below:

To save the photo, tap Save Image. It will be saved to the iPhone’s Camera Roll alongside your other photos.

Endnotes:

  • Note that you can also tap Copy. You can then paste the photo into any app that will allow you to insert photos, like in an email (in the Mail app) or in Pages (Apple’s word processor). To paste, simply hold your finger down on the insertion point, then from the pop-up menu that appears, tap Paste.
  • If a website prevents you from saving the photo, just take a screenshot instead by pressing the sleep and home buttons at the same time.

iPhone Tip: How to Remove the “Sent From My iPhone” Email Signature

If you’ve ever received an email from someone with an iPhone, you may have seen it. Sent from my iPhone, it reads. Some find it annoying, like the person is bragging about their fancy smancy iPhone. Others, like me, think it gives the email context, as in: I sent this while on the go so please excuse the short response and my touchscreen-keyboard spelling errors. In any case, you can either delete or change that message to read however you like. Here’s how.

Step-by-step instructions:

1. Open Settings:

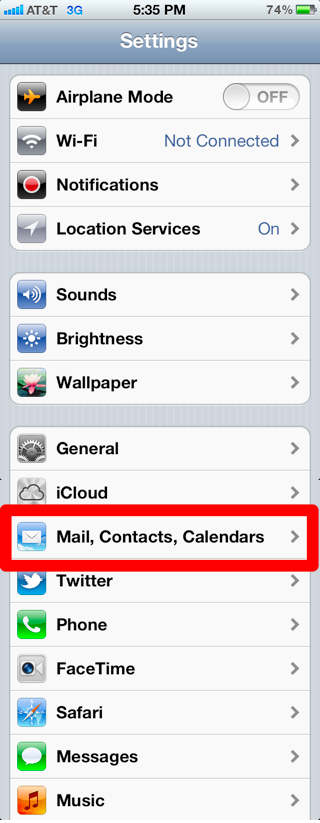
2. Scroll down and tap Mail, Contacts, Calendars:

3. Scroll down and tap Signature:

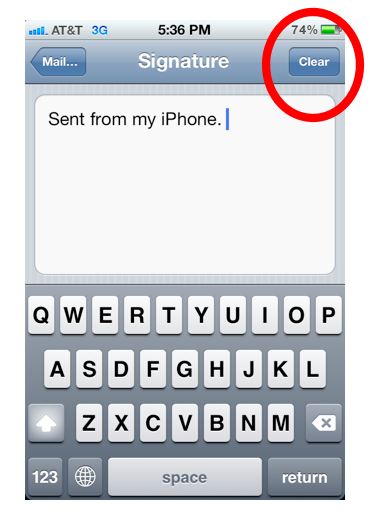
4. Tap Clear, or change the text to whatever you want:

5. When finished, simply press the iPhone’s home button.

iPhone Tip: Find My iPhone Will Make Sound Even If Ringer Switch Is On Mute

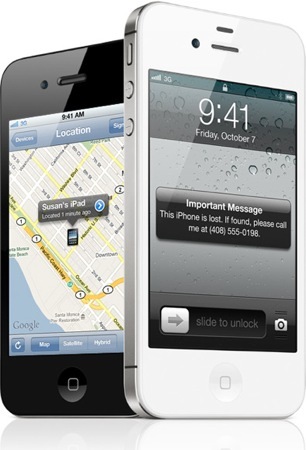
Have you ever “lost” your iPhone in between the couch cushions or in the tangle of sheets on your bed? Then you should know that Find My iPhone can help you find it by forcing your iPhone to emit a beeping sound, allowing you to track down your iPhone in your home.

But what if you’re like me and keep the iPhone’s ringer switch on mute most of the time? No worries, Find My iPhone will still force your iPhone to make a beeping noise, even with the ringer switch on mute.

Want to know what other sounds the ringer switch doesn’t mute. Check out my article titled What Does the iPhone Ringer Switch Mute (And Not Mute)?