Author: Alan

Tip: Quickly Insert Emoji Using iPhone Text Shortcuts

Everyone loves emoji, the cute little icons most commonly used in text messages. But inserting them can be a lumbering, multistep process. Here’s a much quicker way to insert emoji using the new text shortcuts feature on the iPhone. Just follow the step-by-step instructions below for a one-time setup. Then you’ll be able to instantly insert emoji by typing just a few characters.

1. Make sure you have emoji activated. They are not turned on by default (you only have to activate them once). Follow our instructions on activating them.

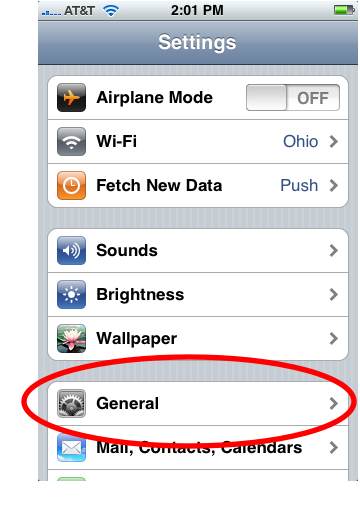
2. Once emoji are activated, open the iPhone’s Settings and tap General:

General in iPhone Settings

3. Scroll down and tap Keyboard:

4. Scroll down and tap: Add New Shortcut…:

5. In the field labeled Phrase, insert the emoji. (You can access the emoji keyboard by tapping the globe icon on the keyboard):

6. Now, in the shortcut field, type in a combination of characters that will turn into the emoji. Pick an uncommon combination of characters to help prevent accidental auto-correction from occuring, but also pick something that will help you remember the shortcut. For example, for a shortcut for the heart emoji, you may want to use the letters hht, as it’s not a common combination of letters and the two H’s will allow you to quickly type the characters.

7. To finish, tap Save:

And that’s it. To test your new emoji shortcut, type in your shortcut anywhere you can enter text on the iPhone, tap spacebar, and your cute little emoji will appear!

Notes:

  • Emoji first gained popularity in Japan, but thanks to the iPhone, they are growing in use in the US. Even Gmail now supports them.
  • Did you know that you can use emoji in the names of your app folders? For example, you could use the hamburger emoji to label a folder of restaurant apps.

How to Add Words to the iPhone’s Dictionary

You can add words to the iPhone’s spelling dictionary to prevent the iPhone’s auto-correct feature from automatically fixing them. To do this, however, you must add the words to a very unobvious place on the iPhone: in the iPhone’s “text shortcuts.” Below are step-by-step instructions on how to add words to the iPhone’s dictionary.

1. Open Settings:

2. Tap General:

General in iPhone Settings

3. Scroll down and tap Keyboard:

4. Scroll down and tap: Add New Shortcut…:

5. In the field labeled Phrase, type in the word. Do not type in anything in the Shortcut field.

6. Tap Save:

And that’s it, you’ve added a word to the iPhone’s spelling dictionary. Now the word will no longer trigger autocorrect.

Notes:

  • The feature that automatically fixes the spelling of words is called Auto-Correction. You can turn the feature off in Settings–>General–>Keyboard, then swipe the Auto-Correction tab to Off.
  • You can find tons of funny (and embarrasing) auto-correct mistakes at the Damn You Auto-Correct blog.

How to Add Text Shortcuts on the iPhone and iPad

A text shortcut is a new time-saving feature on the iPhone that allows you to type just a few characters and turn them into much larger words and phrases. By default, Apple has provided one default shortcut: omw, which expands into on my way. To view it, simply type omw anywhere you can type text on the iPhone, then tap the spacebar. Shortcuts can be useful for quickly inserting email signatures, unusual words not found in the iPhone’s dictionary, or common long phrases you use, like “Love you Snookums Snookums.”

You can easily add your own text shortcuts. Below are step-by-step instructions on how.

1. Open Settings:

2. Tap General:

General in iPhone Settings

3. Scroll down and tap Keyboard:

4. Scroll down and tap: Add New Shortcut…:

5. Type in the phrase and its corresponding shortcut:

6. Tap Save:

Notes and Tips:

  • Shortcuts work system wide on the iPhone, so anywhere you can type in text, you can use shortcuts.
  • Unfortunately, there are no line breaks for text shortcuts. The text can only expand into one continuous line.
  • For your shortcuts, try to use unusual combinations of letters, like aaz, to prevent accidental use of shortcuts. But also try to create shortcuts that will help you remember them. For example, if you wanted a shortcut for John Smith Jr. III, you might create the acronym jsj, which uses the first letter of each word.
  • Entering in a phrase without a shortcut is a way to add words to the iPhone’s dictionary. This is actually Apple’s official method for adding words to the iPhone’s dictionary. You’ll note, when creating a shortcut, the word Optional appears in faint gray text in the Shortcut field.
  • You can use emoji with shortcuts too.

How to Force the iPhone to Shut Down and Restart

There may be times when the iPhone suddenly freezes or its screen goes dark with the power still on. Don’t panic or run to the Apple Store quite yet, simply force a shutdown and restart it. To do this, hold down both the sleep and the home buttons for several seconds until you see the Apple logo appear.

Tip: How to Force an App to Quit on the iPhone/iPad

If an iPhone/iPad app freezes or becomes stuck, you can force that app to quit with two steps:

1. Press and hold down the iPhone sleep button until Slide to Power Off appears:

2. Press and hold the home button until the app quits:

This method will completely shutdown the app and clear the app’s saved state from the iPhone’s memory. When the app quits, you should be taken back to the iPhone’s home screen.

Notes:

  • If you double-click to bring up the iPhone’s app switcher bar, you’ll note that the forced-quit app’s icon still appears in the list of apps (it will appear first in the list). However, if you tap the app to launch, it will launch a fresh version of the app—in other words, it won’t launch the app from its previously saved state.
  • If you want to close the app in the app switcher bar too, simply hold your finger on the icon until it starts wiggling, then tap the red circle with the white minus sign in it.

Tip: How to Rename Your iPhone or iPad

Your iPhone has a name. You’ll see it in iTunes in the left sidebar when the iPhone/iPad is connected. You may not remember, but you gave it that name when you originally set up your iPhone/iPad. You’re not stuck with it though, it can be changed right on the iPhone itself or in iTunes. The following are step-by-step instructions on changing your iPhone’s name, both on the iPhone and in iTunes.

How to Change Your Device’s Name on the iPhone/iPad:

1. Open Settings:

2. Tap General:

3. Tap About:

4. Tap Name and enter in a new one:

How to Change Your Device’s Name in iTunes:

Changing your iPhone/iPad’s name in iTunes is even easier. Here’s how.

1. Connect the iPhone/iPad to iTunes either by the USB cable or through Wi-Fi Synching:

2. Double click on your device’s name in the left sidebar and enter in a new name:

Notes:

  • Make sure to give your device a unique name. The more iPhones, iPads, iPods, and AppleTVs you connect to your computer’s iTunes, the more confusing your sidebar could get. I like to include the type and generation of the device in its name, ie, Alan’s iPhone 4, to help avoid confusion.

How to Add a Pause to Telephone Numbers on the iPhone

You can easily add pauses to phone numbers on the iPhone for those times when you need to dial into automated phone systems or use calling cards. It’s pretty simple, just hold your finger on the * key until you see a comma appear in the phone number. Each comma equals a 2-second pause.

Please note that you can’t begin a phone number with a pause, there must be a least 1 number in the phone number before you can add a pause.

Using Apple’s New Self-Checkout at the Apple Store (Video)

Cult of Mac’s Leander Kahney put together this nice video of himself using Apple’s new EasyPay system at an Apple Store. EasyPay allows shoppers to do self checkout on many items in the Apple Store using their iPhone. The process requires the official Apple Store app (free).

Leander notes that you can’t purchase big ticket items like iPhones, iPads, and Macs via EasyPay, you’ll still need to find an Apple employee for that.

If you haven’t been in an Apple Store in a while, this is a sorely needed service. When I went to purchase headphones at the Lincoln Park Apple Store in Chicago, there was one employee handling purchases in a crowded store on a Saturday. There was no identifiable cash register area in the store. It was a poor, albeit unique, shopping experience.

How to Quickly Add All U.S. Holidays to the iPhone or iPad’s Calendar

There’s no need to enter holidays into the iPhone’s calendar one by one. There’s a much easier way. In fact, if you’re reading this on an iPhone or iPad, simply tap this link to add all US Holidays to your calendar. If you’d rather do it manually, below are step-by-step instructions on adding US Holidays to your iPhone calendar. Also see the Notes section at the end of this post for more useful calendars.

1. Open Settings:

2. Scroll down and tap Mail, Contacts, Calendars:

3. Tap Add Account:

4. Scroll down and tap Other:

5. Tap Add Subscribed Calendar:

6. Next to Server, type in files.apple.com/calendars/US32Holidays.ics:

7. Tap Next:

8. Tap Save:

That’s it. Now launch the Calendar app and flip through it to see the US Holidays.

Notes:

  • You can find and add more calendars to your iPhone at icalshare.com.
  • Subscribed calendars are read only—you can’t edit the events or add new ones.
  • Many Internet companies have compatible calendar-subscription services, including Google and Yahoo.

Basics: How to Delete Individual or Multiple Text Messages on the iPhone

It’s now possible to delete individual text messages on the iPhone (previously to iOS 5, you had to delete whole conversations). Below are step-by-step instructions on how to delete individual or multiple text messages at the same time on the iPhone.

1. Open the Messages app:

2. Tap Edit in the top right corner:

3. Tap the circles next to messages you want to delete. A red circle with a white checkmark will appear next to messages selected for deletion:

4. Tap Delete:

Notes:

  • You can also delete entire conversations at once. Here’s how: If you’re in a specific conversation, tap Messages in the top left corner to take you to the conversations view. Now tap Edit in the top left corner. Tap the red and white circle that appears next to the various conversations, the tap Delete.
  • You can also forward specific text messages to other contacts as well. In a conversation, hit Edit in the top right corner, tap the circle next to the message you want to forward, tap Forward in the bottom right, choose a contact and hit Send.