Category: iPhone Basics

Basics: How to Rotate a Photo on the iPhone/iPad (Without Using a Third-Party App)

If you need to rotate and save a photo on the iPhone so that it’s in the correct orientation, you can do so inside the default Photos app, without using a third-party app. In fact, the Photos app includes a few basic photo editing tools, like crop, fix red-eye, auto-enhance, and rotate. Below are step-by-step instructions on how to use the rotate tool in the Photos app.

1. Open the Photos app:

Photos app icon

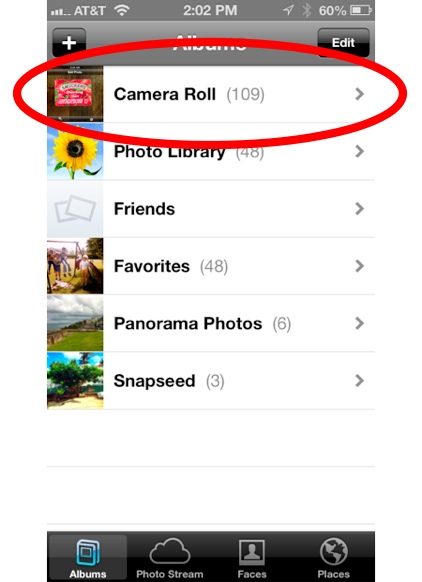
2. Find the photo you want to rotate (it will likely still be in the Camera Roll album if you took it recently):

Camera Roll inside Photos iPhone app

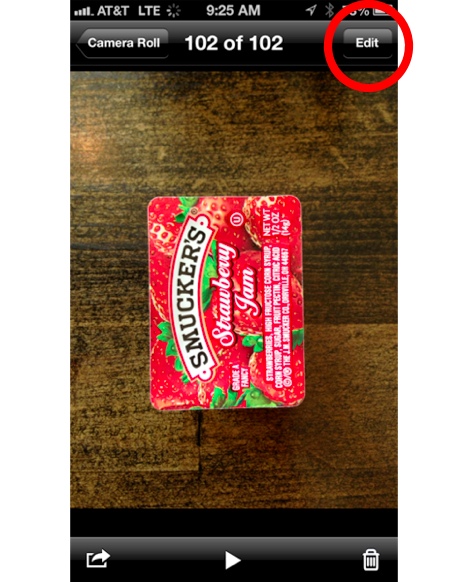
3. Tap Edit in the top right corner (if you don’t see Edit, tap the screen once to make menu options appear):

Tap Edit in top right corner of iPhone photos app

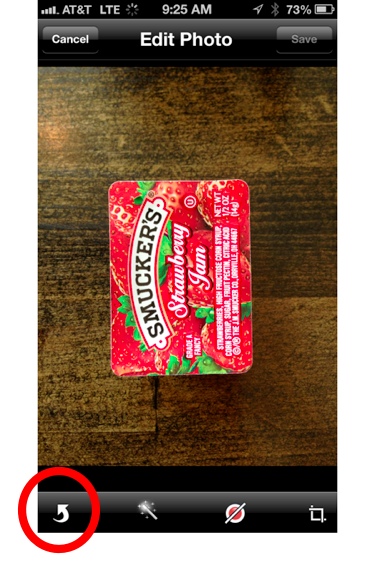
4. Tap the curved arrow in the bottom left of the screen to rotate the photo:

Tap Curved Arrow to rotate

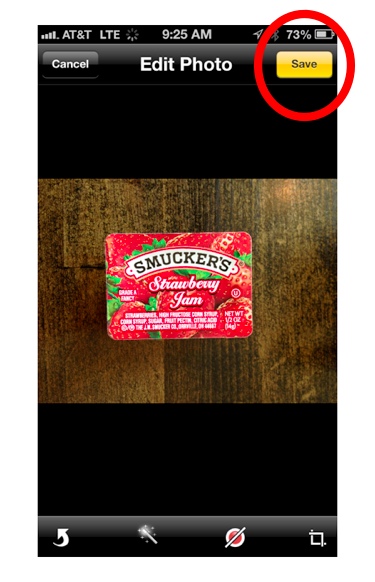
5. Tap Save to save the changes to the photo:

Tap Save

And that’s it, you’ve rotated the photo and saved the changes. Now, whenever you, or anyone else you send the picture to, views the photo, it will be in that orientation.

iPhone Basics: the iPhone Alarm Clock’s Snooze Button(s)

iPhone clock app

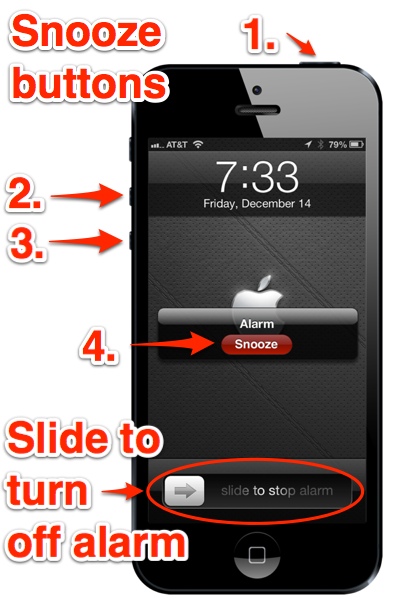
The iPhone’s default Clock app has an alarm clock feature that many people, including me, use to wake them up in the morning. And like most alarm clocks, it has a snooze feature. When snooze is activated, it will delay the alarm from sounding again for 9 minutes. So how do you hit snooze? The iPhone offers 4 ways:

Snooze buttons on iPhone

The snooze buttons are:

  1. Sleep/wake button on top
  2. The up volume button on the side
  3. The down volume button on the side
  4. The Snooze button on the iPhone’s screen

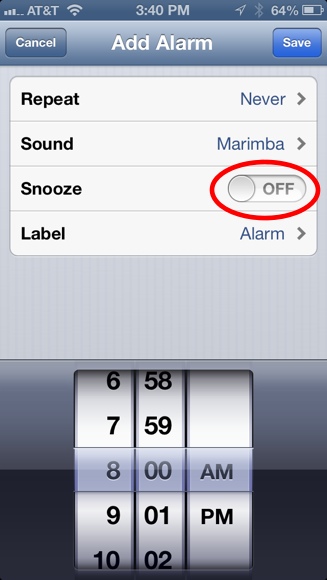
To fully shut off the alarm, you must do the swipe-to-unlock gesture. There is, however, an exception to that rule. If you turn off the snooze option when creating the alarm (see example below), then the sleep/wake and volume buttons will shut off the alarm instead of acting as a snooze button.

Set to snooze to off

How to Turn On and Use Guided Access in an App (iPhone & iPad Basics)

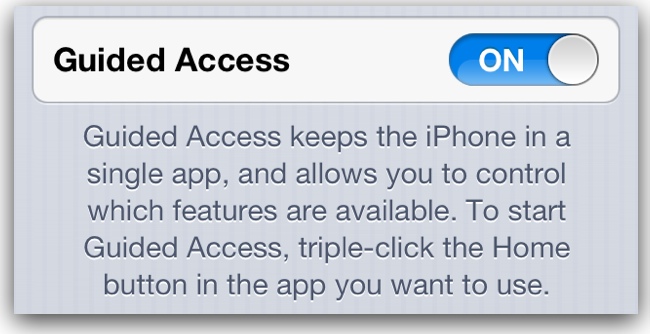
Guided Access

Guided Access is a powerful new feature on the iPhone & iPad that essentially prevents users from quitting out of an app. Guided Access can also block off areas of the screen from registering touches, and prevent users from changing the volume or putting the device to sleep. Check out the video below for instructions on how to activate Guided Access and how to use it in an app. Also check out the Extra Notes section for extra tips.

Video Instructions:

Quick Instructions:

1. Go to Settings > General > Accessibility > Guided Access.

2. Swipe the tab for Guided Access to On.

3. Tap Set Passcode and enter a 4-digit code. This code will be required to quit out of Guided Access once you start it in an app.

How to Use It In an App:

1. Launch an app.

2. Triple click the home button.

3. Circle any areas you want to disable. You can fine tune by dragging the corners of the boxes that appear.

4. Tap Start.

5. To quit out of Guided Access mode, triple click the home button again, enter in the passcode, and tap End.

Extra Notes:

  • In the Settings for Guided Access, you may notice an option: Enable Screen Sleep. When this is set to On, the iPhone’s screen will dim (but not turn off) during periods of inactivity, saving battery. You can also put the iPhone to sleep by pressing the Sleep/Wake button.
  • When you triple click to activate Guided Access in an app, an Options button will appear in the bottom left. There, you can turn off all touches from registering on the screen (this would be perfect for playing a movie on your device in a marketing situation) and another option to lock the screen’s orientation and turn off the device’s accelerometer and gyroscope, preventing the device from registering movement.

iPhone & iPad Basics: How to Use Flagged Emails and the New Flagged Inbox

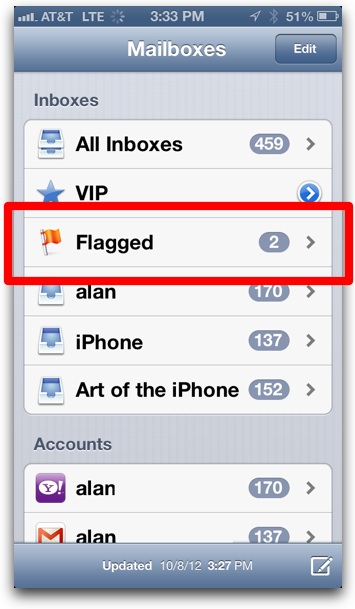
Flagged email inbox in iPhone Mail app

The Flagged inbox is a new feature introduced in the iOS 6 software update that is useful as a way to sort important emails into one central place so you can find them easier. Flagged emails from different accounts all go into the same Flagged inbox.

To send an email into the Flagged inbox, you simply tap the flag icon in the bottom right corner of the individual email, like this:

Tap Flag icon in bottom left

Flagged emails still remain in their original email account’s inbox but also appear in the Flagged inbox. To remove the email from the Flagged inbox, just tap the flag icon again, then tap Unflag from the pop-up menu.

Extra Notes & Tips:

  • Don’t see the Flagged inbox? It doesn’t appear until you flag an email for the first time.
  • You can move a flagged email out of the Flagged inbox into another sub-inbox of the email account it belongs to by tapping the move email button in the Mail app, which is the second button from the left. The email will remain flagged, it just won’t appear in the Flagged inbox. You can move it back into the Flagged inbox via the same “move email” button.

iPhone Basics: How to Take a Panorama Photo Using the Camera App

iPhone Camera app Panorama feature

The new panorama function in the iPhone’s Camera app is an incredibly useful feature that allows you to easily capture beautiful wide-shot vistas and landscapes. It’s a welcome addition to the Camera app, as previous to iOS 6, iPhone users had to rely on third-party apps to create panoramas. But no longer. Below are instructions for how to take panoramas using the iPhone’s Camera app. Also see the end of this article for extra panorama tips. Please note that panorama is only available on the iPhone 4S or newer iPhones.

Quick Instructions:

In the Camera app, tap Options > Panorama, then tap the camera icon to begin creating the panorama. Tap Done to stop at any point. To reverse the panning direction, tap the arrow.

Step-by-Step Visual Instructions:

1. Open the Camera app:


iPhone Camera icon

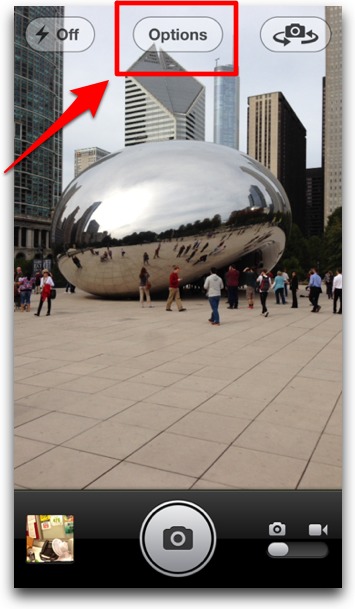
2. Tap Options:

Tap Options Button in iPhone Camera App

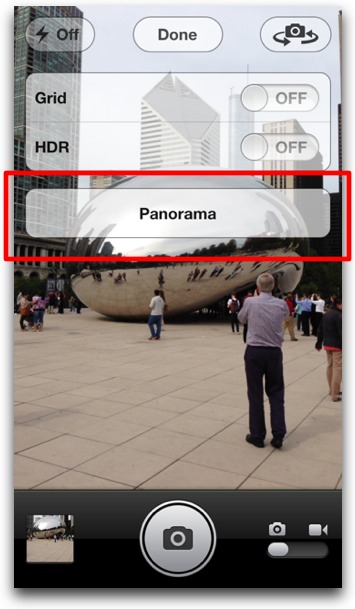
3. Tap Panorama:

Tap Panorama in iPhone camera app

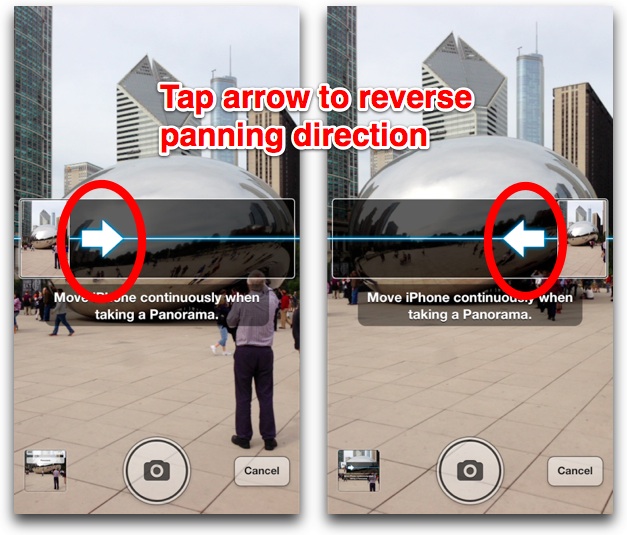
4. If you’d like, tap the arrow to reverse the panning direction (right to left, or left to right):

Tap arrow to reverse panning direction

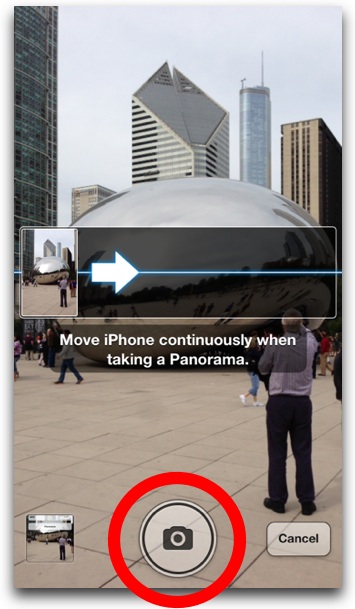
5. Tap the camera icon at the bottom of the screen to begin:

Tap Camera button to start

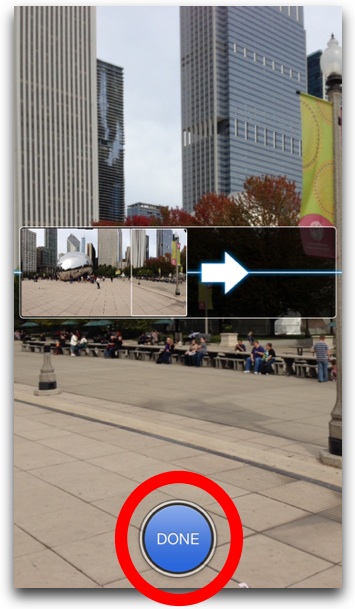
6. Tap Done at any point to finish the photo:

Tap Done in iPhone Camera app

And that’s it, you’ve created a panorama photo. Read on for some extra tips.

Extra tips:

  • You don’t have to fill the entire panorama box on the screen—you can stop at anytime during the panorama process by tapping Done. This, in effect, gives the iPhone a wide lens of any size you want.
  • If you hold the iPhone in landscape orientation and move it up or down, you can use panorama to shoot very tall buildings.
  • If your resulting panorama photos has rough edges, you can square them off using the crop tool right in the Camera app. To access the crop tool, tap the photo thumbnail in the bottom left corner. This will open the Photo Stream. When viewing the panorama in the Photo Stream, tap Edit in the top right corner, then tap the crop tool (it’s on the far right). Drag the cropping box to fine tune your edges, then tap Crop.

Basics: How to Activate Caps Lock on the iPhone and iPad

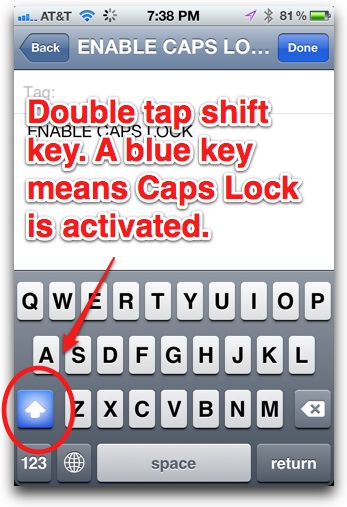
The iPhone’s keyboard has a Caps Lock feature, but you may have to first activate it in the iPhone’s Settings to use it. To test if Caps Lock activated, first try double tapping the shift key (the key with the up arrow, see image above) on the touchscreen keyboard—the key will turn blue to tell you Caps Lock is activated. If it doesn’t turn blue, you’ll need to go into the iPhone’s Settings to enable it. Just follow the step-by-step instructions below.

Video Instructions:

Text:

1. Open Settings:

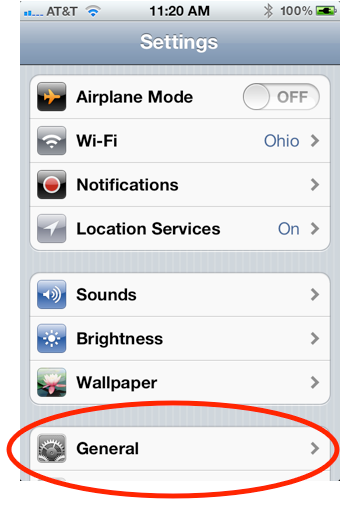
2. Tap General:

General in iPhone Settings

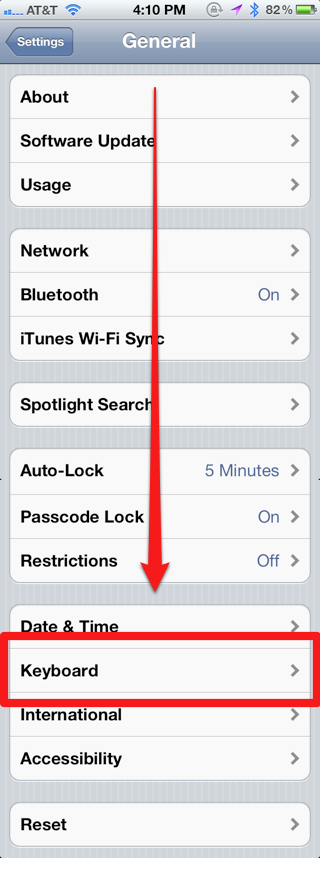
3. Scroll down and tap Keyboard:

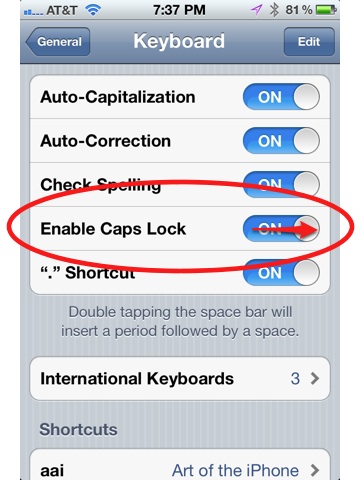
4. Slide the tab for Enable Caps Lock to On:

Now, when you double tap the shift key on the iPhone/iPad’s keyboard (the key with the up arrow), Caps Lock will be activated. To turn off Caps Lock, tap the key again.

Basics: How to Make the iPhone Vibrate in Silent Mode

The iPhone can vibrate when you receive a phone call, text message, or notification even if the iPhone is in silent mode (when the ringer switch is set to mute). Turning on vibrate is simple and is done in the iPhone’s Settings. Below are step-by-step instructions for how to turn on vibrate in silent mode in both video and text format:

Video:

Text:

1. Tap the Settings icon:

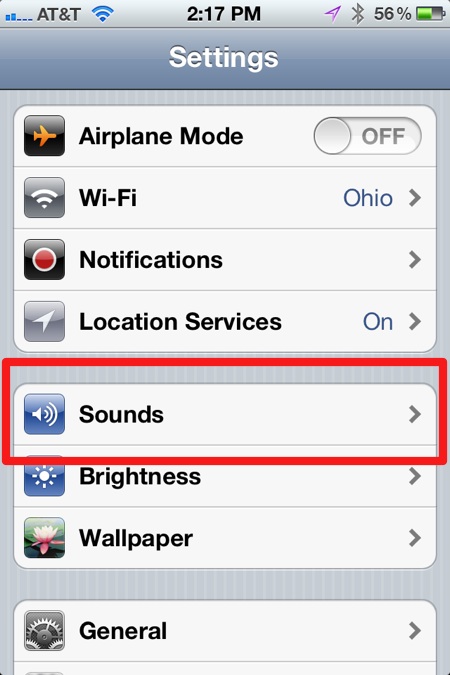
2. Tap Sounds:

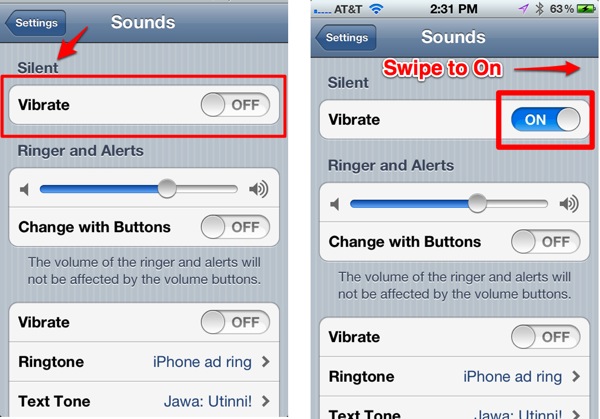
3. Under Silent, swipe Vibrate tab to On:

And that’s it. The iPhone should now vibrate to let you know there is a call, text message, and notification when the ringer switch is set to off.

Note there is a second Vibrate option further down in the Sound settings. Turning on this option will make the iPhone vibrate alongside playing the ringtone (in other words, when the iPhone’s ringer switch is set to on and a ringtone plays when you receive a call or text message). It will cause quite a racket, but it is also more likely to get your attention when a call comes in.

Basics: How to Save Pictures From the Web on the iPhone (and iPad)

If you see a picture you like while browsing the Internet on your iPhone, you can easily save those photos to your iPhone’s Camera Roll. Here’s how.

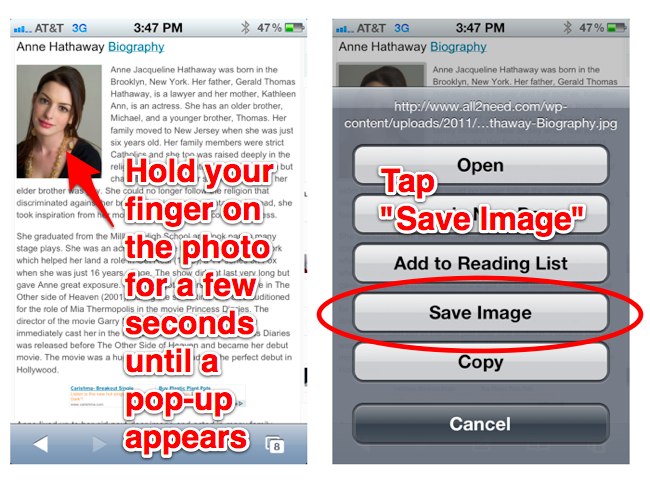
While using the iPhone’s web browser, you can save a photo simply by holding your finger on the photo for a few seconds. A pop-up box will appear with a few options, one of which will read Save Image, as seen below:

To save the photo, tap Save Image. It will be saved to the iPhone’s Camera Roll alongside your other photos.

Endnotes:

  • Note that you can also tap Copy. You can then paste the photo into any app that will allow you to insert photos, like in an email (in the Mail app) or in Pages (Apple’s word processor). To paste, simply hold your finger down on the insertion point, then from the pop-up menu that appears, tap Paste.
  • If a website prevents you from saving the photo, just take a screenshot instead by pressing the sleep and home buttons at the same time.

Is AppleCare+ for the iPhone Worth It? (It Covers Accidental Damage)

A lot of people are interested in insuring their iPhone for accidental damage. Until last year, only third-party companies offered insurance for the iPhone. But in 2011, Apple stepped up to the plate and now offers AppleCare+ for iPhone. In a nutshell, AppleCare+ for iPhone costs $99 for a two-year extended warranty that covers accidental damage like broken screens and water damage. The kicker is that is has a $49 additional fee for each time you need your iPhone fixed (for up to two times).

So, is it worth paying $99 up front for a chance to pay $49 to get your iPhone fixed or replaced in the future? What are the costs to get your iPhone fixed if you don’t have insurance? Read on.

What It Costs to Fix Your iPhone Without Insurance
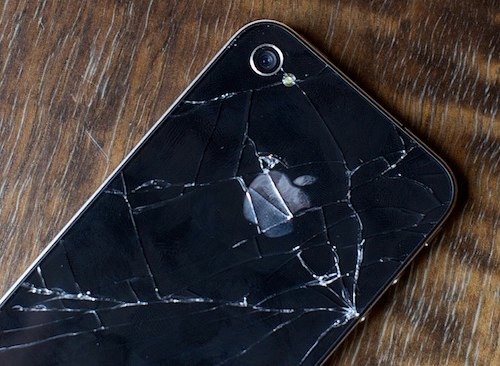
Most major damage to your iPhone, like cracked front screens and water damage, will cost you $200 to get it “fixed” by Apple, with fixed really meaning you’ll likely get a whole new iPhone. The $200 uninsured repair cost is only $50 more than the $150 AppleCare+ cost (the $99 up-front price plus the $49 repair fee). Sure, you are saving $50 with AppleCare+, but then again, you may end up paying $99 for AppleCare+ and never have a need for it.

Where AppleCare+ starts to pay off is if you break your iPhone again. Without insurance, it’s $400 to “fix” your iPhone twice, compared to AppleCare+’s $200 total fee for two repairs.

Oh, and if you’re uninsured and only break the iPhone’s rear glass screen, count yourself lucky. Apple only charges $29 to replace it.

Should You Buy AppleCare+ for iPhone?

For most people, AppleCare+ for iPhone is likely not worth it, but some people in unique situations might find it useful. For example, do you have a history of breaking iPhones multiple times or are in a situation where that could happen (kids like to throw things or work in a hazardous environment)? Then AppleCare+ might be totally worth it. Are you completely new to the iPhone and want phone tech support at home for how to work the darned thing? AppleCare+ might be worth it.

I don’t purchase AppleCare+ for iPhone for a few reasons. First, I’ve kept my previous generation iPhones as backups in case the new one breaks. Even then, I would likely pay the $200 for a new one—that is, if it wasn’t rumored a new iPhone was just a few months away. I also don’t need the phone tech support (there’s the Internet and a few Apple Stores in my city as well).

Overall, AppleCare+ for iPhone is a tough sell, and if you can afford the expensive monthly phone carrier fees, you can likely afford to go without it. Then again, if you are abusive to your iPhone, it may be worth it in the end.

Notes:

  • AppleCare+ for iPhone does not cover losing your iPhone or having it stolen.
  • If you don’t live near an Apple Store, you can send in your iPhone via mail to get it fixed. They’ll even send you a loaner iPhone while you wait. You just need to supply a credit number for authorization as security for the retail price of the replacement iPhone or any shipping costs.
  • If you want to know all the ins-and-outs of AppleCare+ for iPhone, you can find Apple’s legal documents in PDF form here.
  • Apple introduced AppleCare+ for the iPad ($99) in March 2012, and unlike the iPhone version, it may actually be worth buying.
  • Best Buy’s insurance for the iPhone costs $15 a month. That’s $360 total over a course of two years.
Basics: The iPhone’s Screen Brightness Settings, Explained

The iPhone has a feature called Auto-Brightness that is turned on by default and will automatically control the brightness of your iPhone’s screen. Auto-Brightness will dim or brighten the screen depending on ambient light levels. It uses a sensor behind the iPhone’s screen to measure light levels and dim the screen in dark surroundings and brighten in bright surroundings. By lowering screen brightness when it’s not needed, Auto-Brightness also works to conserve battery life. However, you can manually set the brightness of the iPhone’s screen. Here’s how.

How to Change the iPhone’s Screen Brightness

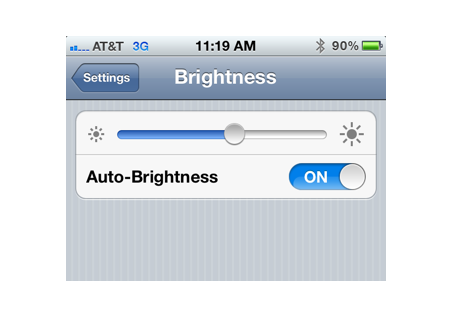
If you go into the iPhone’s Settings–>Brightness, you’ll see the following:

The Brightness Slider lets you manually set the screen’s brightness. If you’d like the screen to always stay at a specific brightness level, you should turn Auto-Brightness off.

However, if you have Auto-Brightness turned on and manually adjust the screen’s brightness, Auto-Brightness will use your brightness setting as a baseline and dim/brighten the screen based around that. For example, if you manually increase brightness by 25%, then Auto-Brightness will continue to dim/brighten, only 25% brighter.

Notes:

  • The brighter the screen, the shorter the iPhone’s battery life. Keep this in mind when manually adjusting brightness levels.
  • While the iPhone’ screen is often used as a makeshift flashlight, the iPhone 4 and newer models have a much brighter light in the form of the camera flash, located on the iPhone’s back. There are many great free apps, like Flashlight by Rik, that let you use the flash as a flashlight or strobe light.