Art of the iPhone

Free iPhone Bible Apps

Bible

Bible Free iPhone App


Bible
(free) is our pick for the best Bible app—free or paid—in the App Store. The app is chock full of features like 150+ versions of the bible, lesson plans to help you learn the Bible, audio playback (have the bible read to you!) and more. And everything is free, there are no in-app purchases. App Store reviewers seem to agree, as it averages 4.5 stars with over 300k reviewers.

Bible iPhone App

Bible App Translations

Bible is a free download in the iTunes App Store.

BibleReader Free

BibleReader Free (free) lets you bookmark favorite passages, keep notes within the app, quickly navigate to books and chapters, and a host of other features.

BibleReader Free is a free download from the iTunes App Store.

Mantis Bible Study

Mantis Study Bible for iPhone and iPod Touch

Mantis Bible Study (free) has the most features of any of the free bible apps and is our recommended pick. It comes with the full King James text, but other translations can be purchased online. There are extensive navigation controls to skip around quickly.

It has some interesting study tools, including text highlighting. It also has bookmarks, a search tool, landscape reading, and many other features.

iPhone and iPod Bible eBook Reader

Mantis Bible Study is a free download in the iTunes App Store.

Holy Bible

Holy Bible App

Holy Bible (free) offers easy offline reading and navigation of the bible. Its standout feature is that it supports several different languages, inlcuding English, Spanish, French, Italian, and Greek. There is quick navigation to different sections, landscape reading, and a search tool.

Holy Bible Navigation

Holy Bible is a free download in the iTunes App Store.

CCEL Devotional Bible

CCEL Devotional Bible

CCEL Devotional Bible (free) is also a very simple and straightforward bible reader. It features offline reading, search, 5 font-size settings, landscape mode, and bookmarking.

CCEL Bible for iPod and iPhone

CCEL Devotional Bible is a free download in the iTunes App Store.

How to Send a Call to Voicemail With the iPhone

We’ve all been in this situation: the iPhone rings, but you can’t take the call. If you want to immediately silence the call (turn off the ringtone and vibration), press the sleep button once.

If you want to send the call directly to voicemail, press the sleep button again. So in other words, to send a call to voicemail after it rings, press the sleep button twice. The sleep button is located on the top of your iPhone on the righthand side.

Send iPhone Call to Voicemail: Press Sleep Button Twice

If you’re using the iPhone headphones, press the headphone button once to answer the call. Press it twice to send it to voicemail.

Check out all of our posts on iPhone Basics.


(Photo via lirent.net)

How To Create a Free iPhone Ringtone Using iTunes

Want to make an iPhone ringtone with your own music? Just follow the step-by-step instructions below. Make sure to start out with songs that are mp3s or are otherwise DRM-free. *Updated for iTunes 11*

How to Make an iPhone Ringtone in iTunes:

1. Open iTunes.

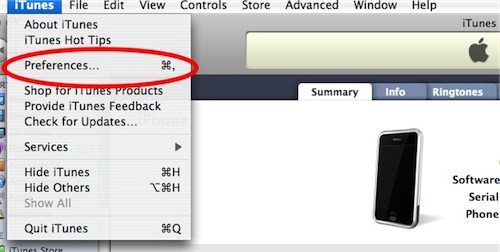
2. Open Preferences in the iTunes menu at the top (it may be under Edit for Windows users):

Create iPhone Ringtone Step 1

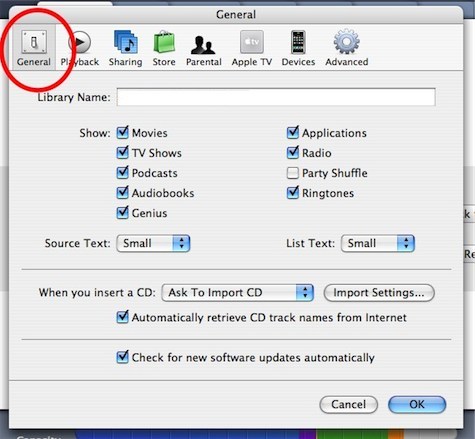
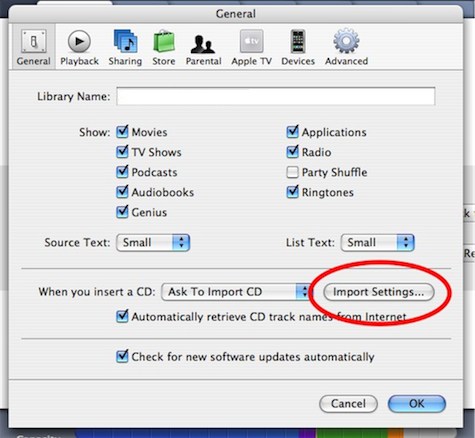
3. Select the General tab:

Create iPhone Ringtone Step 2

4. Select Import Settings:

Import Settings

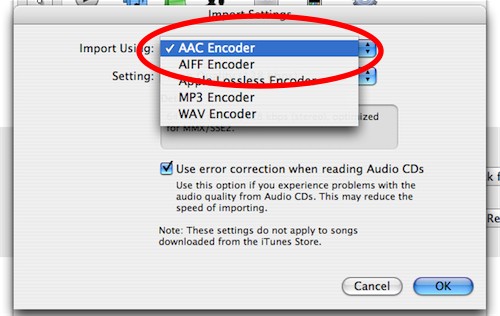
5. Click on the dropdown list after Importing Using:

Click on DropDown

6. Select AAC Encoder (it may already be the default):

Set iTunes Encoder to AAC

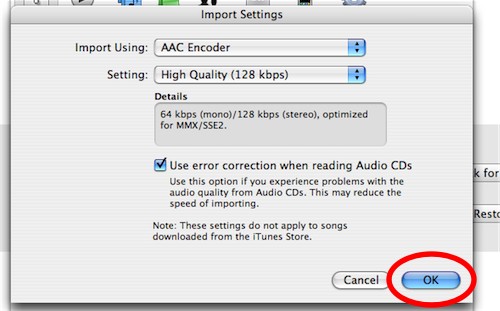
7. Select OK to go back to the Preferences, then select OK again.

Select OK

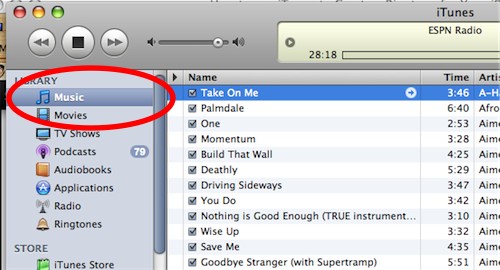
8. Select Music in the left iTunes sidebar and find a song you want to make into a ringtone:

Select Music in iTunes

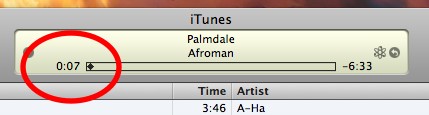
9. You’ll need to find a 40 second or less section of the song to turn into a ringtone. Note (or write down) the starting and stopping point of the section of the song. You can see the time of the song in the play window at the top of iTunes:

iTunes Song Time

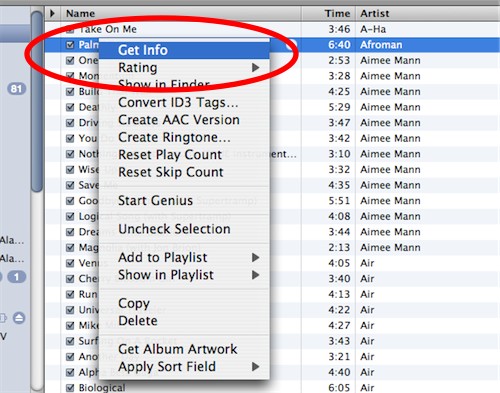
10. Right click on the song, and select Get Info:

Right Click and Select Get Info

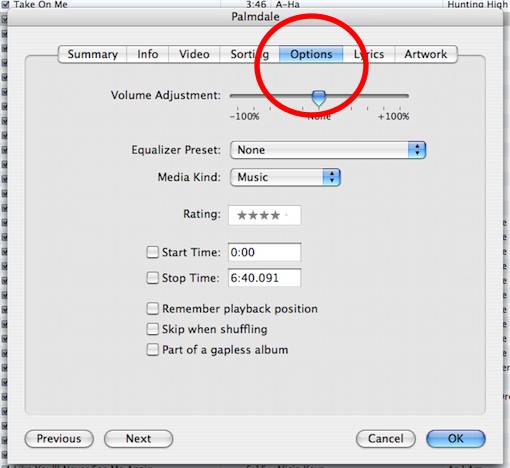
11. Select the Options tab at the top:

Options Tab

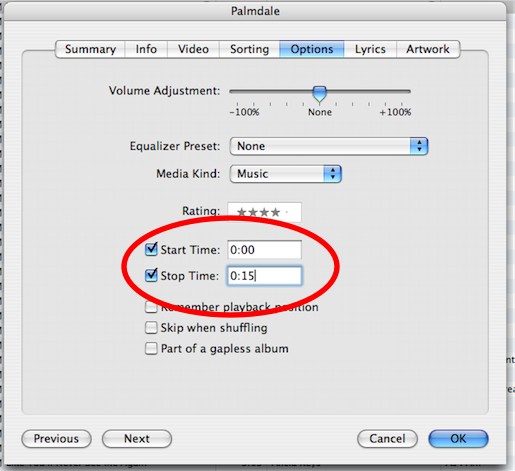
12. Enter the start and stop time of the clip in the corresponding boxes and make sure the checkboxes are checked when you are finished:

Start and Stop

13. Click OK in the bottom right.

14. In the iTunes menu at the top, click Advanced, then Create AAC Version from the drop-down menu (in iTunes 11, it’s File –> Create New Version –> Create AAC Version):

Create AAC version of song

15. You should see a second version of the song appear in iTunes, only with the shorter play time. Click to play to make sure it sounds how you’ll want the ringtone to sound.

A Second Shortened Copy of the Song is Created

16. We aren’t quite finished yet! Now we have to change the file format so that it will appear as a ringtone in iTunes.

17. Navigate to the folder where the new clip is stored on your computer (it will be in the same folder as the original version of the song). To find it in Windows, right-click the clip in iTunes, then choose Show in Explorer. For Mac, right-click and select Show In Finder.

18. Copy the song (press Control and C for Windows, Command and C for Mac), and paste the song in the same folder (Control and V or Command and V) so that a third version appears.

Third Copy of Song

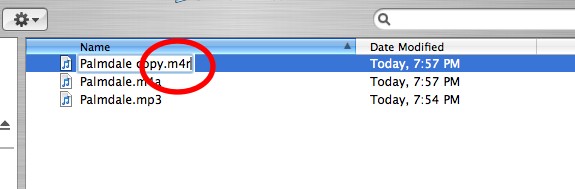
19. Now, change the file extension of the third version from .m4a to .m4r.

Troubleshooting: Don’t see the file extension? Windows 7: click the Start button, Control Panel–>Appearance and Personalization–>Folder Options–>View tab–>and uncheck Hide Extensions for known file types. For Windows XP: in the Explorer window, go to Tools –> Folder Options –> View and uncheck Hide extensions for known file types. For Vista: Organize –> Folder and Search Options and uncheck Hide extension for known file types.

Change File Extension to m4r

20. Rename the file, if you want (for example, CoolRingtone.m4r). Note: If there are symbols such as underscores or hyphens in the name, you must remove them.

21. Important: In iTunes, delete the first AAC clip you made by right-clicking on the clip and selecting delete (if you don’t do this, iTunes might not accept the new ringtone):

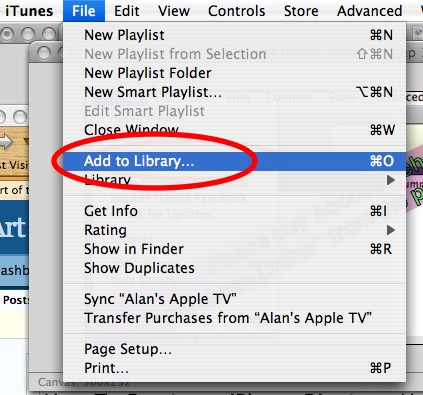
22. Go back to the folder with the new ringtone file (.m4r file). Drag and drop the file into iTunes. Or import it by opening iTunes, select File, and select: Windows XP/Vista: Add File to Library, Mac: Add to Library.

Add Ringtone to iTunes Library

23. Now we need to sync the ringtone to your iPhone. Connect the iPhone to the computer.

Connect the iPhone to Computer

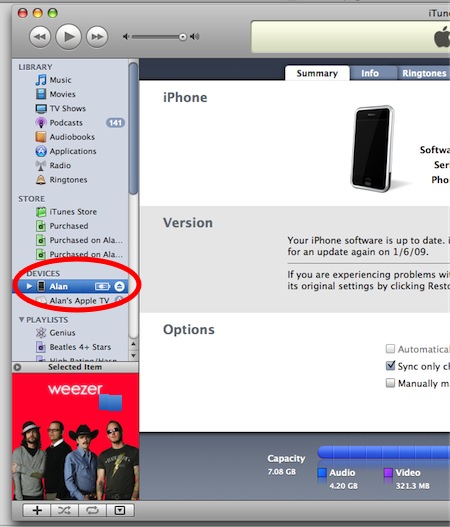
24. Click on your iPhone in the left sidebar in iTunes (Note: for iTunes 11, your iPhone can be found under Devices at the top right):

Add Photos to iTunes Step 2a

25. Click on the Tones tab, check the Sync tones checkbox, then check either All tones or Selected tones. If you choose Selected ringtones, make sure your new ringtone is also checked so it will sync:

iTunes 10 select Tones to sync

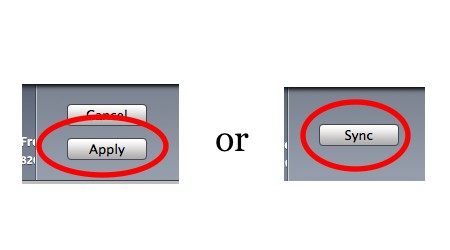
26. Now click the Apply button in the bottom right (it may also say Sync. Click Sync if it does).

Click Apply or Sync

And that’s it. You’ve done it! The ringtone is now on the iPhone. Got to Settings on your iPhone, tap Sounds, and you can change to your new ringtone. If the ringtone doesn’t show up on the iPhone, follow the Troubleshooting steps below, else go to the Clean Up section for one important last step.

Troubleshooting

Did the ringtone not appear on your iPhone? Follow these steps.

1. Click on the Summary tab for your iPhone in iTunes:

2. See if the checkbox labeled Manually manage music and video is checked. If not, check it.

3. Click on Tones in the left sidebar (older versions of iTunes may say Ringtones instead) and find the ringtone:

Click on Tones in Left Sidebar of iTunes

4. Drag and drop the ringtone onto your iPhone in the left sidebar. The iPhone should begin synching immediately, and the ringtone will appear shortly on your iPhone:

More Troubleshooting

Problem: I don’t see Tones or Ringtones in the iTunes Sidebar.

Go into Preferences–>General, and under Show make sure the Tones checkbox is checked.

Problem: You get a scary message “All existing songs, movies and TV shows on the iPhone will be removed.”

You likely received this message because you’ve never synced your iPhone with iTunes before and therefore don’t have a back-up of your iPhone data. Cancel the current sync. Unplug your iPhone and plug it back in again. Right click on your iPhone in the left sidebar and select Back Up:

How to back up iPhone to your computer

Now that iTunes has an image of your current iPhone to work from, right click on it again in the left sidebar and select Sync.

Clean Up

You made the ringtone, but there’s one clean-up task to do. We need to fix the Start/Stop time of the original song. Otherwise, the next time you play the song, it won’t play the whole thing. In iTunes, right click the original song, select Get Info –> Options and reset the Start/Stop time by deleting the numbers and leaving the fields blank. All done!

How to Delete the iPhone’s Safari Browser History

It happens to all of us, you “accidentally” browse to an unsavory website on your iPhone’s browser. Now you want to delete all traces of having visited that site from the browser’s history. How do you do it? Follow these simple instructions:

1. Tap the Mobile Safari icon:

Clear iPhone Browser History

2. Tap the Bookmark icon at the bottom of the screen.

Clear the iPhone Browser History Step 2

3. If your view is like the one below, tap History, otherwise, skip to next step:

4. Tap the Clear button at the bottom left of the screen:

Clear History Step 3

5. Tap Clear History:

Step 3

You have now deleted your history of visited sites. Also note that you have deleted your history of Google searches on the iPhone. Yes, it also keeps a history of search terms too. It does this for the same reason it keeps visited URLs: to save you time. But following the above instructions will delete both types of browsing history, so my, I mean, your habit of visiting AnneHathawayPictures.com need not be revealed.

Note: You may still continue to see some URLs and other terms in that dropdown list. These are either default bookmarks from Apple or bookmarks you have made, they are not a part of your browser’s history.

Try the iPhone’s New Private Browsing Mode

If you are going to be spending some time browsing unsavory websites on your iPhone, try the new Private Browsing Mode, which won’t save any browsing data (history of websites visited, cache images, etc). See our instructions on How to Turn on the iPhone’s Private Browsing Mode.

A Clear History Option in the iPhone’s Settings

What about the Clear History option in the iPhone Settings? What does that do?

Yes, there is an alternative method of deleting Mobile Safari’s history in the iPhone ‘s Settings menu (see picture below). However, it’s not as effective, as it doesn’t also clear your Google searches. For example, if you searched for Anne Hathaway Pictures in Google, the next time someone entered the letter A in the Google search bar, your search keywords for the sexy young starlet would show up in a dropdown list. Busted!

Clear History in iPhone Settings

What about Clear Cache and Clear History in the Settings menu? What do those do?

You can clear two other types of data in the iPhone Settings menu: cache and cookies. It sounds like a snack, but really the cache and cookies are data your browser keeps to make your web browsing experience more fluid.

A cache is saved data from websites (eg, buttons, icons, banners, etc) that helps websites load quicker. Clearing your cache is way to clear some of your iPhone’s memory and may improve speed performance.

Cookies hold your online “personality” so websites can know something about you when you visit. An example of this is visiting Amazon.com and seeing that annoying “Hello, John Smith!” at the top. Clear your cookies to avoid such irritation.

iPhone Basics: Turn the iPhone Calculator Into a Scientific Calculator

Scientific Calculator

You may know the iPhone comes with a basic calculator app. But did you know, if you rotate the iPhone to landscape mode, it will turn into a scientific calculator? Doing so will create a whole new row of buttons to appear, including cos, sin, tan, square roots, and more.

Here’s the forumula for compound interest to get you started:

M = P( 1 + i )n

P=principal amount.

i=rate of interest per year.

n=number of years invested.

M=final amount including the principal.

Check out all of Art of the iPhone‘s coverage of iPhone Basics.

How to Add Photos to Your iPhone Contacts

Instructions for Adding Photos to iPhone Contacts:

1. Tap on the Contacts app, or tap Contacts in the Phone app:

Add Photos Step 1

2. Scroll to the person or business you want to add the photo to, and tap their name.

3. Tap Edit in the top right corner:

Edit a Contact

4. Tap Add Photo.

Add Photo to iPhone Contact

5. Tap Choose Existing Photo if you have a photo on your iPhone that you want to use. Or, tap Take Photo if the person is in photo range:

Choose Photo for iPhone Contacts

6. Selecting Choose Exising Photo will open up the iPhone’s Photo Albums. Navigate through your pictures and select the one you want.

7. You can edit the size and orientation of the photo. This comes in handy if you want to use just the face of a person, or if there are multiple people in a photo. You edit by zooming in and out using pinching gestures or by dragging the photo left, right, up, or down:

Move and Scale iPhone Photos

8. When you are finished, tap Set Photo.

9. Tap Done in the top right corner, and you’ve successfully added a photo to your contact.

Done Adding Picture to iPhone Contact

And that’s it. The next time the contact calls, you can see their bright smiling face lit up on your iPhone.

Check out all our iPhone Tips.

How to Add Photos to iTunes For Synching to iPhone or iPod

Warning: Please be sure to transfer (backup) the photos currently on your iPhone to your computer first before following the instructions below. Windows users can do this with the Camera and Scanner wizard. Mac users can use iPhoto.

1. Connect the iPod/iPhone to your computer and launch iTunes.

Connect the iPhone to Computer

2. Click on your iPod/iPhone icon in the left sidebar:

Add Photos to iTunes Step 2a

3. Click the Photos tab at the top center:

Select the Photos Tab

4. Make sure the “Sync photos from” box is checked, then click on the drop-down menu:

Add Pictures to iTunes

5. Select the source of your photos, such as the folder in which they are located:

Add Pictures to iPhone

Once you select a folder, you can sync all the photographs in that folder to your iPhone or iPod. You can also use subfolders to help organize and sync only certain photos you want on the iPhone/iPod. Note that this works for only one level of subfolders. If you create a sub-subfolder, it will not show up in Tunes.

Subfolders will show up as individual photo albums in iTunes, You can then check or uncheck each folder in order to sync them or not.

Tip: Give your subfolders names, like “Family”, to help keep your images organized.

Notes:

  • Windows users can also sync from Adobe Photoshop Album 1 or Adobe Photoshop Elements 3.0. If you have these programs installed, they will automatically show up in the iTunes dropdown menu under the Photos tab.
  • Mac users can sync from iPhoto. Any albums created in iPhoto will show up in iTunes under the Photos tab.
  • An alternative way to put a photo onto your iPhone is to email it yourself. Access the email on the iPhone, open the photo by tapping on it, then hold your finger on the photo for a few seconds until a menu pops up. Choose Save Image.

Review of Apple In-Ear Headphones

Apple In-Ear Headphones

Before they even shipped, the new Apple In-Ear Headphones ($79.00) stood out on paper thanks to their dual sound drivers, a feature usually found in headphones that cost $200 or more. But do they sound as good as their more expensive competitors? For the most part, yes. We’ve found the sound performance to be full, detailed, and well rounded—although lovers of over-the-top bass will be disappointed. They are impressive for their price point, making them a good value. If you’re looking to upgrade your iPhone headphones, the Apple In-Ear Headphones are a big step up from the default iPhone headphones and outclass similarly priced third-party competitors.

Fit and Comfort

Apple includes three sizes of silicone ear-tips: small, medium, and large. Because everyone’s ears are different, it’s tough to judge the quality of fit other than on a person-by-person basis. In my initial tests, none of the ear-tips formed a good seal. But trying again, I discovered a little wiggling was required to place the tips properly. This caused a dramatic improvement in not only the snugness of the headphones, but thanks to a good seal, also in the overall sound quality.

Extra Ear Tips for Apple In-Ear Headphones

I tested the earphone during a 20-minute jogging session on a treadmill, and they stayed stuck in my ear throughout. The ear-tips are comfortable to wear during long listening sessions: I had a two-hour podcast-listening marathon, and the earphones did not leave any soreness or irritation in my ear. (*Update* It’s not recommended you use Apple headphones while working out, as they are, from my experience, easily water damaged.)


Sound

Thanks to the dual sound drivers, the Apple In-Ear Headphones deliver detailed, balanced sound. The drivers work much like a tweeter and woofer in a floor speaker–separating the highs and lows allows each to be heard more distinctly, as opposed to the muddled sound produced when all frequencies come from a single speaker.

Apple In-Ear Headphones

The Apple In-Ears deliver a good amount of bass–I could feel the physical thump that’s telltale of good bass–but it’s obvious that Apple’s goal is to deliver clear, well-rounded sound. Those looking for headphones with bass-heavy sound should look to another brand like V-Moda or the Shure E2Cs. However, these bass-heavy headphones sacrifice nuance to deliver the full low end. For those who listen to a wide range of genres (like me), it’s just as important hear the acoustic guitar as the bass drum.

Overall, the sound of the Apple In-Ears is much superior to that of the default iPod and iPhone headphones. Music sounds more full-bodied, with both highs and lows strong and distinct. The In-Ear’s eartips go deep into the ear, delivering a closer, more intimate sound. The sound isolation not only keeps ambient sounds out, but keeps the sound from the headphones in your ear and not dissipating outward.

Noise Isolation

The Apple In-Ears tend to muffle sound rather than deliever pure sound isolation. While listening to music, all but the loudest ambient noises disappear. But with the gaps in the music or podcasts, people talking nearby can be faintly heard as a muffled, indistinguishable conversation.

Compatibility With the iPhone

Apple does not officially list the In-Ears as iPhone-compatible, but every feature of the headphones works with the iPhone but the volume controls. The Play/Pause/Answer button works just like the button on the default headphones. The quality of sound from the microphone was on par with that of the default headphones.

Apple In-Ear Button

Durability

The durability of the In-Ears is their most worrisome aspect. As a heavy user, I’ve been through two pairs of default iPhone headphones, and it appears the In-Ears are made from the same material. The cord, in particular, tends to get frayed, exposing bare wires. And speaking from personal experience, in the past, the headphone plug has not been strong enough to endure repeated accidental yankings from the headphone jack. If you are a rough, heavy user of your headphones, expect to pay for replacements in the future. My pace seems to be around every 8 months or so.

Conclusion

The default iPhone headphones are adequate for the casual listener, but many iPhone owners turn to third-party headphones for superior sound quality and sound isolation features, sometimes at a big hit to their wallet. The dual drivers of the Apple In-Ear Headphones deliver that superior sound quality, and they do it at an affordable price. The combination of quality with a low price point make the In-Ears a true bargain, one that will most likely force other companies to decrease their prices on premium headphones as well. We can highly recommend the Apple In-Ear Headphones.

Apple In-Ear Headphone Ear Tips

Tech Specs

  • Frequency response: 5Hz to 21kHz
  • Impedance (100Hz): 23 ohms
  • Sensitivity (100Hz): 109 dB SPL/mW
  • Weight: 0.4 ounce (10.2 grams)
  • Four-conductor 3.5-mm audio jack

Questions and Answers:

How long is the cable?

54.9 inches, about an inch shorter than the default headphones.

Does the Button and Microphone Work With Apple Laptops?

Yes, you can use the button to play and pause tracks on the current generation Macbooks (the generation released in late 2008). The volume button and microphone work as well. The button and volume controls don’t work on previous generations of Macbooks.

Links:

Official website for Apple In-Ear Headphones

Apple In-Ear Headphones at Amazon.com