Category: iPhone Tips

How to Mute iPhone Text Message Notifications for a Specific Contact

iPhone Messages application green and blue

Here’s the problem: a friend is spamming you with text messages on your iPhone, and the notifications are driving you crazy. But, you don’t want to turn off all text message notifications (what if someone else important wants to send you one?), and you don’t want to completely block your spamming friend from sending messages (you’ll want to read those juicy messages later). There is a solution! Here is how to mute text message notifications for just that specific contact and still receive the messages, as well as still receive notifications from other contacts:

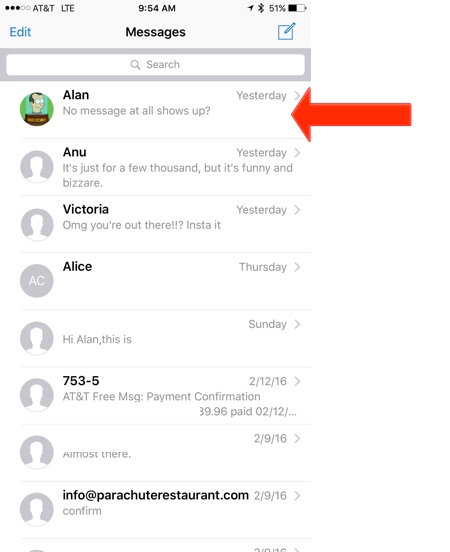
1. In the Messages app, tap on the text message thread from the contact you want to mute:

Select iPhone Text Message Thread

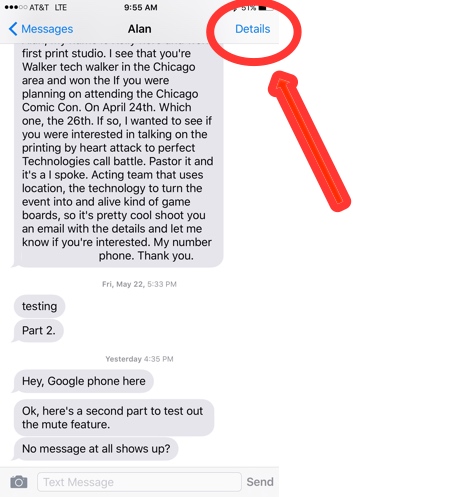
2. Tap Details in the top right corner:

Tap Details in Message Thread

3. Swipe the Do Not Disturb tab to the on position (it will turn green):

Slide the Do Not Disturb tab to On position

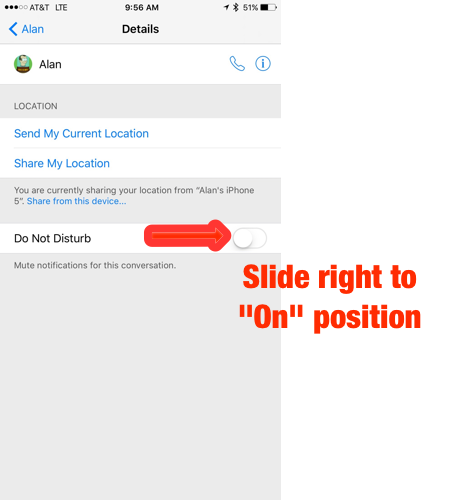
And that’s it, text-message notifications for just that single contact will no longer pop up on your iPhone, yet, you will still receive and keep all the messages the contact sends you.

Just make sure to switch off Do Not Disturb later if you want to receive notifications on your home screen again.

iPhone Tip: EarPods Quit Working? They Are Covered By Your iPhone’s 1-Year Warranty

Apple EarPods

A few weeks ago, the control dongle on my EarPods stopped working. Then, yesterday, the right earbud wouldn’t play any sound, quickly followed by the left. I can’t go without earphones, so I quickly placed an order on Amazon.com for replacements. Then I remembered I’ve had these EarPods for less than a year (they came with my iPhone 5). I wondered, shouldn’t Apple cover these with the iPhone’s warranty? Yes, the EarPods that come with your iPhone are covered by your iPhone’s 1-year warranty, along with everything else in the box. So, I canceled my Amazon order, made an appointment at the Genius Bar at the local Apple Store. Once there, the Apple Genius quickly gave me a new pair of EarPods after taking my iPhone 5’s serial number to confirm the warranty.

Note, however, that your iPhone’s warranty does not cover damage, so if your dog has chewed up your EarPods, you likely won’t get a new pair. But except in those extreme cases, you will get a new pair of EarPods as long as there isn’t any visible damage. For example, I’m pretty sure my EarPods stopped working through some kind of damage I did to them—I’ve gone on long sweaty runs with them on, I shove them in my pocket, and generally use them and abuse them everyday—but since there was no visual damage to the EarPods, the Apple Genius quickly swapped me out a new pair.

What if the EarPods break outside of the iPhone’s 1-year warranty? Well, Amazon often sells them $5 cheaper than Apple does.

Tip: The Quickest Way to Take an iPhone Photo, From Your Pocket to Snapping a Picture

If you want to capture a fleeting moment with your iPhone’s camera, there is actually a way to do it in just a few seconds. You will not need to unlock your phone, enter in a passcode, etc. Just one quick swipe, a press of a button, and you’ve snapped a photo. If you practice it, you can actually get quite fast. Here’s how.

1. Press the home button once to wake the iPhone’s screen:

Press home button to wake screen

2. Slide your finger upward from the camera icon in the bottom right:

Slide up from camera icon

3. As you grip the iPhone in your palm to steady it, press either volume button with your pointer finger to snap a photo:

iPhone 5 volume buttons and camera app

And that’s it, you’ve snapped a photo. This method takes me around 3 seconds to snap a photo from home button press to photo capture. Of course, if the iPhone is buried in your pocket/purse, that can add a few more seconds.

It may also take a moment for the iPhone to autofocus on an object. To help the iPhone’s camera focus on the desired object, tap the area of the screen where the object is displayed. This tells the iPhone where to focus.

Be sure to check out more our Art of the iPhone Tips.

Tip: How To Add Your Favorite MLB Team’s 2013 Schedule to Your iPhone’s Calendar

If you’re on an iPhone or iPad and want to easily add your favorite Major League Baseball team’s schedule to your calendar, just tap your team’s name in the list below, then tap Subscribe from the pop-up box. These are the official schedules from MLB’s website. Please note that you can easily hide all 162 games from view, as all those games can clog up your calendar (see instructions at end of post).

Arizona Diamondbacks
Atlanta Braves
Baltimore Orioles
Boston Red Sox
Chicago Cubs
Chicago White Sox
Cinncinnati Reds
Cleveland Indians
Colorado Rockies
Detroit Tigers
Houston Astros
Kansas City Royals
Los Angeles Angels of Anaheim
Los Angeles Dodgers
Miami Marlins
Milwaukee Brewers
Minnesota Twins
New York Mets
New York Yankees
Oakland Athletics
Philadelphia Phillies
Pittsburgh Pirates
San Diego Padres
San Francisco Giants
Seattle Mariners
St. Louis Cardinals
Tampa Bay Rays
Texas Rangers
Toronto Blue Jays
Washington Nationals

How to Hide the Games in Your Calendar

To hide the games from your calendar, go to the Calendar app, tap the Calendars button in the top left, then tap the checkmark next to the team-schedule calendar to uncheck the calendar and remove it from view. You can delete the calendar by going into the Settings app > Mail, Contacts, Calendar > Subscribed Calendars, tap the calendar and then tap Delete Account.

Siri Tip: Say “Google” First for the Quickest Way to Launch a Web Search on the iPhone & iPad

Siri icon

For the fastest way to search for something on the web, simply speak the word Google first to Siri, followed by whatever you want to search for. This method is, by far, the fastest way to do a web search in iOS. And, it can improve your overall experience with Siri.

Here’s an example: if you ask Siri, “Ten best Hawaii beaches,” Siri will bizarrely respond with a weather forecast. Begin that same question with Google and the browser will quickly and automatically launch and point to several great articles listing the ten best beaches in Hawaii. By starting off with Google, I avoid having to repeat myself or navigating to the browser app.

Another reason to say “Google” first is that Google is also great at correcting mistranslated words or phrases and figuring out what you’re really looking for. Compare this to Siri, which often takes correctly translated words and delivers incorrect info. Don’t get me wrong, Siri is great for creating reminders, text messages, alarms, & timers, and a handful of other things, but Siri is not so great at answering most questions.

Also note you can say Bing or Yahoo to automatically launch searches in those engines as well.

Basics: How to Rotate a Photo on the iPhone/iPad (Without Using a Third-Party App)

If you need to rotate and save a photo on the iPhone so that it’s in the correct orientation, you can do so inside the default Photos app, without using a third-party app. In fact, the Photos app includes a few basic photo editing tools, like crop, fix red-eye, auto-enhance, and rotate. Below are step-by-step instructions on how to use the rotate tool in the Photos app.

1. Open the Photos app:

Photos app icon

2. Find the photo you want to rotate (it will likely still be in the Camera Roll album if you took it recently):

Camera Roll inside Photos iPhone app

3. Tap Edit in the top right corner (if you don’t see Edit, tap the screen once to make menu options appear):

Tap Edit in top right corner of iPhone photos app

4. Tap the curved arrow in the bottom left of the screen to rotate the photo:

Tap Curved Arrow to rotate

5. Tap Save to save the changes to the photo:

Tap Save

And that’s it, you’ve rotated the photo and saved the changes. Now, whenever you, or anyone else you send the picture to, views the photo, it will be in that orientation.

Basics: How to Schedule Do Not Disturb Mode on the iPhone

Do Not Disturb mode is a useful feature of the iPhone and iPad that silences calls, ringtones, notifications, and alerts when turned on. You can turn on Do Not Disturb manually, or you can schedule it to turn on and off automatically during a certain period of the day, say, when you are sleeping or trying to go to sleep. For example, mine is set to turn on at 10 PM and turn off at 5:45 AM. Note that your iPhone’s screen also won’t light up from notifications when Do Not Disturb mode is turned on. Here’s how to schedule Do Not Disturb mode.

1. Open Settings:

iOS Settings Icon

2. Tap Notifications:

Tap Notifications in Settings

3. Now tap Do Not Disturb:

Tap Do Not Disturb in Notifications Settings

4. Slide Schedule to On:

Swipe Scheduled to On

5. Tap the time range below to set a range of time:

Tap time range below Schedule tab

6. Set a range of time by first tapping the From field to create a start time, then tap the To field to create an end time:

Tap From and To fields and set time using the slider below

And that’s it, Do Not Disturb mode will turn on/off automatically during this period of time. Now, you can do something else kind of neat. You may still want some important people to be able to ring your phone when Do Not Disturb mode is on. After all, who is going to bail Junior out of jail at 3 AM? Check out our instructions for How to Allow VIP Contacts to Call You When Do Not Disturb Mode is On, and also, How to Create Groups of Contacts.

iPhone & iPad Tip: Why You Shouldn’t Change Siri’s Speaking Voice in the Settings

Siri icon

One fun thing you can do with Siri’s voice is change her accent and even gender in the settings. You can do this by going into Settings –> General –> Siri –> Language, and choose from over a dozen new accents, even giving her a male British voice. It’s fun, but here’s the thing, you should always change Siri back to your native language…“native” meaning, if you’re American, set it to English (United States), not English (United Kingdom).

Why? Because Siri’s ability to understand you will diminish greatly if she’s set to anything but your native language. Siri is designed to understand a specific accent that is designated in your iPhone’s settings. So if she’s expecting to hear a British accent but you’re a speaking with an American accent, she will be confused and translate your words into crazy things. While it’s funny, it’s not very useful.

iPhone Basics: the iPhone Alarm Clock’s Snooze Button(s)

iPhone clock app

The iPhone’s default Clock app has an alarm clock feature that many people, including me, use to wake them up in the morning. And like most alarm clocks, it has a snooze feature. When snooze is activated, it will delay the alarm from sounding again for 9 minutes. So how do you hit snooze? The iPhone offers 4 ways:

Snooze buttons on iPhone

The snooze buttons are:

  1. Sleep/wake button on top
  2. The up volume button on the side
  3. The down volume button on the side
  4. The Snooze button on the iPhone’s screen

To fully shut off the alarm, you must do the swipe-to-unlock gesture. There is, however, an exception to that rule. If you turn off the snooze option when creating the alarm (see example below), then the sleep/wake and volume buttons will shut off the alarm instead of acting as a snooze button.

Set to snooze to off

iPhone/iPad App Tip: Pandora Radio Is the Best Way to Listen to…Comedy?

Pandora Radio iPhone app icon

Pandora Radio (free) is known as a music radio app with customizable stations that learn your tastes over time. But my favorite use for the app? To make me laugh.

Pandora also features tracks from comedy albums and clips of comedians doing stand-up acts. You can plug-in your favorite comedians—for me, acts like Chris Rock, Louis CK, and Adam Sandler—and Pandora will play clips from those acts and similar comedians. It works just like the music stations: you can vote whether you like the comedy or not, and Pandora will serve up more of what you like. In my case, it seems to be adult (very adult) humor.

Chris Rock on Pandora iPhone App

So why do I say it’s the best way to listen to comedy? Well, sure, you can find comedy radio stations elsewhere, but what’s unique about the Pandora experience is that you’re not stuck listening to an entire comedy act if it’s not funny or in poor taste, you simply vote it down, and you’re on to the next clip. You tend to get the best bits of acts. And it’s all free, with ads of course, but you can pay $3.99 a month to get rid of them.