Author: Alan

Review: Griffin Simplifi Dock for iPhone

Griffin Simplifi Dock for iPhone and iPod

The Griffin Simplifi Dock ($45) is a versatile dock that can be used to charge and sync all generations of the iPhone as well as several generations of iPods—it even can fit an iPhone with all but the thickest cases. The Simplifi includes 2 card readers with read/write support for 6 types of digital media cards and comes with 2 powered USB ports on the back. Overall, we found the dock worked perfectly with the iPhone and can recommend it for iPhone users looking for something different from the default Apple dock, or for those who need a card reader or extra USB port.

The Griffin Simplifi comes with 6 white plastic adapters that allow various iterations of the iPhone and iPod to have a tight, secure fit while sitting in the dock. If you use an iPhone case, the iPhone won’t fit snug into any of the adapters. However, the Griffin Simplifi functions as a universal dock if you don’t use any of the adapters, leaving plenty of room for an iPhone with a case. A side effect of using no adapter is that the iPhone fits very loosely in the dock, and the docking process is a much less guided, and therefore, much less smooth, process.

The dock is a combination of aluminum casing and white plastic. Beauty is in the eye of the beholder, but we found it generally good looking. The fact that it breaks from the all-white plastic of Apple’s docks will appeal to those who like to “think different” while still maintaining some Mac aesthetic. Owners of a Mac Pro or the original Apple Cinema display, in particular, will find that the dock’s aluminum casing matches their equipment well.

Griffin Simplifi Blue LED

Some might find the glowing blue LED power indicator on the front as a drawback.

Griffin Simplifi for iPhone Card Slots

There are two memory card ports on the front that have read/write support for 6 types of memory cards: Memory Stick, Memory Stick Pro, SD, SDHC, XD, and compact flash. Although not quite up to par with, say, a 60-in-1 card reader, the 6 supported formats should cover the basics for most.

Griffin Simplifi Short Mini USb Cord

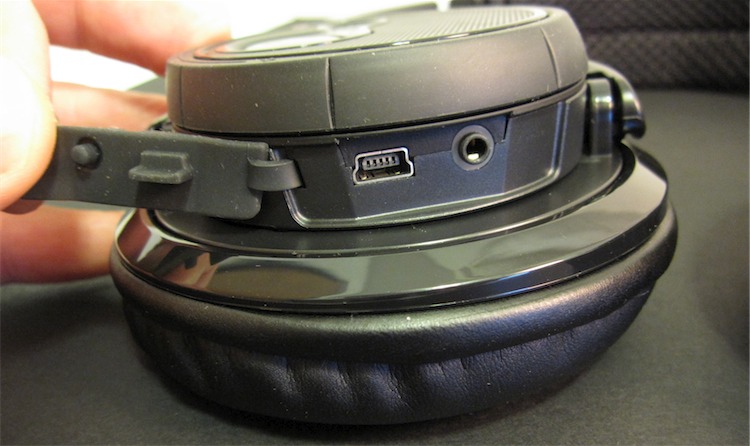
The dock uses a mini-USB cord to connect to your computer (the end that plugs into your computer is normal USB, the end that goes into the dock is mini-USB). The cord is amazingly only 2-feet long, which is a problem if you plan on docking your iPhone anywhere but right next to your computer.

Griffin Simplifi iPhone USB hub

On the back of the Simplifi are 2 powered USB ports. Because you use up one of your computer’s USB ports to plug it in, the dock adds a net gain of 1 USB port to your computer. While that doesn’t exactly qualify it as a USB hub, it’s still a nice feature in an iPhone dock.

Griffin Simplifi Rubber Bottom

The Simplifi also comes with an AC adapter (wall plug), but strangely enough, you can’t recharge your iPhone when the wall plug is used. The wall plug only powers the USB ports on the back. You could conceivably plug your iPhone into one of the USB ports to charge, but this defeats the purpose of having a dock. If your goal is to have a dock you can plug into the wall and charge your iPhone (without connecting it to a computer), you will want to look elsewhere. (Just to be clear, the dock does charge your iPhone when the dock is plugged into a USB port on your computer.)

Griffin Simplifi Back

Griffin Simplifi With Adapters

Conclusion

The Griffin Simplifi is a versatile dock for your iPhone or iPod that adds a net gain of an extra USB port as well as a card reader. Its silver aluminum breaks from Apple’s all-white-plastic docks, making it perfect for those who like a little something different, while still keeping with the Mac aesthetic.

Links:

Official website for the Griffin Simplifi

Review: Buster the Chicago Bus Tracker

Chicago CTA Buster for iPhone

Buster: the Chicago Bus Tracker ($0.99, iTunes link) is an amazing little app that lets you know when a bus is going to arrive at a bus stop. As a Chicagoan, I can tell you this drastically changes the experience of using buses in the city, and could be game changing for all mass transit if they implement similar networked GPS technology.

Buster Nearby Bus Stops Map

Before the city put GPS locators on CTA buses, it was a hassle taking the bus. You’d never know if it was arriving in 5 minutes or 45 minutes. So there you’d stand on the sidewalk, freezing in the Chicago cold or burning in the heat, waiting for a bus as hundreds of cars drive by gawking at you.

Not any more. Simply select the bus stop, and the app will tell you when the next bus is arriving so you can dash and catch it, or do something else while you wait. After using it for the past two months, I can tell you it’s accurate down to a minute or so.

Buster Nearby Bus Stops

If you’re not sure of a stop’s location, the app uses the iPhone’s GPS to list the nearest bus stops, which is extremely useful if you’re in a strange part of town. You can even save a list of your favorites for quick access. The app also distinguishes between north/south and east/west traveling buses.

Buster List of Bus Stops

The app can be a money saver for Chicagoans who, like me, pay a single monthly fee for unlimited rides on the city’s trains and buses. Buses should be a more convenient travel option for city dwellers because their routes blanket most of the city (trains travel to only a portion of the city). But buses could be big time wasters, as often it could take an hour just to go 5 blocks (counting wait time). Most people are forced to take more expensive taxi rides simply for the convenience. Now I feel much more comfortable taking the bus, as my time isn’t wasted and I don’t have to suffer the elements as much.

How to Change the Font of the iPhone’s Notes App

Marker Felt on iPhone

Many people dislike the default font (Maker Felt) used in the iPhone’s Notes app. Luckily, Apple recently supplied a way to select from two other fonts. There are also a few “unofficial” ways to change the fonts of the Notes app. First, here’s the official way:

How to Change the Font in Notes

1. Open the iPhone’s Settings:

2. Scroll down and tap Notes:

3. Select from the 3 default fonts: Marker Felt, Chalkboard, or Helvetica.

And here are two ways to squeeze out a few more fonts in the Notes app:

The Chinese Keyboard Method

1.Tap the iPhone’s Setting’s icon:

iPhone Settings icon

2. Tap General
3. Scroll down and tap Keyboard
4. Tap International Keyboards
5. Scroll down all the way to the bottom and tap Chinese (Simplified):

Changing the iPhones Note App Font 1

6. Switch the tab labeled Pinyin to On:

Change the iPhone Note App Font 2

You’ll only have to do steps 1-6 once. Steps 8 and 9 will have to be repeated every time you want to change the font.

7. Open the Notes app.
8. Create a new note, and when the keyboard pops up, hit the little globe icon until you see the Chinese keyboard. Most of the keys will be the same as the English version, but the space bar and return button will have Chinese characters on it:

Changing the iPhones Font

9. Type one letter, then switch back to the English keyboard.

Now, when you continuing typing, the note will be in Verdana font.

The Computer to iPhone Method (Mac Only)

iPhone Notes With Multiple Fonts

This method is for Mac users only, as it involves creating notes in the Mac Mail application. With this method, you can use dozens of fonts.

1. In the Mail program on your Mac, create a new Note:

Create New Note in Mac Mail

2. Change the font style to whatever desired font style you want on the iPhone and type a letter or two in that font:

Add a Different Font to Mac Mail Note

3. Click Done.
4. Connect your iPhone to the computer.
5. In iTunes, select your iPhone in the left sidebar.
6. Under the Info tab, scroll down and make sure the checkbox for “Sync notes” is checked:

Sync Notes Checkbox

7. Hit Apply or Sync
8. On the iPhone, open the Notes app.
9. Find the note you just created on the Mac, open it, and start typing. You’ll see the text is in the same the font you used on the Mac.

You can also use this method to change the font color and size:

Change Font Color and Size in Notes App

Note that the font change will only work in the note that you created in the Mac’s Mail application. If you try to copy and paste the text into a new note, it will revert back to Marker Felt. Now, create a 100 notes with a single character typed in Helvetica, and you’ll never have to use Marker Felt again!

Be sure to check out more of our iPhone Tips.

Review of SwitchEasy Colors (iPhone 3G and 3GS Case)

With so many poorly made silicone cases out there, it’s nice to come across one with some attention to detail. SwitchEasy Colors ($15) is a silicone case for the iPhone 3G and 3GS available in 10 colors. The case impressed us with its superb, curve-hugging fit and thorough surface coverage. Although not the most stylish case we’ve seen, its overall build quality is excellent, with no loose corners, no frayed edges from sloppy machine cutting, and no dangling rubber threads. Despite a few quibbles with how it handles the home button and ringer switch, we found SwitchEasy Colors to be one of the best all-around cases for the iPhone and rate it a 9.0 out 10, highly recommended.

We found SwitchEasy Colors’ minimalistic form factor very much to our taste. The back of the case is a single color and has a smooth rubber texture. It covers the Apple logo and all of the exposed shiny chrome, taking away the iPhone’s gloss. The case’s smooth texture doesn’t do much to improve the iPhone’s slipperiness, but the soft silicone feels good in the hand.

We loved how the case handled the volume and sleep buttons. Some cases carve out openings around these problematic areas. But the openings are often made too small, making the buttons uncomfortable to use. SwitchEasy Colors takes the better approach of covering the buttons with little raised areas of silicone that simulate buttons. The buttons are very comfortable to use, with no sacrifice in performance.

SwitchEasy Colors for iPhone 3G and 3GS Back 4

The case comes with a few extras. Included are two protective screen shields, a plug for the headphone jack, a plug for the docking port, and a small square cleaning cloth. We didn’t find any of the extras particularly useful, as we don’t recommend using screen shields, the cloth is too small to get much use out of, and the plugs aren’t convenient for everyday usage.

SwitchEasy Colors Case Ringer and Volume

In terms of protection for accidental drops, the SwitchEasy Colors offers moderate shock absorption. It’s not a particularly thick case, but its slim form factor is nice for sliding in and out of pockets. We do like the thick rim that sticks up around the iPhone’s screen that should help prevent the screen from cracking when dropped .

SwitchEasy Colors for iPhone 3G and 3GS Top View 3

We do have two quibbles. The first is the home button. We didn’t like that it’s a different color from the rest of the case, or at least, we’d like the option for the same color. Also, we did not like the feel of the button. Its stiff plastic removes what little tactile feedback there is. While it functions well—meaning the same pressure with your finger gets the same results—there’s a dead feeling to pressing it that is disconcerting.

SwitchEasy Colors Sleep Button and Headphone Port

Our other quibble is a common one with silicone cases: poor access to the ringer switch. The area around the ringer switch is too small and makes it difficult to flip on and off. You must reach with your fingernail, which is uncomfortable. We’re still waiting for a case designer to figure out how to deal with this problem area.

SwitchEasy Colors Color Choices 2

Available in ten colors.

Conclusion

The SwitchEasy Colors case impressed us with its overall quality and attention to detail. The case hugs the curves of the iPhone just right, leaving the iPhone’s distinct shape in place while still offering superb coverage. We prefer silicone cases in general for their convenience (small form factor, easy to put on and remove, dirt resistant), and SwitchEasy Colors is one of the best in class. Despite a few minor quibbles, we found it one of the most well-designed cases we’ve come across and give it a high recommendation with a 9.0 out of 10 rating.

4 Free Clock Apps for the iPhone

I’ve been looking for a good iPhone clock app. My old first-gen iPhone pretty much sits in a dock on my desk all day because I’ve decided to use it as a Skype phone. Why not use it as a desk clock too?

A good iPhone clock app disables the iPhone’s auto lock, so as long as you have it plugged in, it will always display the time without going to sleep. After searching through the hundreds of clock apps in the store (most costing $0.99 or more) and testing out dozens, I found these four excellent free apps.

Alarm Clock Free

Alarm Clock Free

Alarm Clock Free (free) is one of the more popular free clock apps in the App Store. It shows time, day of the week, and live local weather conditions and temperature so you’ll know what conditions you’ll be facing that day. The alarm function allows you to wake up to your choice of song or playlist from your iPhone’s music library. A built-in flashlight occasionally comes in handy as well. Very simple but sharp looking interface.

Naver Clock

NaverClock (free) is a cool flip clock for the iPhone. The app has an flipping animation for the turning of every minute and hour. It also conveniently displays a monthly calendar. There is an option to set an alarm for those who want to use their iPhone as an alarm clock. The only problem with that app is that settings are all in Japanese Korean.

Free Digital Clock

Free Digital Clock (free) is very basic clock app that shows time (including seconds), date, and day of the week. There is no alarm, but there are settings that allow you to change the color of the clock to just about any color.

Theme Clock

Theme Clock (free) features 9 different styles of digital clock to choose from. There are settings for a 24-hour clock, show weekday, show date, dimmer, show iPhone status bar, and auto-lock.

Note: The clock launches stuck in landscape. To get it in portrait mode, I had to rotate the iPhone a few times.

iPhone Basics: How to Attach Multiple Photos to an Email

To send multiple photos on the iPhone, you need to start in the iPhone’s Photo app, not in the Mail app like you’d assume. Below are step-by-step instructions for attaching multiple photos to an email.

1. Launch the Photo App:

2. Tap the album where the photos are located:

3. You’ll see a bunch of thumbnails of the pictures in the album. Tap the Share button in the top right corner:

4. Tap up to 5 photos you want to share. A red check mark will appear on the selected photos:

5. Tape Share in the bottom left.

6. Tap Email:

7. A new email will pop up with your photos inserted into the email. Choose your recipients, write a subject and message if you want, and tap Send. And that’s it.

Be sure to check out more of our posts on iPhone Basics.

Review of Motorola S805 Bluetooth DJ Headphones (iPhone Stereo Bluetooth Headphones)

The Motorola S805 Bluetooth DJ Headphones ($75) are wireless, stereo bluetooth headphones that work with the iPhone 3G and 3GS. After pairing the headphones with the iPhone, you can to listen music, answer/end calls (there’s a built-in microphone), play/pause music, and control the volume. And with the iPhone 3.1 update, you’ll be able to access Voice Controls as well.

The headset has a built-in rechargeable battery, which lasted for around 15 hours of music playback in our tests (Motorola claims 17 hours). The headphones come with a plug-in wall adapter for recharging. A full recharge takes around 3 hours.

The headset has a studio or DJ-style appearance and is larger and bulkier than most Bluetooth headsets. They are made of mostly plastic, with the earphones covered in a combination of vinyl and fabric, which can get hot if worn over long periods of time. The inside of the headband is lined with fabric, which makes the headphones more comfortable to hang around your neck. Overall, we found the headphones comfortable to wear if not a bit warm due to a lack of ventilation.

The headphones delivered a well-rounded sound–much better than the stock iPhone earphones and just about all in-ears we’ve tried. The bass, in particular, was deep and full. There was some audible background hiss that all Bluetooth headphones experience. The hiss is only clearly heard at higher volumes and generally did not interfere with the enjoyment of music (although some audiophiles might disagree).

As mentioned, the headphones come with built-in controls for both audio and phone functions. The left earphone features an answer/end button for phone calls. The volume can be lowered or raised by twisting a circular knob around the earphone.

The right earphone has a play/pause button for music control. There is also a circular knob that can move the music forward/back a track, but the iPhone only supports the A2DP profile, which doesn’t have music controls built in. The good news is that upcoming iPhone 3.1 software update is bringing Voice Control, which will allow users to verbally move the music forward or back a track.

I tested the headphone’s range around my apartment and found that it delivered a solid signal even in rooms separated from the iPhone by several walls. Motorola says the Bluetooth has a range of around 30 feet, and our tests indicated about 25-30 feet before cutting out. But that’s 25 feet with a solid signal through 3 walls in between.

Motorola describes the S805s as having “noise, echo, and wind cancellation.” In reality, we found no noise cancellation other than the fact that the headphones are large and form a decent seal around your ears.

In our tests, the call quality with the headset’s microphone was mediocre at best but good enough to be heard clearly during phone conversations. My voice was described as sounding somewhat tinny compared to the normal iPhone microphone, but still clearly audible.

Conclusion

What most impressed us about the Motorola S805 Bluetooth DJ Headphones was the excellent audio. They delivered full, rich sound reproduction and excellent bass levels. The built-in microphone is adequate for phone calls but not up to par with the iPhone’s built-in mic. The cons of the headphones are their bulky size, which make them difficult to travel with, and the plastic-and-vinyl construction, which give the headphones a somewhat cheap, breakable feel. Overall, thanks mainly to the excellent audio quality of the earphones, we can recommend the Motorola S805 headphones for iPhone owners.

Helpful Links:

WMExperts review

BlueTomorrow.com review

TechDigest.tv review

Amazon.com: Motorola S805 Bluetooth DJ Headphones

Review of CaseCrown Polycarbonate Slim Fit Case

For owners looking to add a little color to the iPhone, the CaseCrown Polycarbonate Slim-Fit case might be a good way to go. The CaseCrown is a thin, hard-shell case for the iPhone 3G and 3GS that comes in 5 colors. And the colors themselves are quite impressive–created from a premium paint that resembles that used on cars. The case is more for changing the looks of your iPhone than it is for protection, particularly in the shock absorption area. The CaseCrown is generally well-designed but not spectacular. We find it a decent value for its price point and assign it an overall rating 7.1 out of 10, recommended.


For those looking to protect your iPhone from falls, the CaseCrown is not an ideal choice. Its thin case does not deliver much shock absorption. It does offer some scratch protection to the back of the iPhone. The upside to having this smaller form factor is that there is almost no added weight or width to the iPhone, keeping it light and easy to slide in and out of your pocket.

The case is available in five colors: black, blue, green, red, and silver. We found the red case, in particular, to be an impressive shade, with a subtle dark tone. To produce the color, the polycarbonate material is covered with a premium paint job that has an appealing shiny metallic sheen, which goes well with the iPhone’s chrome detailing.

To apply the case, you snap the iPhone inside. The iPhone is held in place via long rails on the side and 4 gripping teeth in the corners. It’s a snug, secure fit–we had little worry of the iPhone ever accidentally slipping out. However, the tight fit also makes it hard to remove the iPhone from the case.

The CaseCrown leaves plenty of room around all ports for easy accessibility (docking port, headphone jack, etc). Our one complaint in this area is that the volume and ringer switch become slightly inset when the case is on and are therefore not as comfortable to operate.

Another quibble we have with the case is that its corners are rectangular teeth, separated by thin slots, that help grip the iPhone. While the teeth make sure the iPhone fits snug, they’re also a bit awkward in terms of the overall contour, and we envision snagging them on something in the future.

The iPhone itself is pretty drop friendly thanks to its slick casing. The CaseCrown’s polycarbonate material only offers a slight improvement in terms of slippage. It’s not quite as slippery as the iPhone’s glossy surface, but it’s smooth to the touch with little added grip.

Conclusion

The CaseCrown is an affordable way to give your iPhone some premium color without adding weight or bulk. It offers little protection in case you drop your iPhone, as there is virtually no shock absorption. We see the CaseCrown as perfect for value-driven customers looking to add color to the iPhone and keep it from everyday scratches. Rating: 7.1 out of 10, recommended.

How to Make an Em Dash and Ellipsis With the iPhone Keyboard

The iPhone’s keyboard has a few extra characters that only become visible if you press and hold down keys. Two frequently used characters you might find useful to know about are the em dash (–) and the ellipsis (…).

Em Dash–

To make an em dash—often used to interrupt a sentence for parenthetical remarks like this one—hold down the hyphen key until you see an em dash appear next to the hyphen. Slide your finger over to highlight the em dash and release your finger.

Ellipsis…

To make an ellipsis, hold down the period key until the ellipsis appears next to the period. Slide your finger to highlight and release.

Be sure to check out more of our posts on iPhone Basics.