Category: iPhone Tips

3 Hidden Features of the iPhone Camera’s Panorama Mode

The panorama mode in the iPhone’s Camera app is easy to use, but it also has a few non-obvious “hidden” features. Below are 3 of these hidden features.

1. Reverse the Panorama’s Direction By Tapping the Arrow
Tap arrow to reverse panning direction

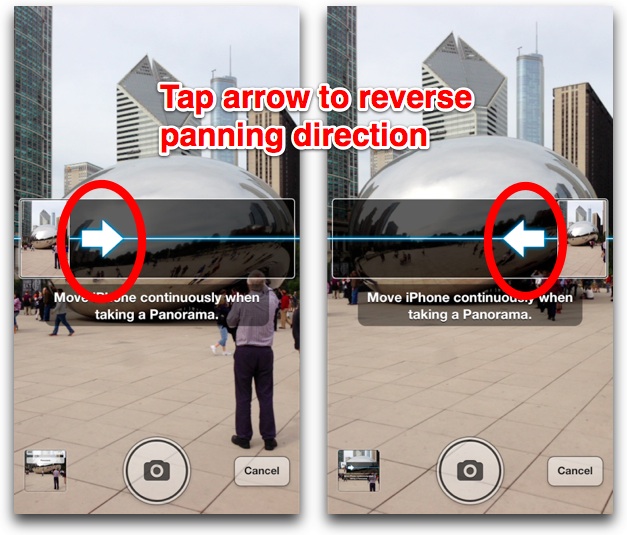
By default, the iPhone’s panorama mode requires you to tilt the iPhone from left to right. To reverse the direction, simply tap the arrow on the screen. Now you can start on the right, and tilt the iPhone to the left to create a panorama. Why would you want to change the direction? Because it’s easier to accurately select a starting point than it is a finishing point.

2. Finish a Panorama By Suddenly Moving the the iPhone in the Opposite Direction
Tilt in opposite direction to finish Panorama

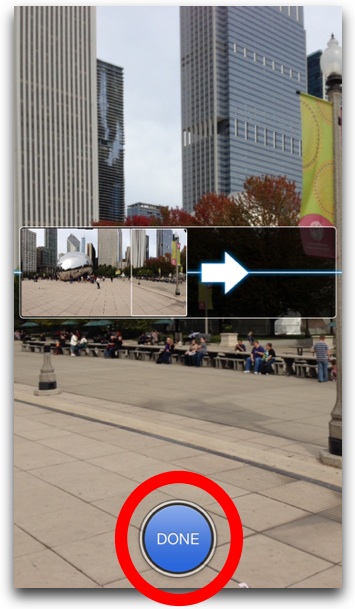
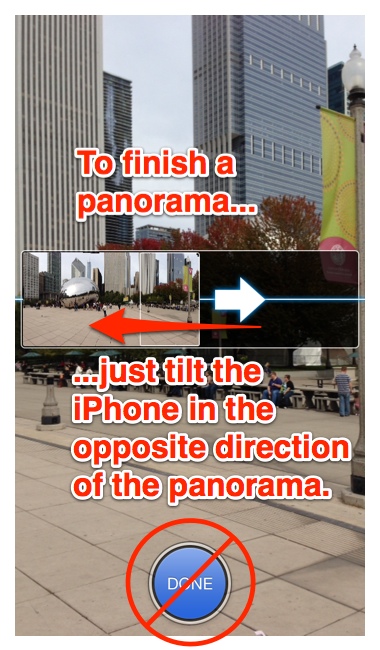
You don’t need to tap the Done button to finish a panorama photo, just move the iPhone in the opposite direction you were creating the panorama. This is actually the best way to finish off your panorama, as reaching for the Done button could cause you to tilt the iPhone up or down, creating jagged edges in your panorama. Also note that you don’t have to fill the entire rectangular box the iPhone displays in panorama mode to make a panorama—you can stop at any time and still create a photo.

3. Take Vertical Panoramas of Tall Structures

Building Panorama shot vertically

Panorama mode isn’t just for horizontal landscapes, you can use it to record tall structures like buildings, trees, etc. To do this, simply hold your iPhone in landscape orientation while in panorama mode. Then you simply start photographing from the bottom up (or top down…see Tip #1).

Tip: How to Easily Delete Accidentally Highlighted Text in iBooks (iPhone & iPad Tip)

iBooks icon

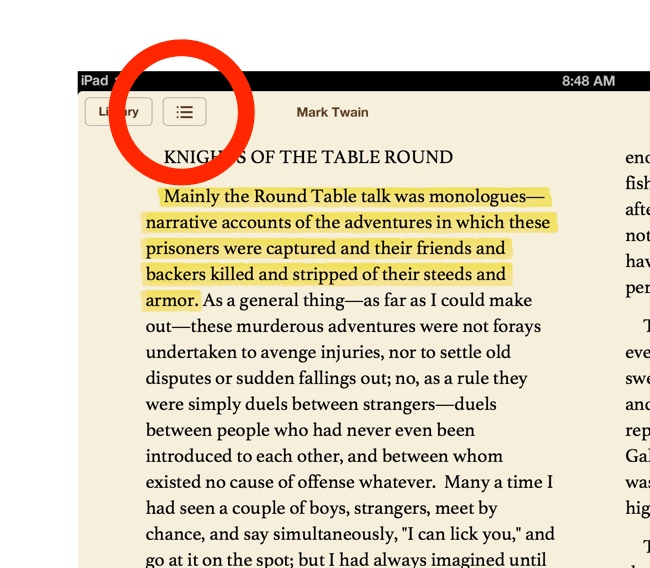
I love using iBooks to read books on the iPad & iPhone, but there is one feature that can be annoying: highlighting text. You see, iBooks lets you highlight text simply by dragging your finger over it. The problem is, this often leads to accidentally highlighting the text when turning pages or casually touching the screen. To make matters worse, trying to delete those highlights can have the comically opposite effect of creating even more highlights. There is an easy solution to removing the highlighting. Below is a quick way to delete those highlights.

Video Instructions:

Step-by-Step Instructions:

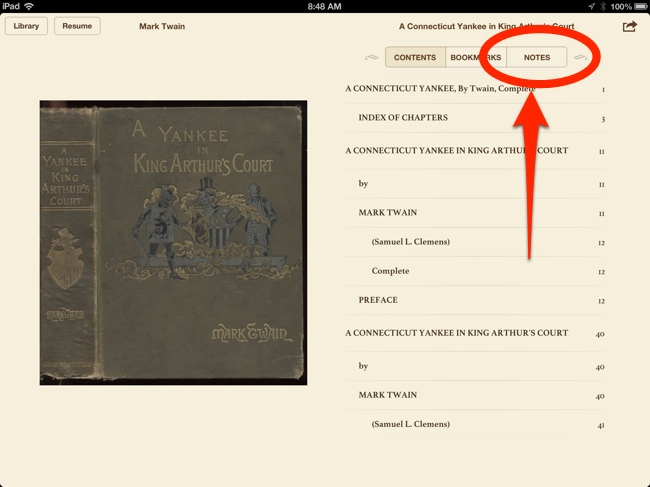
1. Tap the Table of Contents button at the top left:

Table of Contents button in iBooks

2. Tap Notes:

Tap Notes button in iBooks

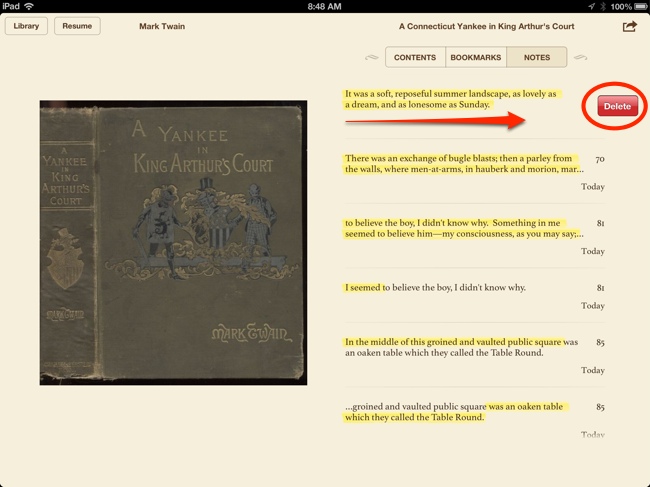
3. Swipe the note, then tap Delete:

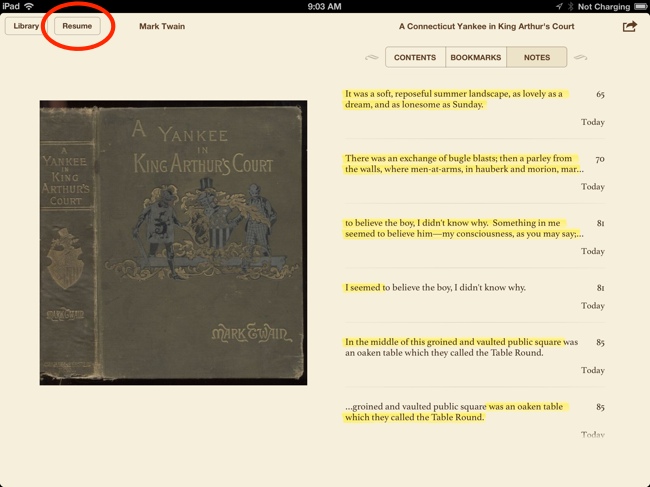
4. Tap Resume in the top left:

Tap Resume button in iBooks

And that’s it. You’ll be taken right back to where you left off reading, and the highlighting will be deleted from the text.

An iPhone Tip for Mac Owners: How to Import iPhone Photos Without Using iPhoto

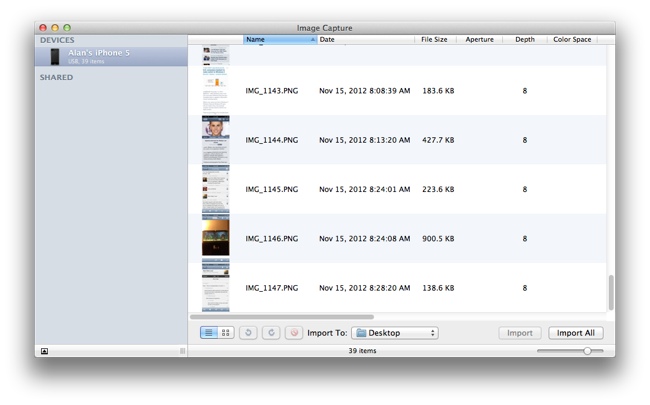
Image Capture Mac App

When importing photos from my iPhone to the Mac, I’ve found the default method—using iPhoto—to be slow and clunky. There is a better solution, however. It’s called Image Capture, and it’s built right into the Mac.

Image Capture Mac App

Image Capture connected to my iPhone 5

Image Capture is a fast and lightweight application that comes with every modern Mac. The application can import photos and video from cameras, iPhones, and other devices. Just connect your device to your Mac, launch Image Capture, and import. It runs much, much, much faster than iPhoto. You can import all photos/video at once, or choose only select photos. And perhaps best of all, you can even choose the photos’ destination—for example, the desktop or a specific folder—something iPhoto won’t let you do.

Extra Tip:

You can have Image Capture automatically open whenever you connect your iPhone to your Mac, speeding up the photo-import process even more. Here’s how.

1. Open Image Capture and connect your iPhone to your Mac.

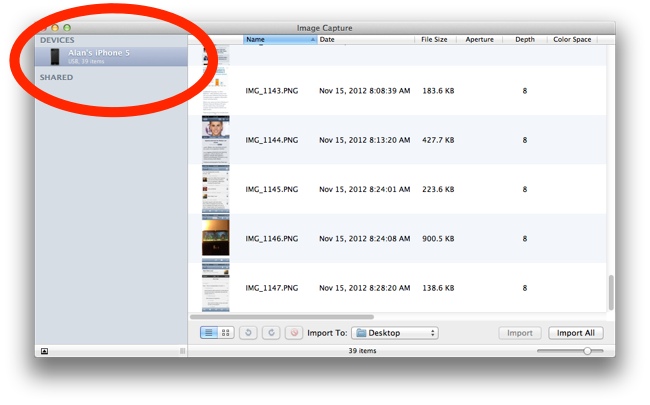
2. In Image Capture, make sure your iPhone is selected (highlighted) in the left column:

Select your iPhone in Image Capture

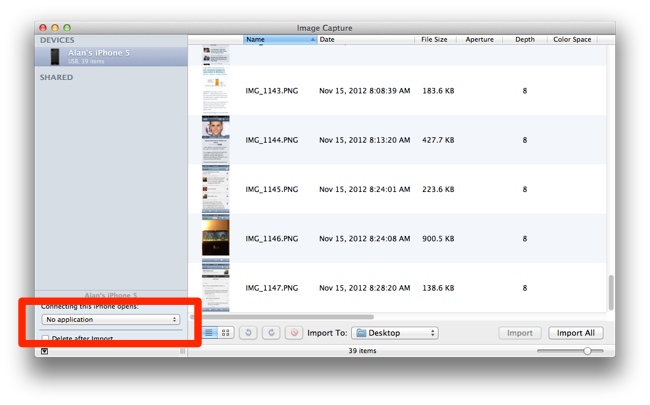
2. Click the icon in bottom left corner of Image Capture:

Click icon in bottom right corner

3. Click on the drop-down menu beneath the text Connecting this iPhone opens:

Click drop-down box

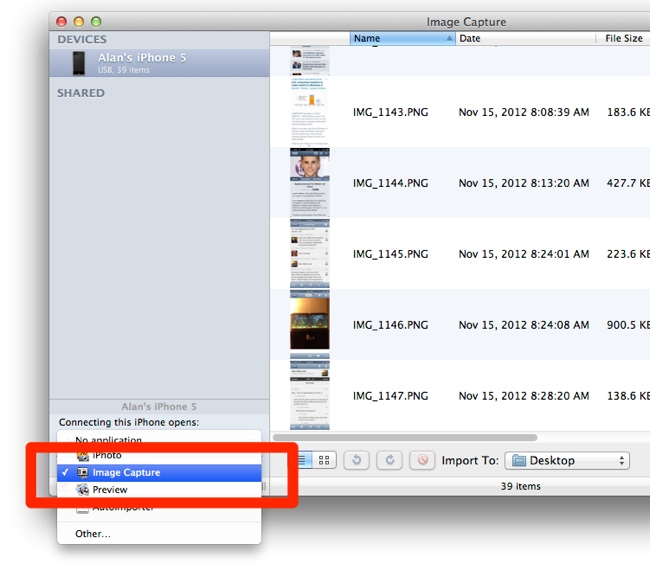
4. Select Image Capture:

Select Image Capture from drop-down menu

And that’s it. Image Capture will now automatically launch whenever your connect the iPhone to your Mac.

Extra Note:

  • Image Capture lets you delete photos off your iPhone without importing them first, something iPhoto will not let you do. So if you just want to delete all of your iPhone photos at once, or a select few, this is a great solution.

iPhone Tip: A Special Way to Enter Birthdays on the iPhone, and Its Benefits

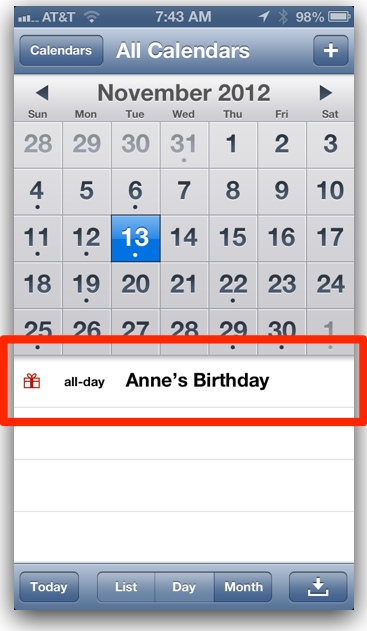
Birthdays on the iPhone

Birthdays get special treatment on the iPhone. They have their own unique way for adding them to the calendar much different from other calendar events. And it’s done in the…Contacts app? Yep.

This special method may take a little more time, but it has a few benefits. One benefit is that birthdays get a cute little red-and-white box icon next to them in the Calendar app (see image above). The other benefit is that birthdays get their own special calendar, which you can use to show just birthdays in the Calendar app, or conversely, prevent all birthdays from showing.
Check out the instructions below on how to enter birthdays using the Contacts app. Also see the end of this article for more interesting info on Birthdays and the iPhone.

Quick Instructions:

Select a contact in the Contacts app. Tap Edit > Add a Field > Birthday.

Step-by-Step Visual Instructions:

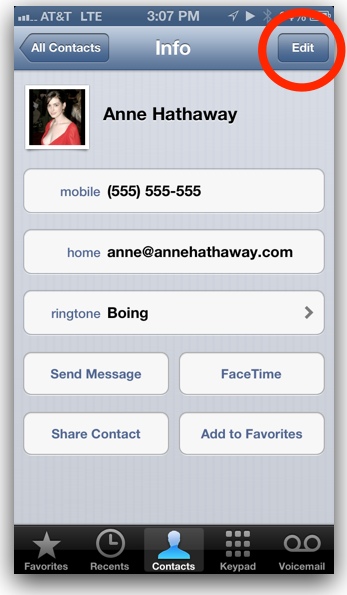
1. Open Contacts app and select a contact:

2. Tap Edit in the top right:

Tap Edit to create birthday

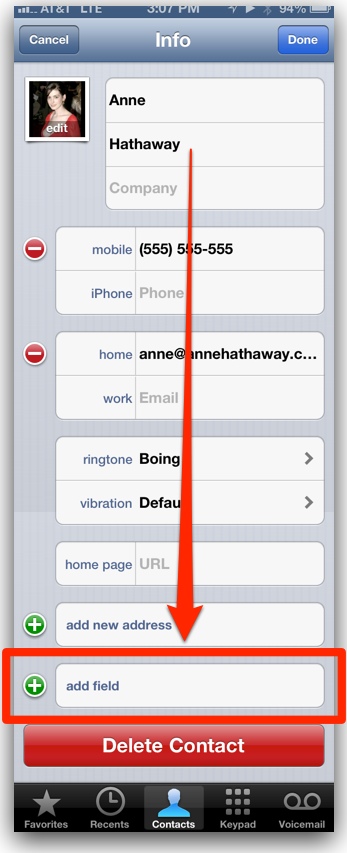
3. Scroll down and tap Add Field:

Scroll down and tap Add Field

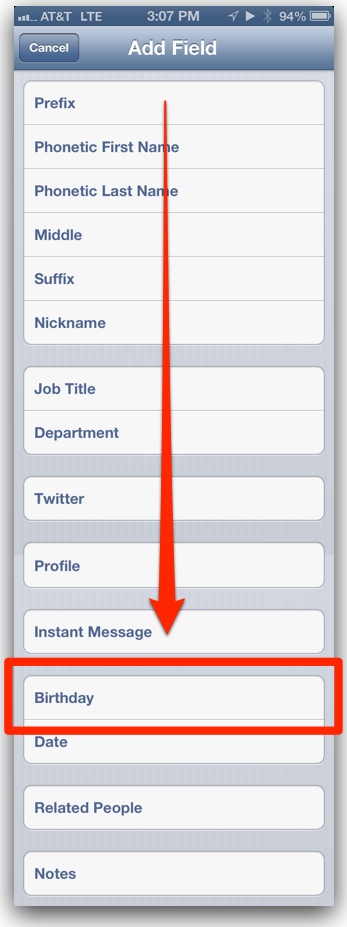
4. Scroll down and tap Birthday:

Scroll down and tap Birthday

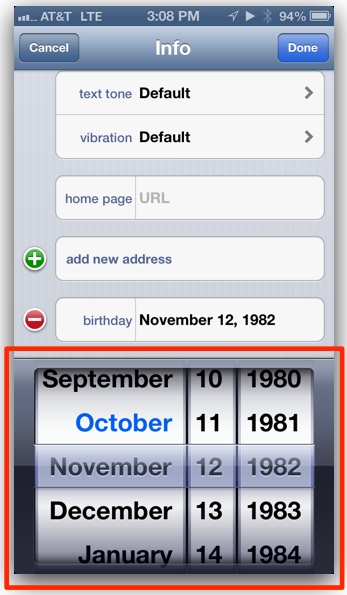
5. Enter the birthday’s day, month, and year. If you don’t know the year, choose the 3-dash line option below the current year:

Enter in Birthday date

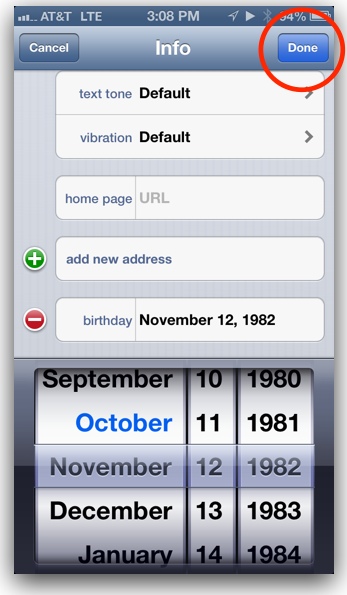
6. Tap Done in the top right:

Tap Done in top right to finish birthday creation

And that’s it, you’ve created a birthday for that contact.

Extra Notes and Tidbits:

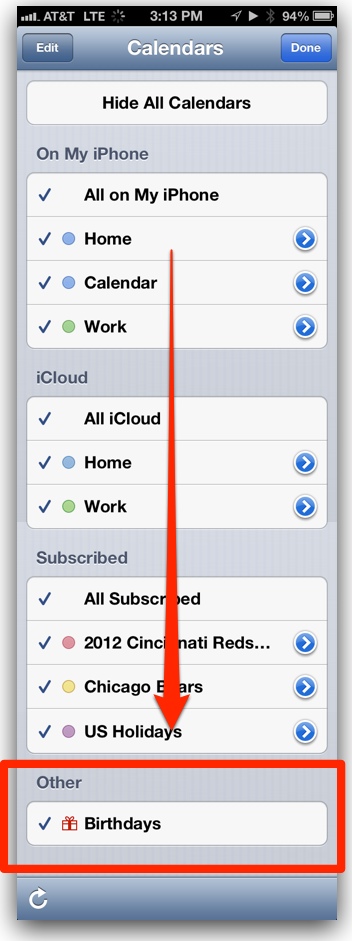
  • Note that all birthdays entered with this method will appear in the iPhone’s special Birthday calendar (see image at bottom of post). The calendar can be found by opening the Calendar app and tapping the Calendars button in the top right corner. A separate Birthdays calendar is useful in case you wanted to view only birthdays. To do this, tap Hide All Calendars, then tap the Birthdays calendar so that a checkmark appears next to it. Conversely, you can remove all birthdays from showing in the calendar by unchecking the Birthdays calendar.
  • If you set up the iPhone’s special Facebook integration (found in the iPhone’s Settings), all of your Facebook friends’ birthdays (along with their contact info and email addresses) will be downloaded into the iPhone’s Contacts and Calendar apps. Their birthdays will then show up in the special Birthday calendar. You can prevent this from happening by going into Settings > Facebook and sliding the tabs under Allow These Apps to Use Your Account for Contacts and Calendar to Off. This option will only appear after you have logged in to the special Facebook integration for the first time.
  • If you enter the contact’s birth year and sync with the Mac version of Calendar, the person’s age will show up in Calendar (example, “Anne’s 36th Birthday”). The person’s age does not show up in the iPhone/iPad Calendar app, however.

Special Birthday Calendar

Tip: How to Quickly Add Your Favorite NFL Football Team’s Schedule to Your iPhone’s Calendar

NFL logo

Want to quickly and easily add your entire favorite NFL team’s schedule to your iPhone’s calendar? If you’re reading this on an iPhone or iPad, just find your favorite team in the list below, tap subscribe, then again tap subscribe from the pop-up that appears on your iPhone.

Note that, because these are subscription calendars, they will automatically update every year (as long as the calendar owner keeps them updated). Subscription calendars are also easily removed from your iPhone’s calendar if they annoy you. To delete, go to Settings > Mail, Contacts, Calendar > Subscribed Calendars, select the calendar, and tap Delete Account. Also note that some of calendars below have alerts set up for each game. You can turn off the alerts by sliding the Remove Alarms tab to On in the calendar’s account settings.

The subscription calendars below are provided by SportyCal.com, where you can find more links to your favorite sports teams.

Arizona Cardinals subscribe
Atlanta Falcons subscribe
Baltimore Ravens subscribe
Buffalo Bills subscribe
Carolina Panthers subscribe
Chicago Bears subscribe
Cincinnati Bengals subscribe
Cleveland Browns subscribe
Dallas Cowboys subscribe
Denver Broncos subscribe
Detroit Lions subscribe
Green Bay Packers subscribe
Houston Texans subscribe
Indianapolis Colts subscribe
Jacksonville Jaguars subscribe
Kansas City Chiefs subscribe
Miami Dolphins subscribe
Minnesota Vikings subscribe
New Orleans Saints subscribe
New England Patriots subscribe
New York Giants subscribe
New York Jets subscribe
Oakland Raiders subscribe
Philadelphia Eagles subscribe
Pittsburg Steelers subscribe
San Diego Chargers subscribe
San Francisco 49ers subscribe
Seattle Seahawks subscribe
St. Loius Rams subscribe
Tampa Bay Buccaneers subscribe
Tennessee Titans subscribe
Washington Redskins subscribe

iPhone Tip: How to Insert a Photo Into an Email Without Leaving the Mail App

Want to send a photo via email on the iPhone? Apple has now made it easier. Used to be, you had to start in the Photos app (not very intuitive, I know). But now, you can do it right inside the Mail app itself. Here’s how.

Quick Instructions:

In an email, hold your finger down until a pop-up menu appears. Tap the right arrow in the menu, and tap Insert Photo or Video.

Step-by-Step Visual Instructions:

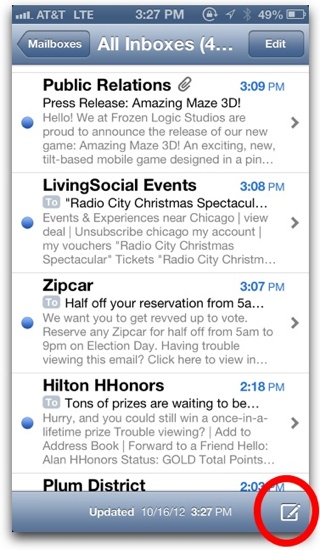
1. Begin by creating a new email message by tapping the Compose button:

Tap Compose in Mail

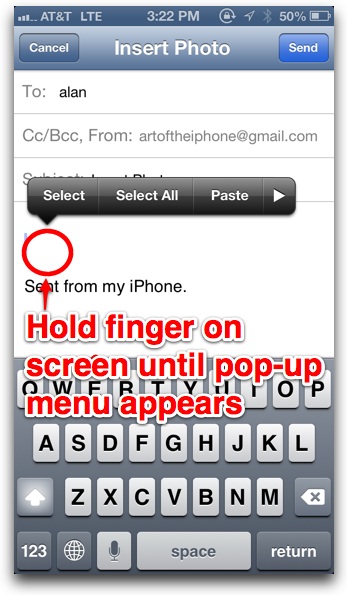
2. Hold your finger down in the body of the email until you see the following pop-up box:

Hold finger until menu appears

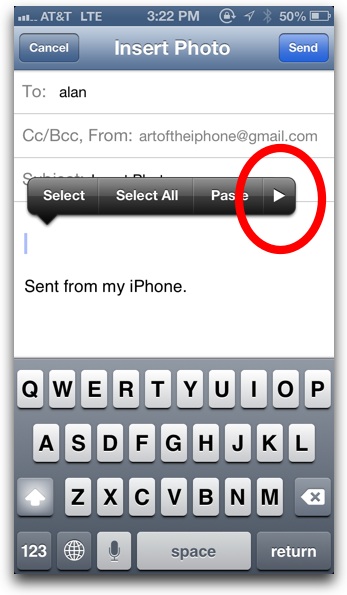
3. Tap the arrow on the right:

Tap arrow on pop-up menu

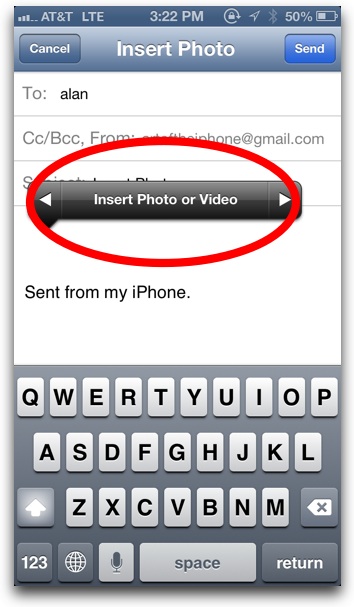
4. Tap Insert Photo or Video:

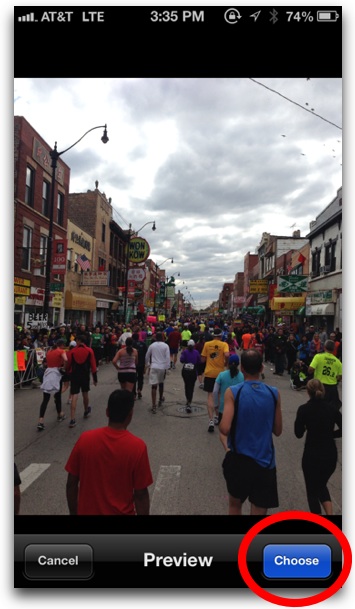
5. Find a photo you want and tap Choose:

6. The photo will be inserted into your email. Repeat steps 2 through 5 if you’d like to add more photos.

And that’s it. Just tap send! You may be asked what file size of the image you want to send. Choose one depending on your connection (keep in mind your recipient’s download speeds as well).

Extra Tip

  • You can only insert one image at a time using the above instructions. If you want to attach multiple photos at a time, start in the Photos app. Instructions here.

iPhone & iPad Basics: How to Use Flagged Emails and the New Flagged Inbox

Flagged email inbox in iPhone Mail app

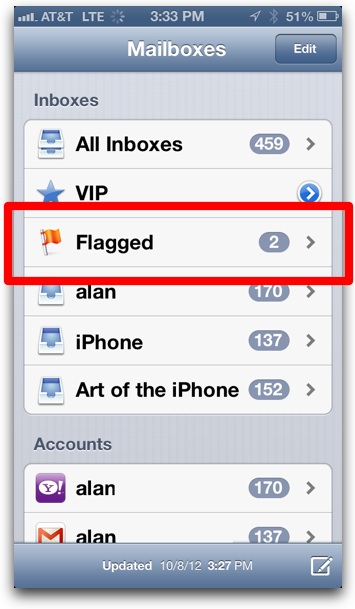
The Flagged inbox is a new feature introduced in the iOS 6 software update that is useful as a way to sort important emails into one central place so you can find them easier. Flagged emails from different accounts all go into the same Flagged inbox.

To send an email into the Flagged inbox, you simply tap the flag icon in the bottom right corner of the individual email, like this:

Tap Flag icon in bottom left

Flagged emails still remain in their original email account’s inbox but also appear in the Flagged inbox. To remove the email from the Flagged inbox, just tap the flag icon again, then tap Unflag from the pop-up menu.

Extra Notes & Tips:

  • Don’t see the Flagged inbox? It doesn’t appear until you flag an email for the first time.
  • You can move a flagged email out of the Flagged inbox into another sub-inbox of the email account it belongs to by tapping the move email button in the Mail app, which is the second button from the left. The email will remain flagged, it just won’t appear in the Flagged inbox. You can move it back into the Flagged inbox via the same “move email” button.

iPhone Tip: How to Receive Notifications for Emails From VIP Contacts Only

Want to get a notification for only when a specific contact sends you an email? It’s now possible thanks to the VIP contacts feature in the Mail app. It’s easy to set up, just follow the step-by-step instructions below.

1. Open the Mail app:

iPhone Mail app icon

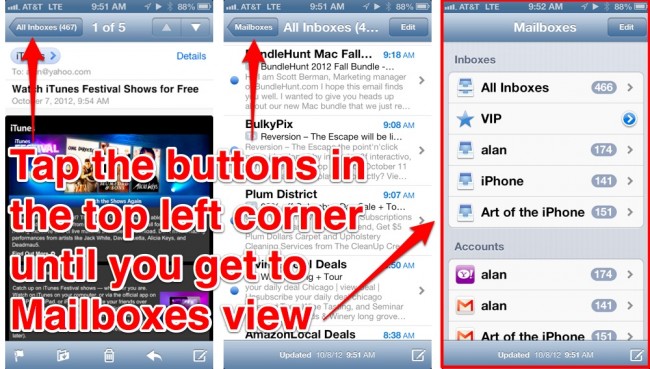
2. Tap the buttons in the top left corner to navigate to Mailboxes view:

Navigating to Mailboxes view

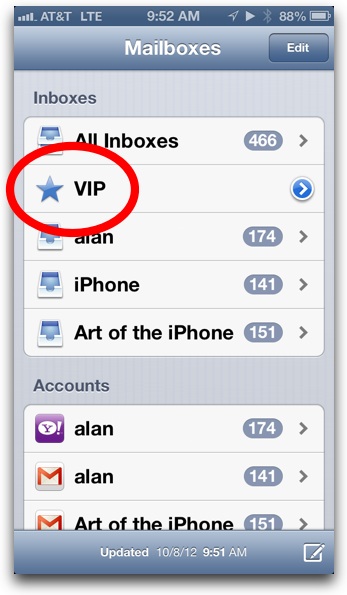
3. Tap VIP:

Tap VIP in iPhone Mail app

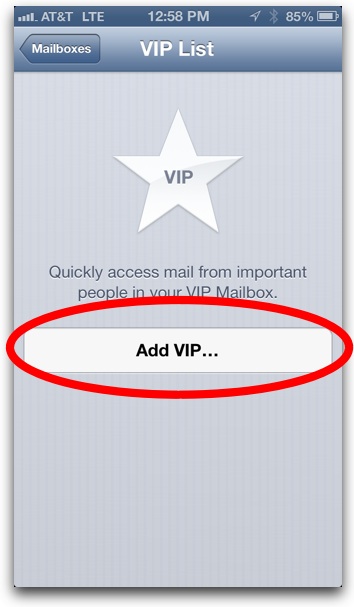
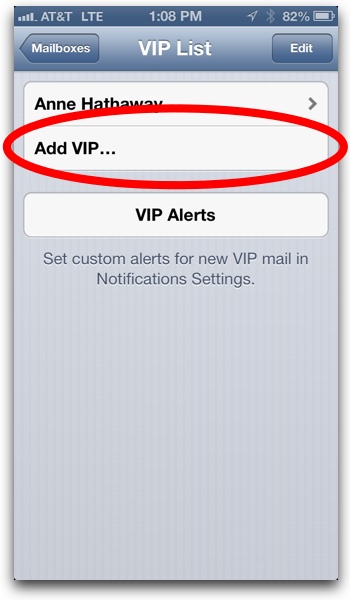
4. Tap Add VIP…:

Tap Add VIP in iPhone Mail app

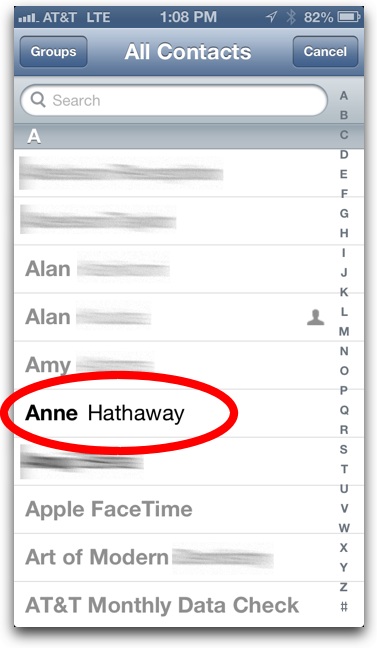
5. Tap a contact to add it to your VIP list (see note below if you aren’t able select a contact):

Select a Contact for VIP Notification Treatment

Note: A contact must have an email address assigned to it in order to add it to the VIP list. To add an email to a contact, quit out of Mail, open the Contacts app, tap the contact’s name, tap Edit in the top right corner, and enter an email.

6. To add another, tap Add VIP… again:

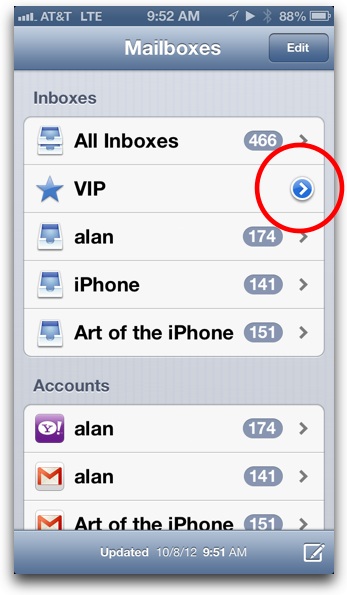
Note: To add more contacts to the VIP list in the future, tap the blue and white arrow button in Mailboxes view:

Tap blue and white arrow button

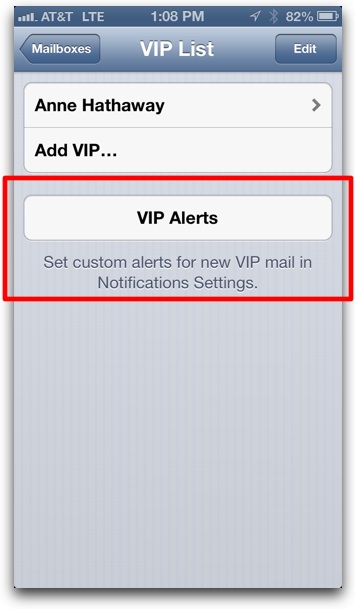
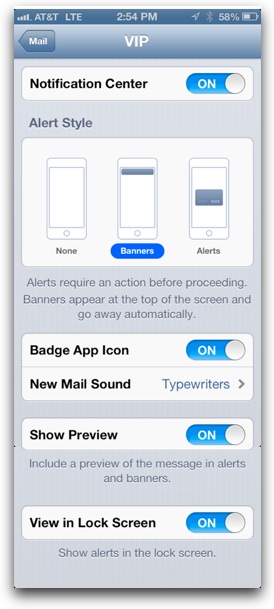
7. When finished adding contacts, next tap VIP Alerts:

Set VIP Alerts

8. Adjust the various settings to your liking:

VIP Alerts Settings

And that’s it, you’ve set up VIP email notifications. Also note that VIPs get their own special inbox, so emails from VIPs will appear in the VIP inbox in addition to the original inbox (in other words, your Gmail account, etc).

Be sure to check out more of our iPhone Tips.

iPhone Basics: How to Take a Panorama Photo Using the Camera App

iPhone Camera app Panorama feature

The new panorama function in the iPhone’s Camera app is an incredibly useful feature that allows you to easily capture beautiful wide-shot vistas and landscapes. It’s a welcome addition to the Camera app, as previous to iOS 6, iPhone users had to rely on third-party apps to create panoramas. But no longer. Below are instructions for how to take panoramas using the iPhone’s Camera app. Also see the end of this article for extra panorama tips. Please note that panorama is only available on the iPhone 4S or newer iPhones.

Quick Instructions:

In the Camera app, tap Options > Panorama, then tap the camera icon to begin creating the panorama. Tap Done to stop at any point. To reverse the panning direction, tap the arrow.

Step-by-Step Visual Instructions:

1. Open the Camera app:


iPhone Camera icon

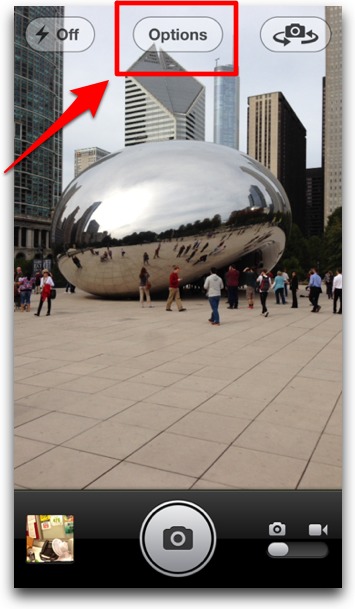
2. Tap Options:

Tap Options Button in iPhone Camera App

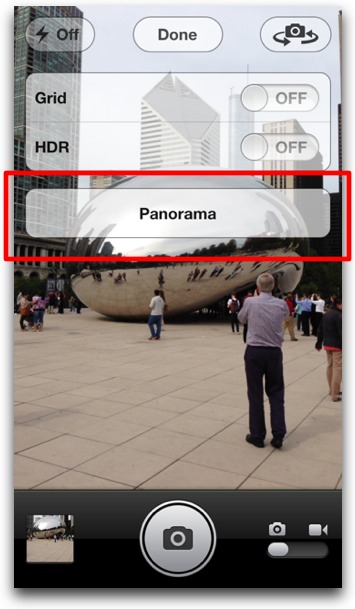
3. Tap Panorama:

Tap Panorama in iPhone camera app

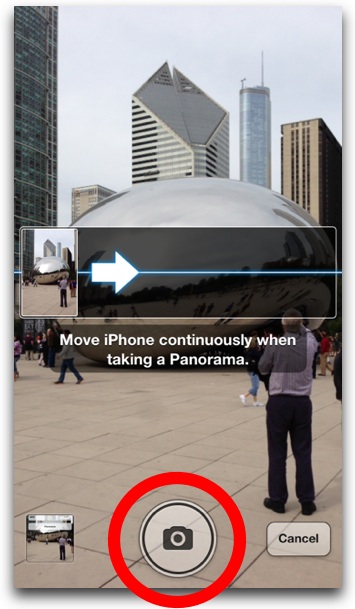
4. If you’d like, tap the arrow to reverse the panning direction (right to left, or left to right):

Tap arrow to reverse panning direction

5. Tap the camera icon at the bottom of the screen to begin:

Tap Camera button to start

6. Tap Done at any point to finish the photo:

Tap Done in iPhone Camera app

And that’s it, you’ve created a panorama photo. Read on for some extra tips.

Extra tips:

  • You don’t have to fill the entire panorama box on the screen—you can stop at anytime during the panorama process by tapping Done. This, in effect, gives the iPhone a wide lens of any size you want.
  • If you hold the iPhone in landscape orientation and move it up or down, you can use panorama to shoot very tall buildings.
  • If your resulting panorama photos has rough edges, you can square them off using the crop tool right in the Camera app. To access the crop tool, tap the photo thumbnail in the bottom left corner. This will open the Photo Stream. When viewing the panorama in the Photo Stream, tap Edit in the top right corner, then tap the crop tool (it’s on the far right). Drag the cropping box to fine tune your edges, then tap Crop.

iPhone Tip: How to Check Monthly Data Usage for Verizon, AT&T, and Sprint By Dialing a Number

Now that the iPhone has LTE, your monthly data cap can be used up much, much quicker. It’s now more important than ever to be able to track exactly how much data you’ve used up so far during the month. You can check your monthly data usage fairly easy. Just dial one of the numbers below, and you’ll receive a free text message back with your data usage:

  • Verizon dial #DATA (#3282)
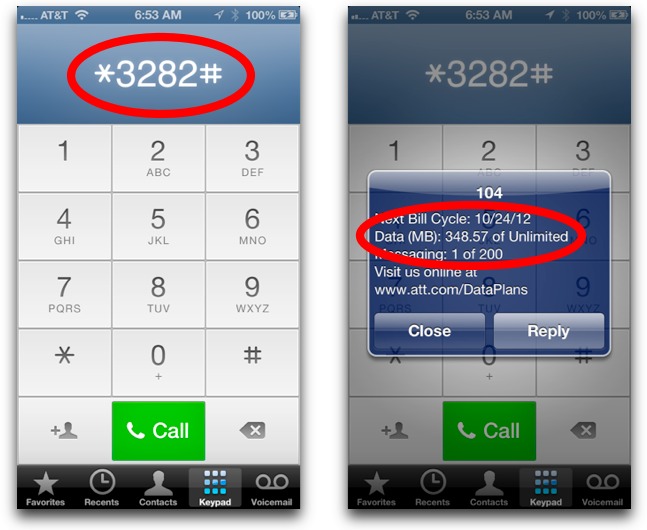
  • AT&T: dial *DATA# (*3282#)
  • Sprint: dial *4

You might event want to create an iPhone contact so you’ll not have to remember the number in the future.

Below is a screenshot of my data usage just after a few days of AT&T LTE usage on my new iPhone 5. Sheesh! That’s about what I’d use in a month on 3G.

Data usage iPhone text-message from AT&T WIreless