Art of the iPhone

Tip: How To Activate Emoji on the iPhone

iPhone users no longer have to resort to tricks to activate emoji (the colorful icons most popularly used in text messages). They can now be turned on easily enough with a simple swipe of the finger. Here’s how:

1. Open Settings:

2. Tap General:
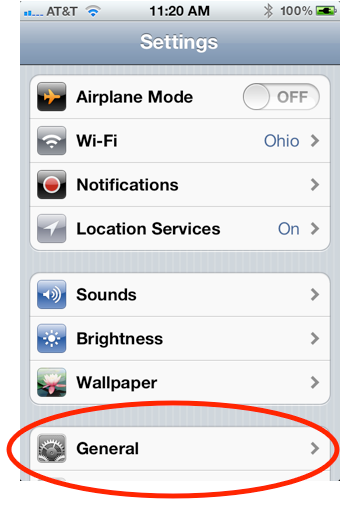
General in iPhone Settings

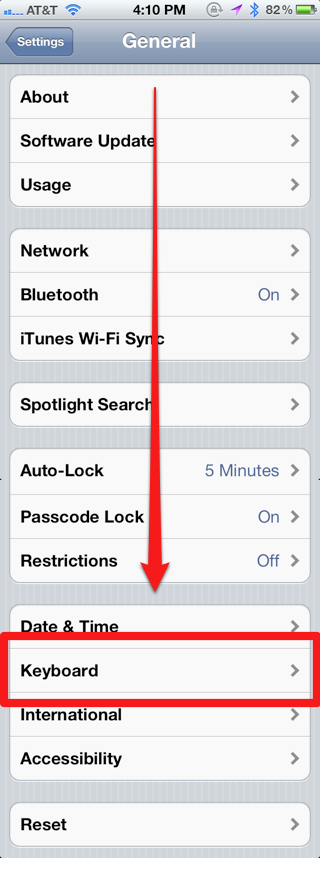
3. Scroll down and tap Keyboard:

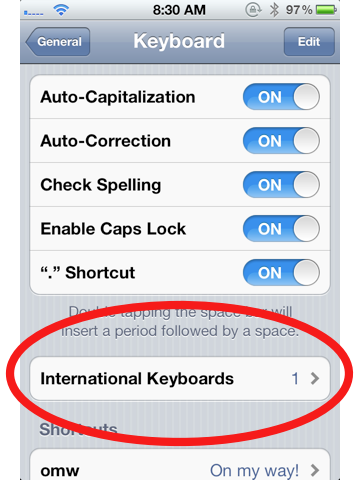
4. Tap International Keyboards:
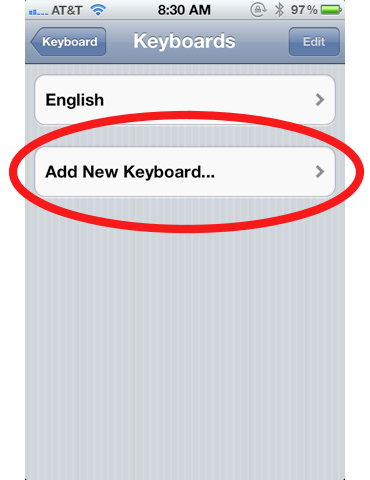
5. Tap Add New Keyboard:
6. Scroll down and tap Emoji:

Now you’re able to access the emoji keyboard. But how do you bring that keyboard up? Here’s how.

How to Access the Emoji Keyboard

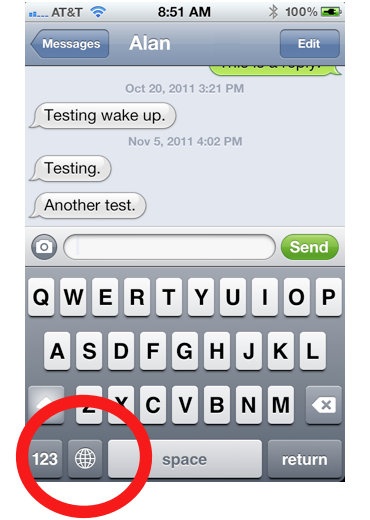
1. A new globe icon will now appear at the bottom left of your keyboard. Tap it:
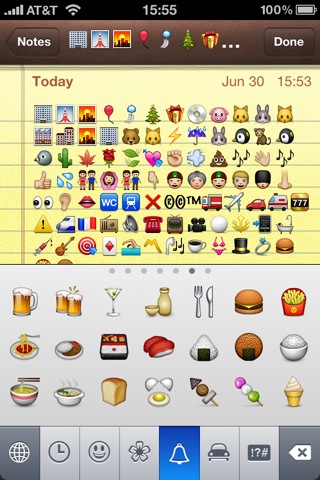
2. You should now see the emoji keyboard. Tap away to enter the cute little icons!:
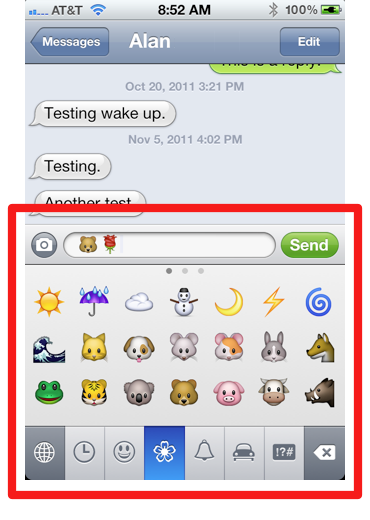
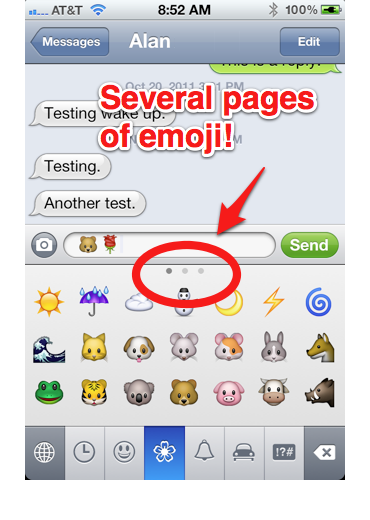
3. Extra tip: Please note that for some types of emoji, there are several pages of graphics. Swipe to the left to access them:
Notes and Tidbits:

  • Extra tip #2: You can use emoji to label your iPhone folders. For example, if you put all your restaurant apps into a folder, you could label it with the hamburger emoji.
  • Emoji are activated on Japanese iPhones by default.
  • It used to be that emoji on iPhones sold in the United States and elsewhere could only be activated through complicated tricks via third-party apps. With iOS 5, they are now easily activated via the iPhone’s settings.
  • The blog Narratives in Emoji tells stories using just emoji.

Tip: Make the iPhone’s LED Light Blink When You Receive a Call, Text Message, or Notification

The iPhone’s LED light can be used for more than just flashlight apps. You can have it blink whenever you receive a call, text message, or notifications from apps. Below are step-by-step instructions for setting it up.

1. Open Settings:

2. Tap General:

General in iPhone Settings

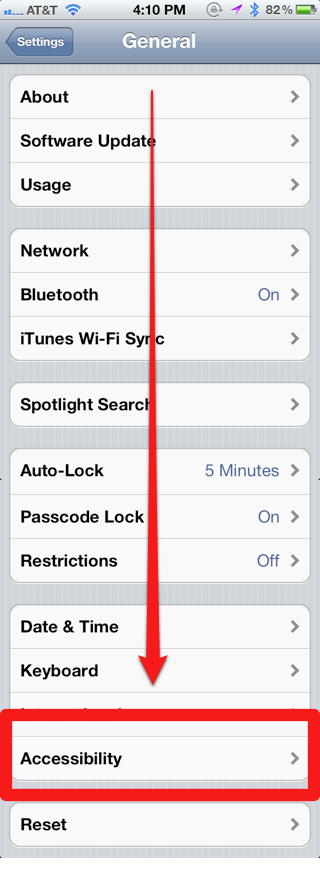
3. Scroll down and tap Accessibility:

4. Scroll down and swipe the tab next to LED Flash for Alerts to the On position:

And that’s it, you’ve turned on LED light notifications. See the Notes section below for interesting details about LED light notifications.

Notes:

  • The LED Flash for Alerts feature will only work if the iPhone is locked or in sleep mode.
  • If you have your alerts set up to repeat multiple times, (see our instructions on setting up repeating alerts), the LED will flash every two minutes for however many times you set for repeating alerts (up to 10 times!).
  • LED Flash for Alerts only works for iPhone 4, 4S, and newer iPhones (in other words, iPhones with an LED light).

How to Manually Set the iPhone’s Time and Date and Prevent Them From Auto-Updating

If you’re looking for a way to manually set the iPhone’s time and/or date, you won’t find it. At least, not at first. You’ll need to change something in the iPhone’s settings to make the option appear. Below are step-by-step instructions on how to turn off the iPhone’s automatic time/date updating and set the time & date manually.

1. Open Settings:

2. Tap General:

General in iPhone Settings

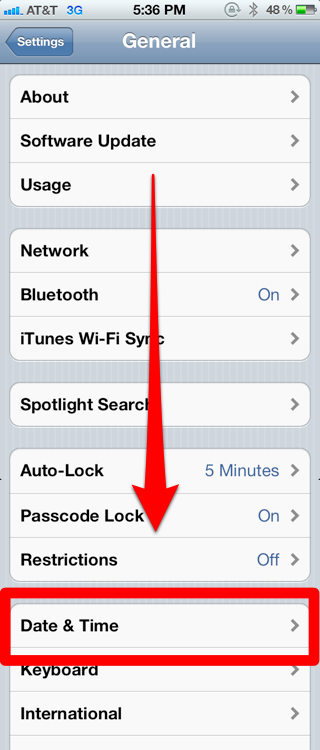
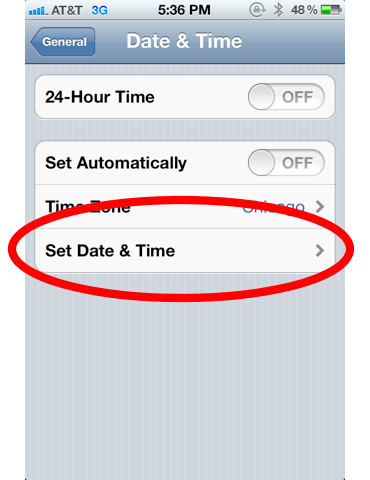
3. Scroll down and tap Date & Time:

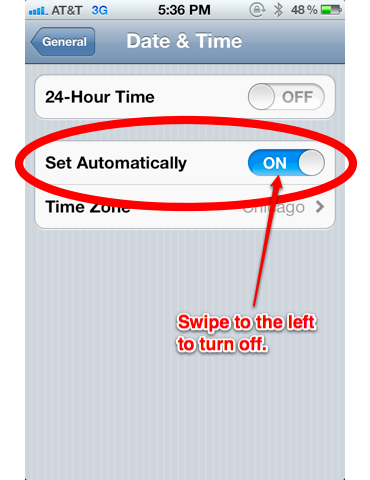
4. Next to Set Automatically, swipe the tab to Off:

5. You’ll see a new option appear labeled Set Date & Time. Tap it:

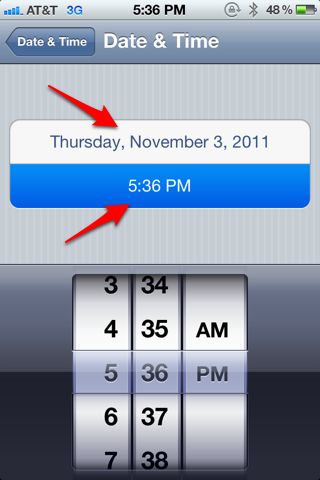
6. Tap both the date and time to set them:

That’s it. You’ve set the time and date, and the iPhone will no longer automatically update the time.

Notes:

  • When auto-updating is on, the iPhone will automatically reset to local time when you travel into a new time zone.
  • The iPhone updates the time and date via its cell network connection.
  • While traveling, if you want to keep track of the time in your home city, try adding your city to the iPhone’s World Clock. Open the iPhone’s Clock app, tap World Clock in the bottom left, then tap the plus sign in the top right.

Tip: How to Get Text-Message Alert Tones to Repeat on the iPhone

You may know that the iPhone can play a sound (called an alert tone) whenever you receive a text message, but did you know the alert tone can repeat up to ten times in case you missed it the first time? You’ll need to dig down into the iPhone’s settings to set it up. The following are step-by-step instructions on how to get your text-message alert tones to repeat.

1. Open Settings:

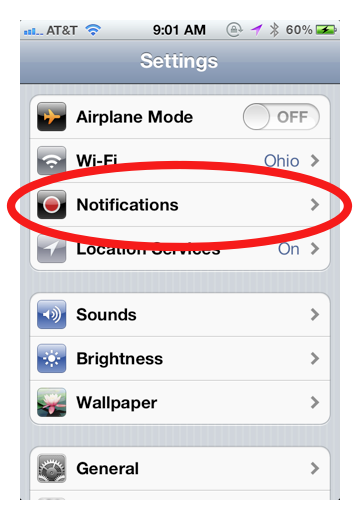
2. Tap Notifications:

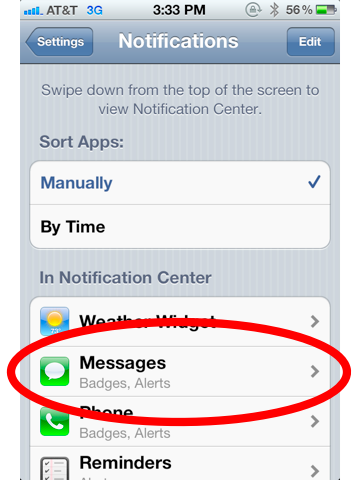
3. Tap Messages (you may have to scroll down to find it):

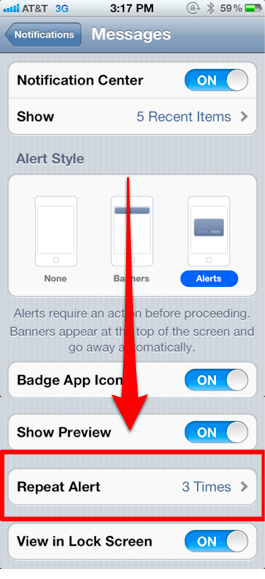
4. Scroll down and tap Repeat Alert:

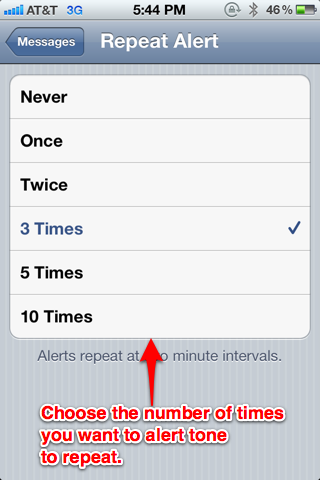
5. Select how many times you want the sound to repeat*:

*Note that Never means an alert will indeed play, but you’ll only hear it once (in other words, it won’t be repeated).

That’s it, you’ve now set up repeating alert tones on the iphone.

Notes and Troubleshooting:

  • Alert tones will repeat every two minutes.
  • To stop alert tones from repeating, simply press the sleep button or unlock the iPhone.
  • If you want to completely turn off Sounds for text messages, you’ll need to do that in Settings–>Sounds–>Text Tone and select None.
  • You can use any ringtone as an alert tone. You can even buy alert tones from the iTunes Music Store (you’ll need to use the iPhone’s iTunes Music Store app to access the alerts).
  • Are the alert tones not working at all? Confirm these three steps:
    1. Go to Settings–>Sounds–>Text Tone and make sure an alert tone is selected (in other words, make sure None is not selected.
    2. Make sure the iPhone’s ringer/mute switch is set to an On position.
    3. Make sure the Ringer and Alerts volume is turned up. The volume controls are found in Settings–>Sounds–>Ringers and Alerts

Tip: How to Turn On Private Browsing Mode on the iPhone & iPad

Need to browse to some websites without leaving tracks on your iPhone? Do you want the iPhone to not remember your sites visited, searches, and the information you entered into fill-in forms? That’s what the new Private Browsing Mode is for. I mean, does my wife need to know I spent 20 minutes looking at Anne Hathaway pictures last night? No she doesn’t. Here’s how to turn on Private Browsing mode.

1. Open Settings:

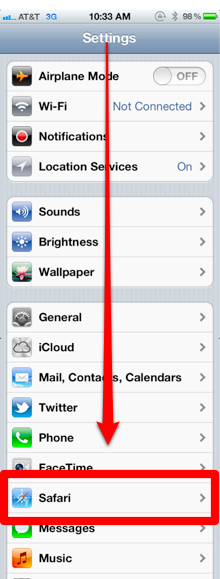
2. Scroll down and tap Safari:

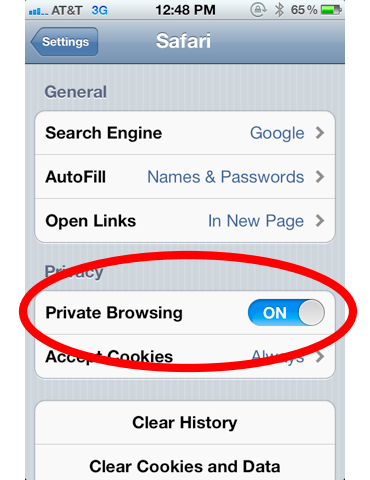
3. Next to Private Browsing, swipe the tab to On:

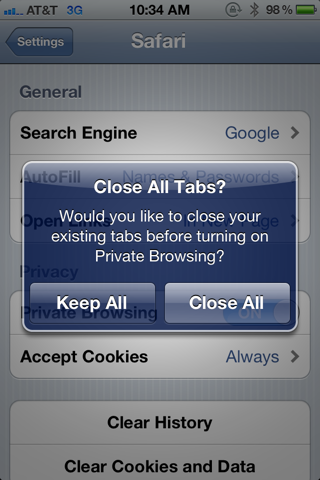
4. The following pop-up may appear:

This allows you to either keep all the webpages currently open in the iPhone’s browser or to close them all as you switch to Private Browsing mode. Tap Keep All to keep them open, or Close All to close them.

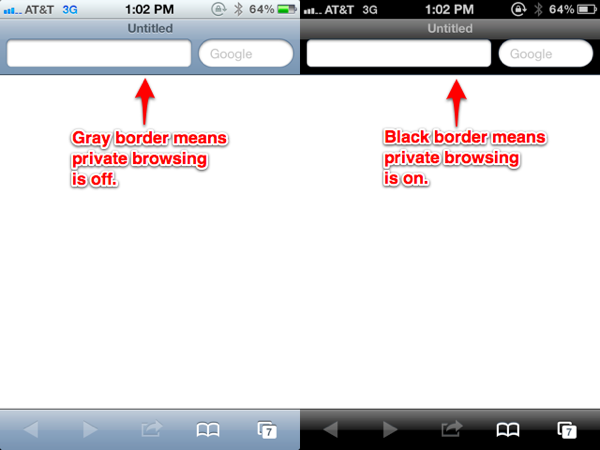
5. Now open Safari. The border of the app should be black instead of gray:

A black border means Private Browsing mode is on.

Endnotes:

In private browsing mode:

  • Visited sites are not added to the browser’s history.
  • Searches are not added to the search history drop-down for Google (or your choice of search engine).
  • Filling out forms won’t result in have that info being saved to the browser’s autofill feature
  • Cookies are deleted.
  • If you want to completely cover your tracks after you finish browsing, make sure to close all your browser windows.

Tip: Make the iPhone’s Spotlight Search More Useful By Preventing Emails, Contacts, Etc, From Showing Up

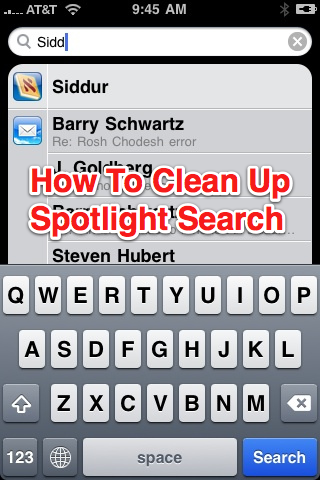
Spotlight Search iPhone

If there was one tip I’d give to new iPhone users, it’s to teach themselves to use the iPhone’s Spotlight Search to find and launch apps. It really is the quickest way to launch an app buried somewhere in the various home screens and folders on the iPhone. If you’re new to the iPhone, you can access Spotlight Search by swiping to the right on the iPhone’s first home screen.

The only problem with Spotlight Search is that search results oftentimes can be cluttered. Emails, contacts, music, etc, can show up as well, making it difficult to find what you’re looking for. Thankfully, you can prevent the unwanted clutter. Below are step-by-step instructions on preventing certain types of items from showing up in Spotlight Search:

How to Clean Up Spotlight Search:

1. Open Settings:

2. Tap General:

General in iPhone Settings

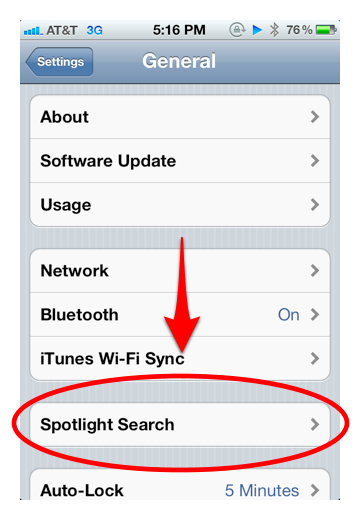
3. Tap Spotlight Search:

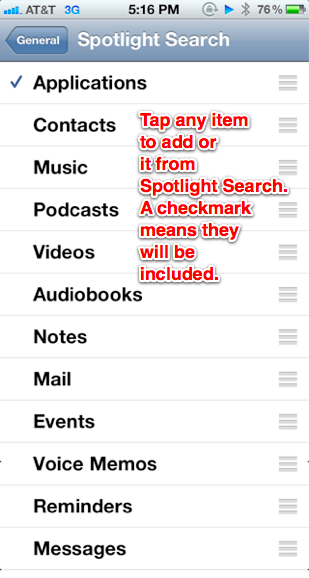
4. Add or remove items by tapping them (a checkmark indicates it will be included in search results):

I only want apps to appear in my search results, so I’ve only selected Applications (aka, apps).

Notes:

  • If you’ve add a website bookmark to the iPhone’s home screen, it will be considered an app and will show alongside App Store apps in search results.
  • You can also set the order that items show in search results. For example, you can make Apps show first, Contacts second, Emails third, etc. Simply go to Settings–>General–>Spotlight Search, then tap, hold, and drag the three white lines next to an app to reorder the search results.

10 Tips for Better Voice Dictation on the iPhone With Siri (VIDEO)


One of the more powerful features of Siri on the iPhone is voice dictation—the ability to turn your speech into text. While the basics of voice dictation are easy enough, just speak and let Siri take care of the rest, there is, unfortunately, a learning curve to improve the accuracy. For example, you’ll need to say “cap” before words that aren’t typically capitalized, like bacon, to capitalize them (“Bacon”).

But what if you want to dictate the title of a movie, like Gone With the Wind, and have each of the word’s capitalized? You tell Siri “caps on” before saying gone with the wind, which will turn into Gone With the Wind (Siri even knows not to capitalize the word “the” as per title capitalization style). The video above contains 10 advanced tips for Sir’s voice dictation from Snazzy Labs.

Tip: How to Turn Off the Unread Badge for the Mail App on iPhone/iPad

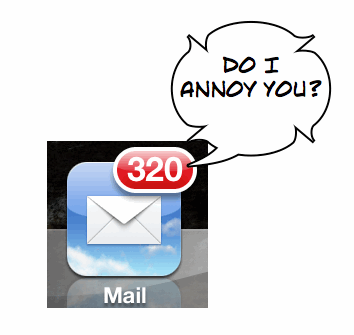
One of past annoyances of the iPhone’s Mail app was a little red badge that told you hundreds of unread emails were waiting for you. Well, suffer no longer, as you can now turn off that ugly little red badge. Here’s how:

1. Open the Settings app:

2. Tap Notifications:

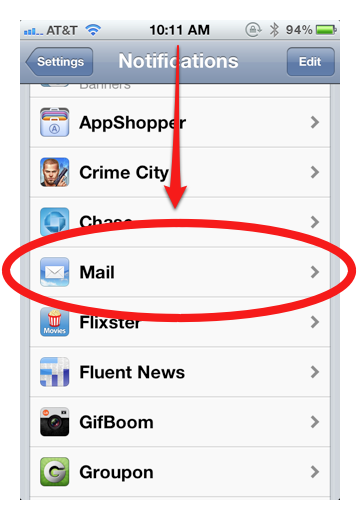
3. Scroll down the list of apps until you see the Mail app. Tap it:

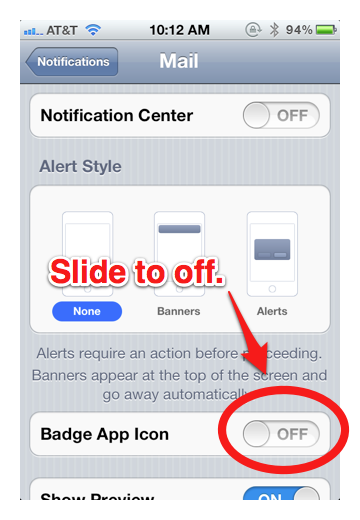
4. Slide Badge App Icon to Off:

And that’s it. You’ll never see that annoying red badge again. Note that this also works for turning off badges for any app. You can use this same method to turn off badges for any app, not just the Mail app. Badges? We don’t need no stinkin’ badges.

Tip: How to Change the Order of Alerts in Notification Center for iPhone/iPad

You don’t have to settle for the default order of alerts in the iPhone and iPad’s Notification Center. You can rearrange them how you like. Below are step-by-step instructions on changing the order that alerts appear in the Notification Center.

1. Open the Settings app:

2. Tap Notifications:

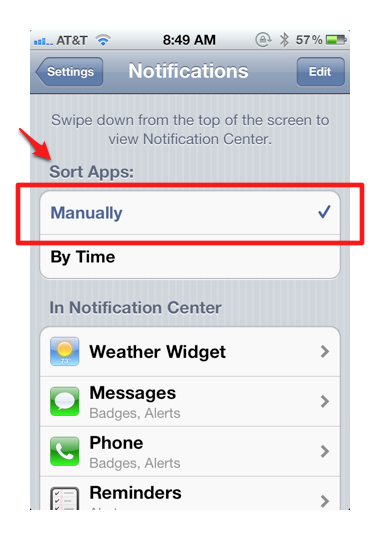
3. Under Sort Apps, tap Manually:

See the Notes section at the bottom of this post for the difference between sorting your alerts Manually and By Time

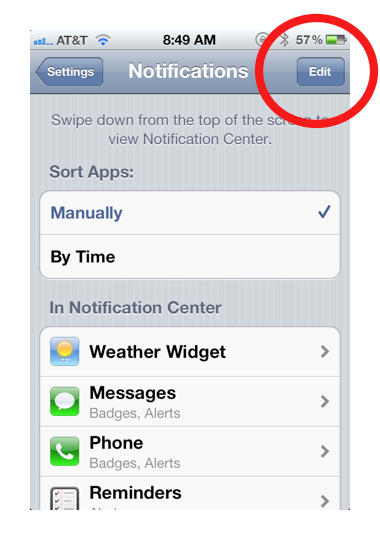
4. Tap Edit in the top right corner:

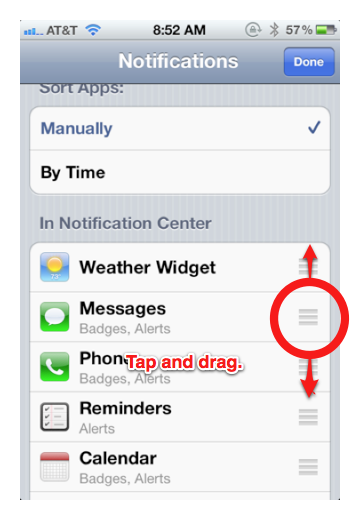
5. Tap and hold the three lines next to each app in the list, then drag it to your desired position:

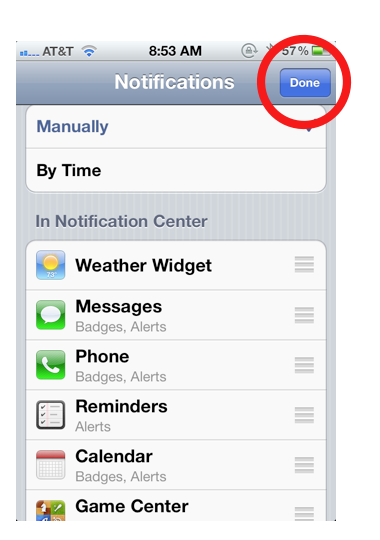
6. Tap Done when finished:

That’s it. You’ve now manually changed the order in which alerts will appear in the Notification Center.

Notes:

  • The Notification Center’s settings give you two options for sorting alerts:
    1. Manually gives you the ability to rearrange the order how you like (see instructions above)
    2. By Time will automatically sort alerts by the time in which they appeared, showing the most recent at the top of Notification Center. However, alerts will display clumped together by app. Meaning, if your most-recent alert was a text-message alert, all of your text-message alerts will show at the top, then all of the alerts from the app with the next most-recent alert.
  • If you choose to sort apps By Time, the stock widget and weather widgets will likely always display first, as they are constantly updated by the iPhone. You can turn them off in the iPhone’s Settings under Notifications.

Tip: Wi-Fi Syncing Taking Too Long? You Can Switch to the USB Cable Without Pausing Your Sync

The new Wi-Fi syncing capability for the iPhone and iPad is convenient, but it also can be much slower than using the USB cable to sync. If you have begun the syncing process over Wi-Fi and discover it’s taking too long, you can speed things up a bit by plugging your iPhone/iPad into the computer without stopping the sync. That’s right, there’s no need to stop the syncing process, just plug in your device and the sync will continue to chug along without starting over.

However, please note that the reverse is not true, meaning, you can’t start a sync using the USB cable, unplug the iPhone in mid sync, and continue over Wi-Fi. Doing so will end the sync.