Art of the iPhone

Fandango iPhone App Gets Passbook Support, But Few Theaters Currently Support it

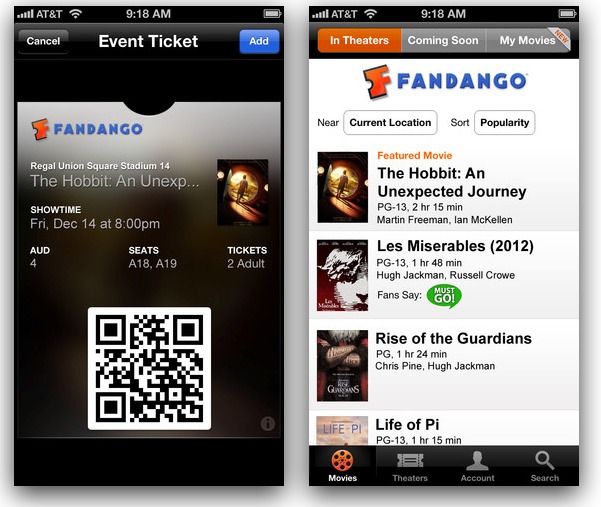
Fandango iPhone app screenshots

The Fandango iPhone app (free) has been updated for iOS 6 and the iPhone 5 to support the new Passbook feature. Passbook will allow movie theaters to scan a barcode displayed on your iPhone’s screen to confirm your ticket purchase.

It sounds useful in theory, but unfortunately, the Passbook implementation in the Fandango app is currently hard to find and without much instruction.

Few theaters support Passbook, and it’s a lot of work to find the theaters in the Fandango app that do. In the app’s description, Fandango says to “look for the ‘Mobile Ticket’ icon on the theater page.” Well, I had to tap through 20 theaters in Chicago one by one until I found the mobile ticket icon (which really means Passbook support. Why don’t they just say “Passbook tickets”? Presumably because they want these mobile tickets to be used on other phones as well). The “mobile ticket icon” looks like this:
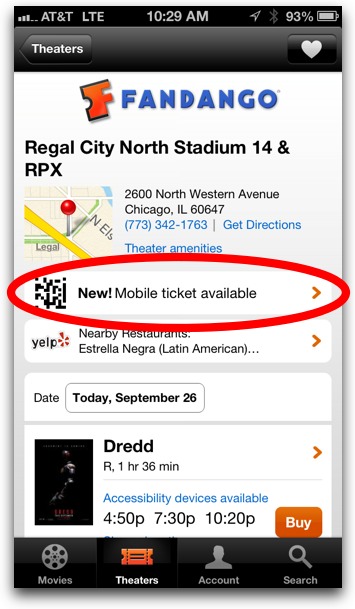
Fandango Passbook mobile ticketing example on iPhone

There is no way to list just the theaters that support Passbook. You have to tap in and out of each theater to find one that does. Most users will likely think, as I did, that Passbook “just works,” meaning if you buy a movie ticket via Fandango, you can use it in Passbook. Not so.

I hope Passbook support will grow quickly, but at least for Fandango, it’s not very widespread so far, and it’s not very intuitive to use.

Controversial Scratch Test Video Shows iPhone 5 Holds Up Well Against Some Materials

A controversial video made by a forum poster over at MacRumors.com seems to indicate that the black iPhone 5 may not be quite as scratch prone as other recent tests have indicated.

The “controversial” video—controversial because it was done in an AT&T store on an iPhone 5 on display—shows an iPhone 5 being rubbed hard against a sharp corner of a plastic display case. The iPhone 5 comes away unscathed, even when the test is repeated several times. It likewise survives the sharp digging and scratching of a fingernail.
The video seems to indicate that, at least when it comes to plastic or acrylics with sharp edges, the back of the iPhone 5 isn’t quite as brittle or easily scratched as another recent popular scratch-test video from iFixIt indicated. That particular test involved metal-on-metal contact.

Some members of the MacRumors forum and commenters on YouTube objected to the methods of the test, pointing out that the creator of the video could have been arrested for attempting to destroy store property. However, no damage was apparently done to the device.

A Really Obvious But Important Tip About the New Apple EarPods

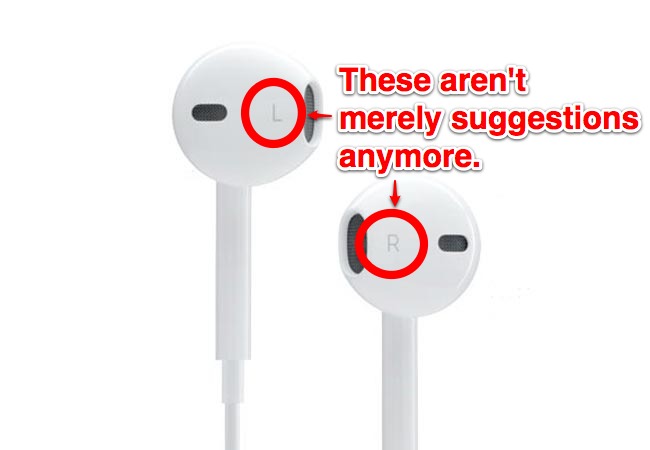
Apple EarPods Right and Left earbuds

The new Apple EarPods sound so much better than the previous Apple earphones. The bass really is thumping. But there’s something obvious you need to do to get the best sound out of them: the left earbud goes in the left ear, and the right earbud goes in the right ear.

I’m being serious.

You see, with the previous Apple earphones, it didn’t really matter much whether you put them in correctly. There was only the slightest difference in sound and comfort when they were flipped. Not so with the new EarPods.

The first time I tried the EarPods, I just plopped them in incorrectly, left/right, right/left. They sort of fit but sounded….just like the old Apple earphones, maybe slightly worse. But I had them in backwards, and upon reversing them…damn son, whomp whomp whomp!

Could this be the cause for some of the rare, seemingly hastily written mediocre reviews of the EarPods. I mean, they sound great, much better than the $10 MonoPrice earbuds that the WireCutter says are superior (which I happen to own and, no, they sound terrible. You can’t even move around while wearing the MonoPrices else they channel weird chaffing noises to the eartips. They have no 3-button dongle, either).

Anyway, the EarPods are solid at only $30.

Tip: How to Allow Some Contacts to Ring the iPhone When Do Not Disturb Mode Is On

Do Not Disturb Mode for iPhone

The new Do Not Disturb mode is an incredibly useful feature for the iPhone that, when turned on, will silence all calls and notifications. With DND turned on, you won’t be suddenly awoken at night by an app’s notification or a phone call. You may, however, still want to let some important phone calls through. Below are instructions for how to allow a special group of VIP contacts to call you even when Do Not Disturb is turned on.

Quick Instructions:

Go to Settings > Notifications > Do Not Disturb. Swipe Scheduled to On > select a time range > tap Allow Calls From > select Favorites or another group of contacts (for how to create groups, click here).

Step-by-Step Instructions:

1. Open Settings:

iOS Settings Icon

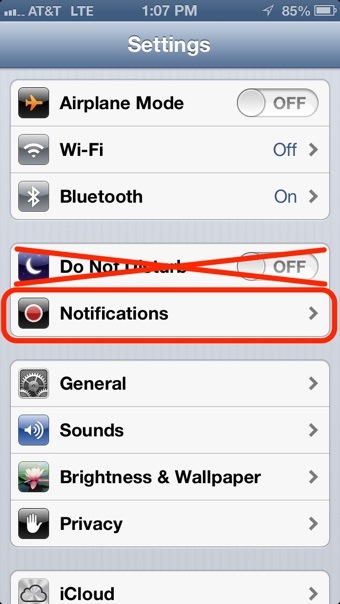
2. Ignore Do Not Disturb, and tap Notifications instead:

Tap Notifications in iPhone Settings

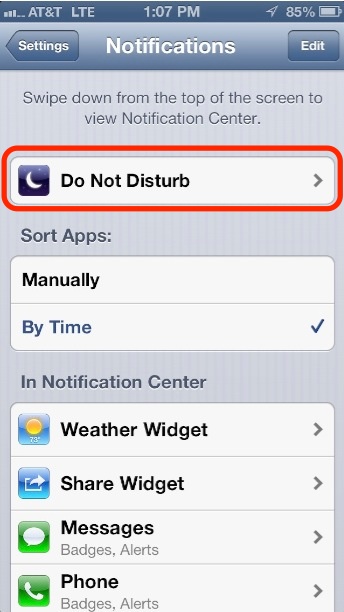
3. Now tap Do Not Disturb:

Tap Do Not Disturb in Notifications Settings

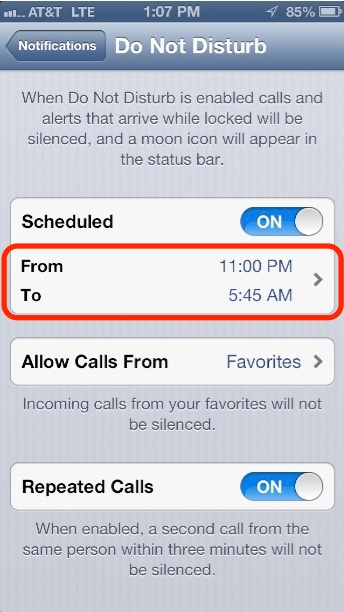
4. Set a time for DND to automatically turn on and off:

Set time for Do Not Disturb to automatically turn on and off

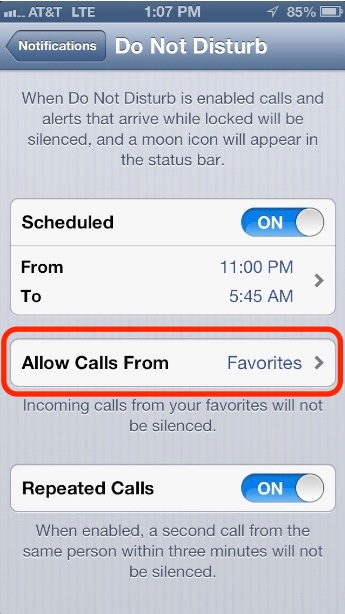
5. Tap Allow Calls From and select a group of contacts (see note below if you wish to create a new group of contacts):

Tap Allow Calls From in Notification's Do Not Disturb Settings

Note about creating groups of contacts: Bizarrely enough, other than adding/removing contacts to the Favorites group, you can’t create/edit groups of contacts on the iPhone. However, check out our instructions for alternative methods for creating groups of contacts for use on the iPhone.

And that’s it. Please note that this VIP list of contacts will only work when the scheduled version of Do Not Disturb mode is turned on. When you manually turn on DND (see screenshot in step 2), this VIP list will not function.

Bonus Tip: Alarms from the iPhone’s Clock app (for example, wake me up at 6:00am) will still sound even when Do Not Disturb is turned on, or even when the mute switch is turn on, for that matter.

Tip: How to Create a Group of Contacts As Exceptions for the iPhone’s Do Not Disturb Mode

Do Not Disturb Mode for iPhone

When turned on, the useful new Do Not Disturb mode blocks all calls and notifications from ringing your iPhone, allowing you to sleep or work in peace. But you can also assign a special group of contacts as exceptions while Do Not Disturb is turned on. When anyone in this group of special contacts calls, your iPhone will still ring, even though Do Not Disturb is turned on.

There’s only one problem though: Apple still hasn’t supplied a way to create groups of contacts on the iPhone (it’s a headshaker, I know). The lone exception is the Favorites group, which you can add/remove contacts from. Fortunately, you can use third-party apps and iCloud.com to create, edit, and delete groups. Check out the instructions below for:

  • How to add contacts to the Favorites group.
  • A suggestion for a good free third-party iPhone app for creating groups.
  • How to create groups on iCloud.com.

How to Add Contacts to the Favorites Group:

1. Select a contact in the Contacts or Phone app.

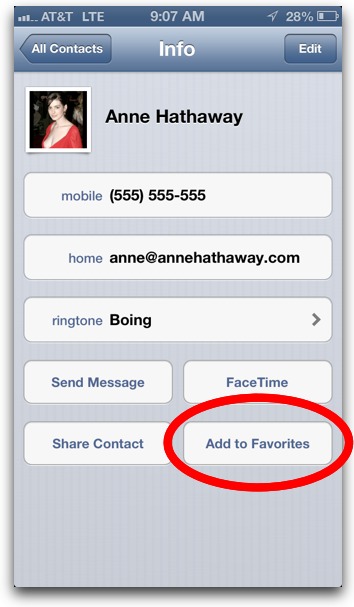
2. Tap the Add to Favorites button:

How to Add to Favorites List on iPhone

And that’s it. To delete contacts from the Favorites list, open the Phone app > tap the Favorites tab > tap Edit > tap the red circle > tap Delete.


A Free App for Creating Groups of Contacts:

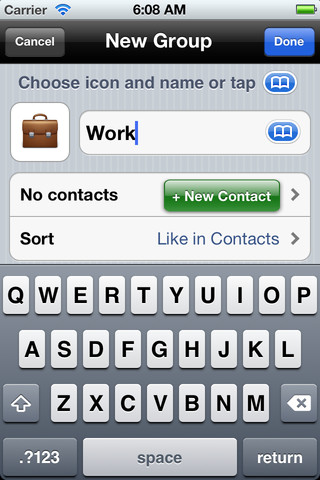
Groups app screenshot

Groups (free) is a solid but somewhat barebones free app for creating new groups on contacts on your iPhone. Any group created within the app will show up in the iPhone’s default Contacts and Phone apps. To create a group in the app, tap the All Contacts drop-down list at the top, then tap Add New Group.


How to Create a Group of iPhone Contacts at iCloud.com:

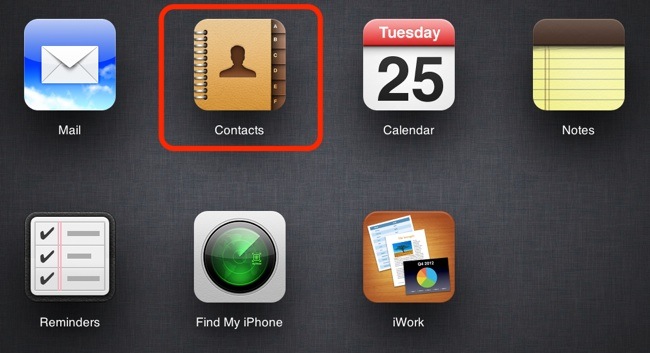
1. Go to iCloud.com and and select the Contacts app:

Click the Contacts app on iCloud.com


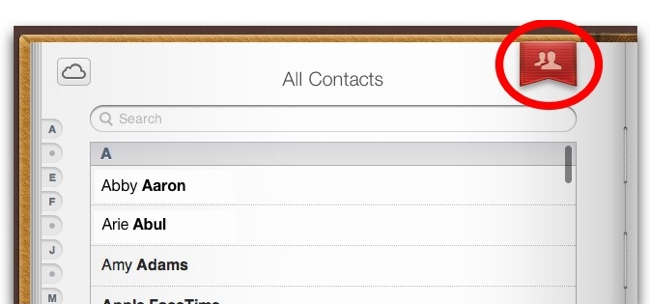
2. Click the red groups ribbon at the top:

Create Group of Contacts on iCloud


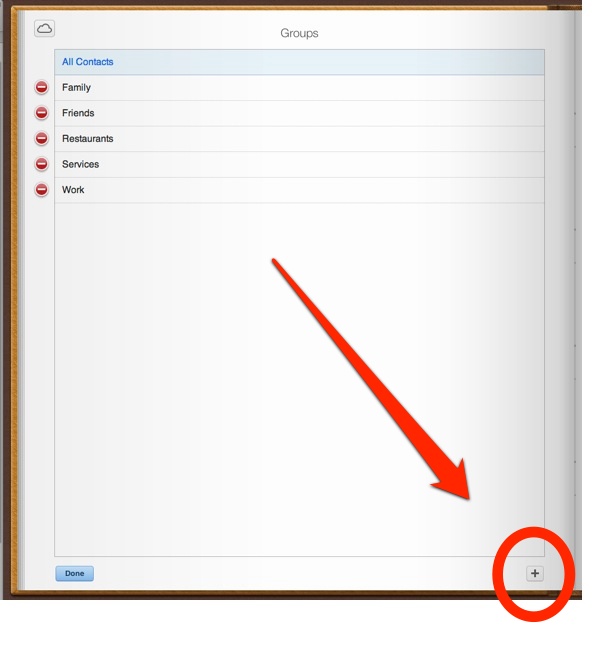
3. Click the plus sign at the bottom right to create a new group:

Click  the Add Groups button on iCloud

4. Type in a name.

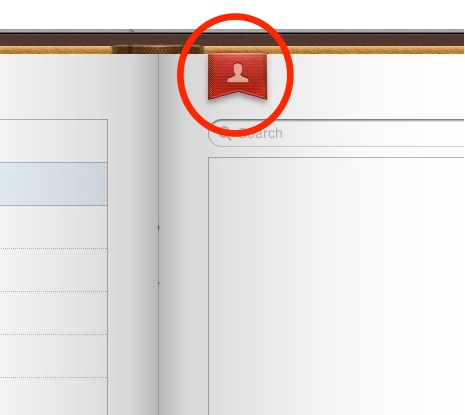
5. Click the red groups ribbon:

Click Red Ribbon for Groups in iCloud

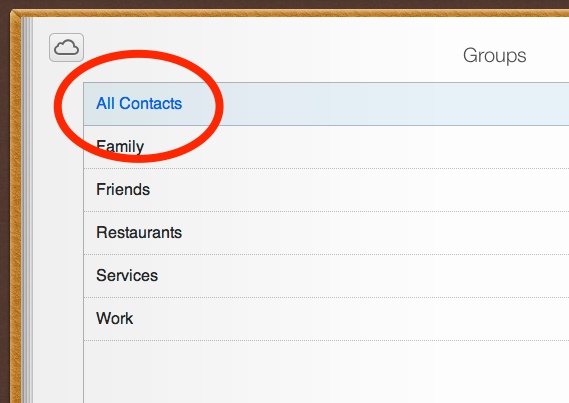
6. Click All Contacts:

Select All Contacts in iCloud

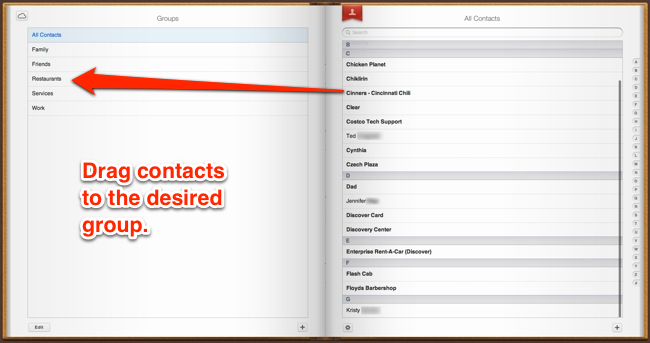
7. Drag a contact from the list on the right to the group name on the left:

Drag Contacts to Group on iCloud

And that’s it. Your new group of contacts should be synced to your iPhone via iCloud almost instantly (depending on your connection).

Official iPhone 5 iOS 6 User Guide Manual Now Available for Download

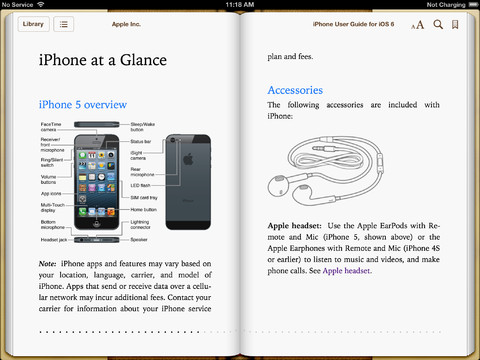
iPhone User Guide for iOS 6 screenshot

If you bought an iPhone 5 and wondered where the heck the instruction manual was, well, here it is. Apple’s iPhone User Guide for iOS 6 is a free download in both PDF and iBook (ePub) formats:

You’d think the size of the manual would keep growing with all the added features, but this version has actually shrunk to 156 pages from the previous 179.

If you’re considering buying one of those third-party help books like iPhone 5 for Dummies, you might start here first. Even a grizzled iPhone veteran like myself always finds something new in these manuals.

Video Shows Aluminum Back of Black iPhone 5 Easily Scratched

Bad news if you want to keep the surface of your iPhone 5 blemish free for years to come. A scratch-test video from online repair site iFixIt shows that the iPhone 5 isn’t exactly scratch resistant.

The video features Ellie, a 2-year-old toddler, going to town on an iPhone 5 with a set of car keys. The slate-colored back of the iPhone 5 doesn’t hold up well, ending up covered in unsightly scratches. When the toddler’s beautiful mother rubs a steel ring against the iPhone 5’s edge, the black surface paint peels off to reveal the silver metal below.

When the toddler and mother perform the same tests on the iPhone 4S, the phone appears without visible damage.

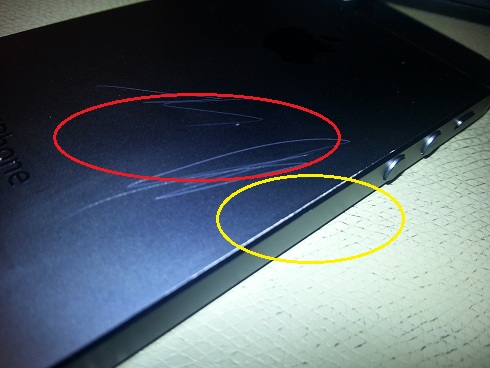
More evidence was supplied by a forum poster over at Overclockers, who posted a photo of his iPhone 5 after a car key and sim card pin were rubbed against its back and edge:

Rear of Black iPhone 5 Scratched

Preview: iPhone 5 Cases from Ballistic

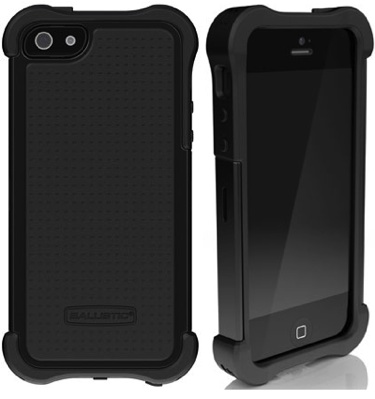
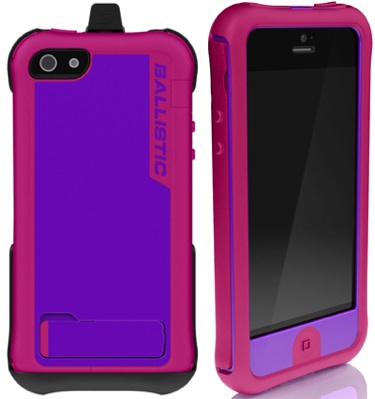
iPhone 5 Ballistic SG Maxx case

Ballistic SG MAXX
$49.99
The Ballistic SG MAXX has 4 layers of protection….4! Layer 1 is silicone rubber with padded corners. Layer 2 is hard polycarbonate plastic. Layer 3 is shock resistant polymer. And Layer 4 is a molded screen protector. Comes with a belt-clip holster for quick-on-the-draw phone calls. Available in several different colors. Check it out at the Official Ballistic SG MAXX website.
Ballistic Every1 Case for iPhone 5

Ballistic Every1 with Stand
$49.99
The Ballistic Every1 is another 4-layer case, this time with a built-in kickstand. The Every1 has what Ballistic calls “Air Gap Suspension Springs,” which the company describes as surrounding “your phone with 1mm of air so your phone never lays against a hard surface.” Whatever that means. Comes with a belt-clip holster and available in several colors. Available at the official Ballistic Every1 website.
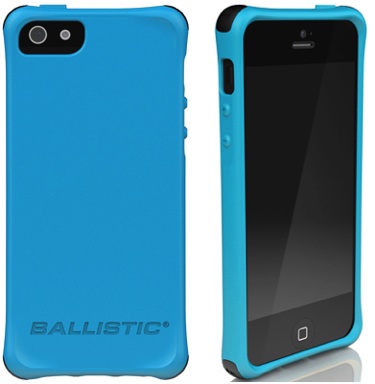
Ballistic Smooth Case for iPhone 5

Ballistic Smooth
$29.99
The Smooth is Ballistic’s slimmest case and best looking (in my opinion). The case’s corners are its most interesting feature. Each case comes with 4 different-colored sets of interchangeable corners (4 pieces in each set for 16 total), which add extra protection for the iPhone’s impact points. Available in several color schemes. Available at the official Ballstic Smooth website.
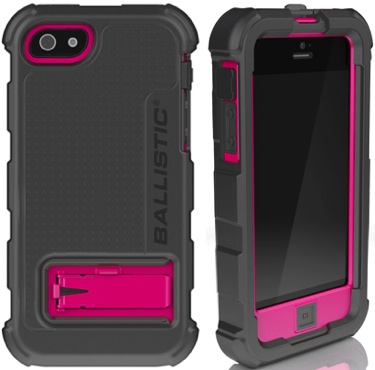
Ballistic Hard Core iPhone 5 Case

Ballistic Hard Core with Stand
$59.99
The Ballistic Hard Core has a ridiculous 5 layers of protection. 2 layers of shock-absorbing polymer, 1 layer of hard plastic, an optional layer of silicone rubber, and a clear plastic screen protector. A built-in stand lets you prop up the iPhone on a desk. Comes with a rotating belt-clip holster. Click here for the official Ballistic Hard Core website.
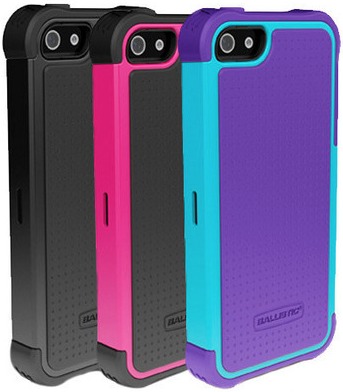
Ballistic Shell Gel case for iPhone 5

Ballistic Shell Gel
$34.99
The Ballistic Shell Gel offers 3-layers of protection. Layer 1 is shock-absorbing polymer, Layer 2 is hard polycarbonate, and Layer 3 soft silicone rubber. The case features extra padding at the iPhone’s 4 impact points (the four corners). More info at the official website for the Ballistic Shell Gel case.

iPhone/iPad Tip: Notes From the Notes App Can Now Be Edited In a Browser on iCloud.com

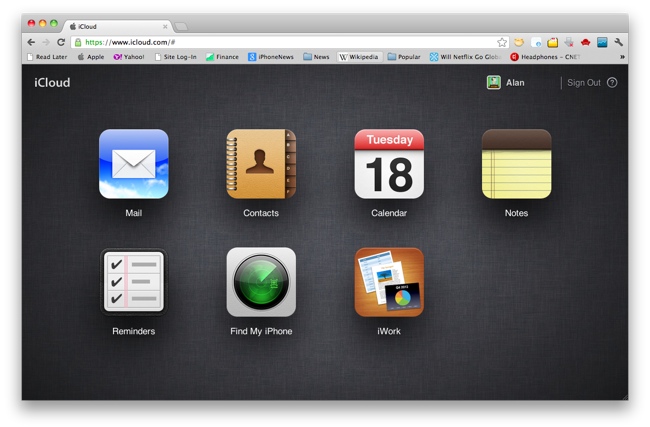
iCloud apps in web browser

The Notes app on the iPhone & iPad just became a lot more useful thanks to a recept update to iCloud.com. Now, notes created on the iPhone can be edited in a web browser on iCloud.com, and vice versa. With iCloud syncing, it’s all pushed wirelessly and automatically—no need to tap a button or connect a cord. And no matter if you’re on Windows or Mac, home or office, if there’s a web browser, you can access and edit your notes and sync back the changes to the iPhone instantly.

I find this feature incredibly useful for doing things like maintaining a to-do list, planning vacations, or simply storing important bits of information that I come across throughout the day.

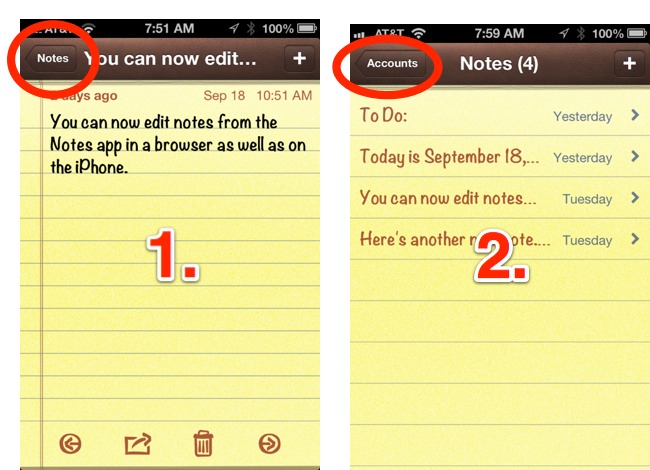
There is one tricky part, however. In the Notes app, you have to create the notes you want to sync in the special iCloud “folder,” which is kind of hidden. To find this folder, open the Notes app, if you see a button labeled Notes in the top-left corner, tap it, then/else tap Accounts:

Maneuver to iCloud account in Notes app

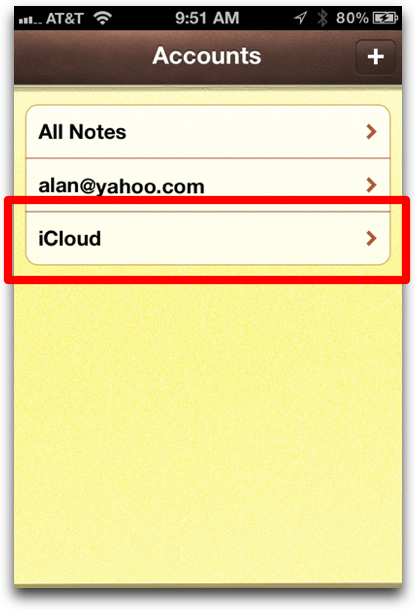
Then tap iCloud from the list shown (see below):

Create Notes in the iCloud folder

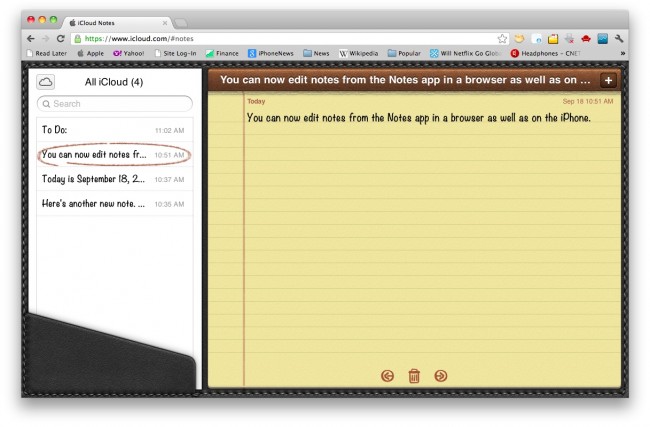
Now, when you create or edit a note, it will created in your iCloud account and be pushed (synced) to iCloud. You can then go to iCloud.com, log in, click on the Notes icon, and take up where you left off. You’ll even see that familiar legal-pad yellow paper background (see below).

You can make your iCloud account the default account for new notes by going into the iPhone’s Settings > Notes and selecting iCloud. That way, when you create new notes (for example, creating a note via Siri), they will by default be synced via iCloud.

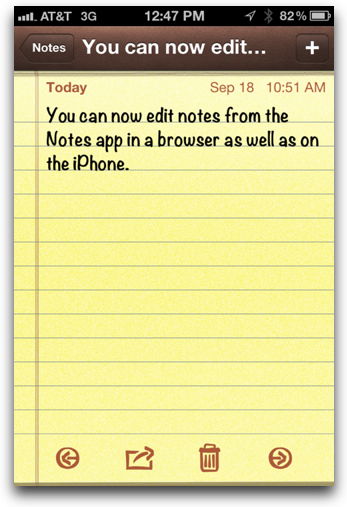
The Notes app at iCloud.com, editing a note I created on the iPhone (click to enlarge):

Of course, you must first have iCloud set up on your iPhone/iPad. To set up iCloud, go to Settings > iCloud and make sure the Notes tab set to On.

iOS 6 Troubleshooting: iPhone/iPad Wi-Fi Not Connecting After Update? Turn Off Location Services

*Update* The problem involved an Apple server being down. When your iPhone connects to a Wi-Fi network, Apple checks a special site to confirm the Wi-Fi network is not behind a paywall. Despite there being numerous “solutions” like the one below, it appears that the problem simply resolves itself after a period of time. All I can say is the solution below worked instantly and permanently for me (and others), but it simply could have been a coincidence of timing.

iOS 6 Wi-fi not connecting on iPhone and iPad

After upgrading my iPad 3 to iOS 6, my iPad’s Wi-Fi connection stopped working. And a quick glance at Apple’s discussion boards reveals hundreds (maybe thousands) are having this problem as well. Here’s a closer look at the issue: my iPad would temporarily connect to my home Wi-Fi router for a few seconds, then a browser window would pop up and try to connect to Apple.com, and then the connection would end. It appears there is some conflict with Location Services on the iPhone and iPad. I asked Siri how to fix it, but she was no help. But I eventually found the solution.

The Solution:

1. Go into Settings > Privacy (which is new in iOS 6) and slide Location Services to Off.

2. Connect your iPhone/iPad to the Wi-Fi network again (Settings > Wi-Fi)

3. Go back to Settings > Privacy and slide Location Services back to On

That solved the problem for me. Good luck!