Category: iPhone Tips

A Really Obvious But Important Tip About the New Apple EarPods

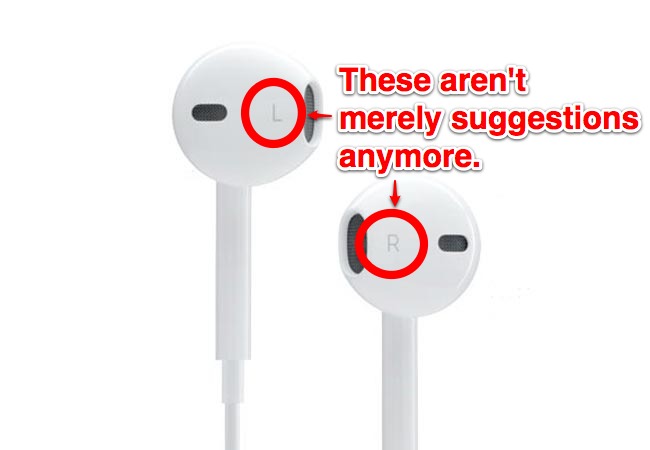
Apple EarPods Right and Left earbuds

The new Apple EarPods sound so much better than the previous Apple earphones. The bass really is thumping. But there’s something obvious you need to do to get the best sound out of them: the left earbud goes in the left ear, and the right earbud goes in the right ear.

I’m being serious.

You see, with the previous Apple earphones, it didn’t really matter much whether you put them in correctly. There was only the slightest difference in sound and comfort when they were flipped. Not so with the new EarPods.

The first time I tried the EarPods, I just plopped them in incorrectly, left/right, right/left. They sort of fit but sounded….just like the old Apple earphones, maybe slightly worse. But I had them in backwards, and upon reversing them…damn son, whomp whomp whomp!

Could this be the cause for some of the rare, seemingly hastily written mediocre reviews of the EarPods. I mean, they sound great, much better than the $10 MonoPrice earbuds that the WireCutter says are superior (which I happen to own and, no, they sound terrible. You can’t even move around while wearing the MonoPrices else they channel weird chaffing noises to the eartips. They have no 3-button dongle, either).

Anyway, the EarPods are solid at only $30.

Tip: How to Allow Some Contacts to Ring the iPhone When Do Not Disturb Mode Is On

Do Not Disturb Mode for iPhone

The new Do Not Disturb mode is an incredibly useful feature for the iPhone that, when turned on, will silence all calls and notifications. With DND turned on, you won’t be suddenly awoken at night by an app’s notification or a phone call. You may, however, still want to let some important phone calls through. Below are instructions for how to allow a special group of VIP contacts to call you even when Do Not Disturb is turned on.

Quick Instructions:

Go to Settings > Notifications > Do Not Disturb. Swipe Scheduled to On > select a time range > tap Allow Calls From > select Favorites or another group of contacts (for how to create groups, click here).

Step-by-Step Instructions:

1. Open Settings:

iOS Settings Icon

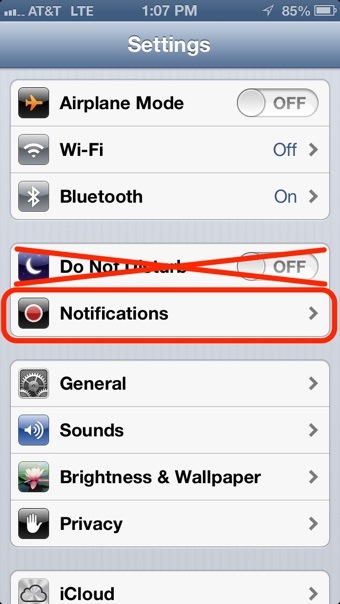
2. Ignore Do Not Disturb, and tap Notifications instead:

Tap Notifications in iPhone Settings

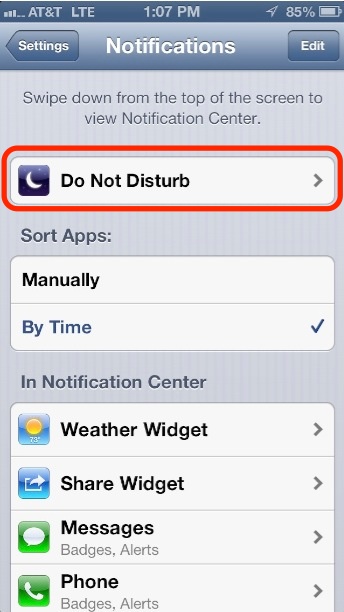
3. Now tap Do Not Disturb:

Tap Do Not Disturb in Notifications Settings

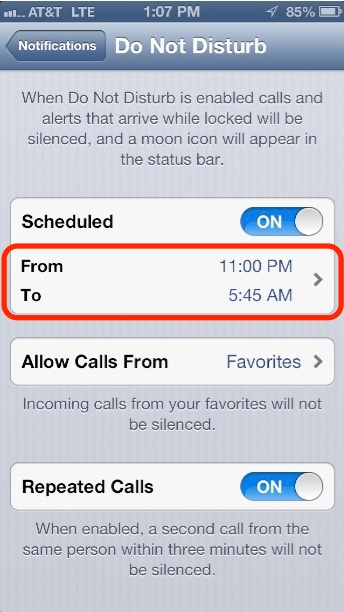
4. Set a time for DND to automatically turn on and off:

Set time for Do Not Disturb to automatically turn on and off

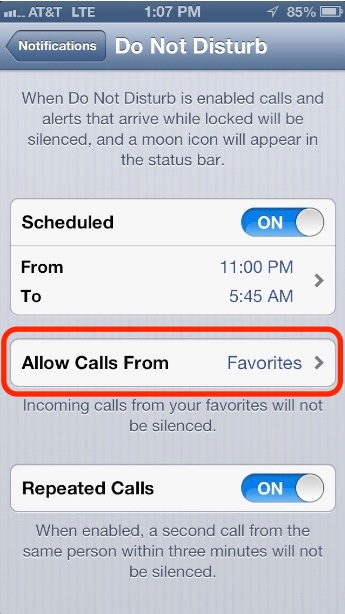
5. Tap Allow Calls From and select a group of contacts (see note below if you wish to create a new group of contacts):

Tap Allow Calls From in Notification's Do Not Disturb Settings

Note about creating groups of contacts: Bizarrely enough, other than adding/removing contacts to the Favorites group, you can’t create/edit groups of contacts on the iPhone. However, check out our instructions for alternative methods for creating groups of contacts for use on the iPhone.

And that’s it. Please note that this VIP list of contacts will only work when the scheduled version of Do Not Disturb mode is turned on. When you manually turn on DND (see screenshot in step 2), this VIP list will not function.

Bonus Tip: Alarms from the iPhone’s Clock app (for example, wake me up at 6:00am) will still sound even when Do Not Disturb is turned on, or even when the mute switch is turn on, for that matter.

Tip: How to Create a Group of Contacts As Exceptions for the iPhone’s Do Not Disturb Mode

Do Not Disturb Mode for iPhone

When turned on, the useful new Do Not Disturb mode blocks all calls and notifications from ringing your iPhone, allowing you to sleep or work in peace. But you can also assign a special group of contacts as exceptions while Do Not Disturb is turned on. When anyone in this group of special contacts calls, your iPhone will still ring, even though Do Not Disturb is turned on.

There’s only one problem though: Apple still hasn’t supplied a way to create groups of contacts on the iPhone (it’s a headshaker, I know). The lone exception is the Favorites group, which you can add/remove contacts from. Fortunately, you can use third-party apps and iCloud.com to create, edit, and delete groups. Check out the instructions below for:

  • How to add contacts to the Favorites group.
  • A suggestion for a good free third-party iPhone app for creating groups.
  • How to create groups on iCloud.com.

How to Add Contacts to the Favorites Group:

1. Select a contact in the Contacts or Phone app.

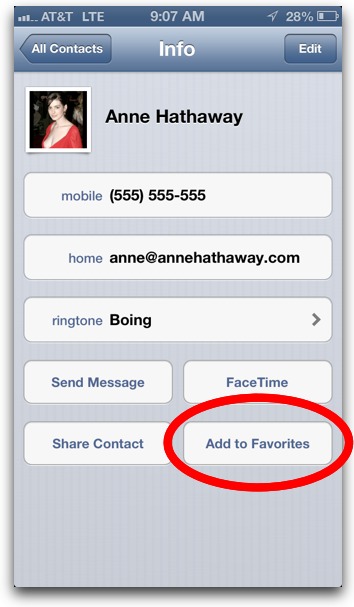
2. Tap the Add to Favorites button:

How to Add to Favorites List on iPhone

And that’s it. To delete contacts from the Favorites list, open the Phone app > tap the Favorites tab > tap Edit > tap the red circle > tap Delete.


A Free App for Creating Groups of Contacts:

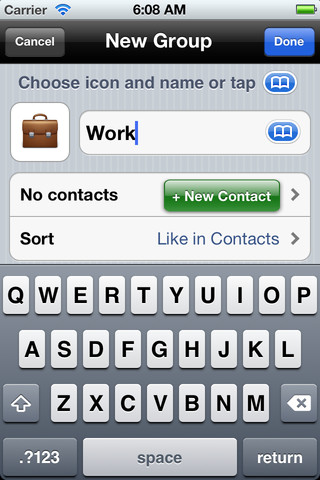
Groups app screenshot

Groups (free) is a solid but somewhat barebones free app for creating new groups on contacts on your iPhone. Any group created within the app will show up in the iPhone’s default Contacts and Phone apps. To create a group in the app, tap the All Contacts drop-down list at the top, then tap Add New Group.


How to Create a Group of iPhone Contacts at iCloud.com:

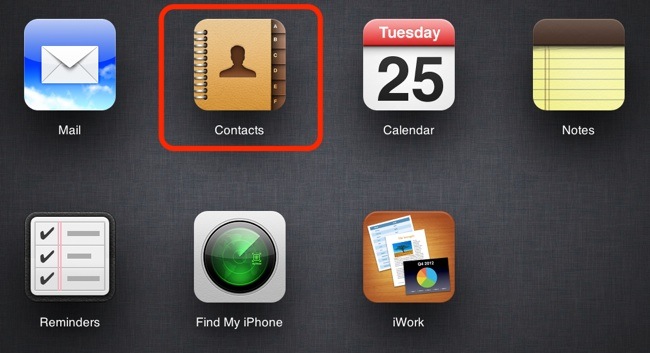
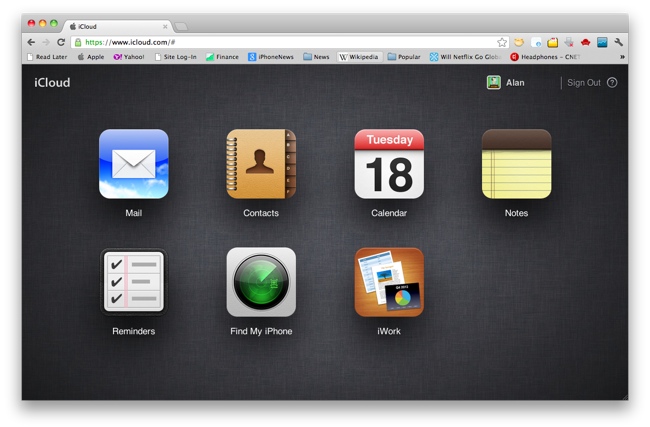
1. Go to iCloud.com and and select the Contacts app:

Click the Contacts app on iCloud.com


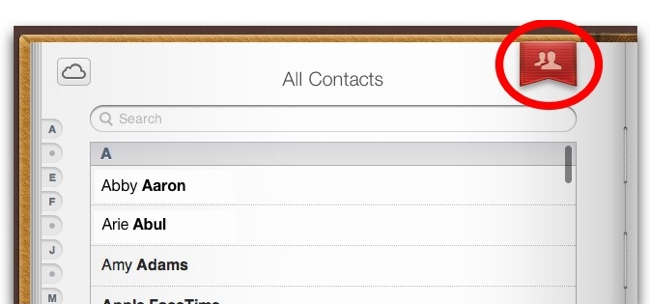
2. Click the red groups ribbon at the top:

Create Group of Contacts on iCloud


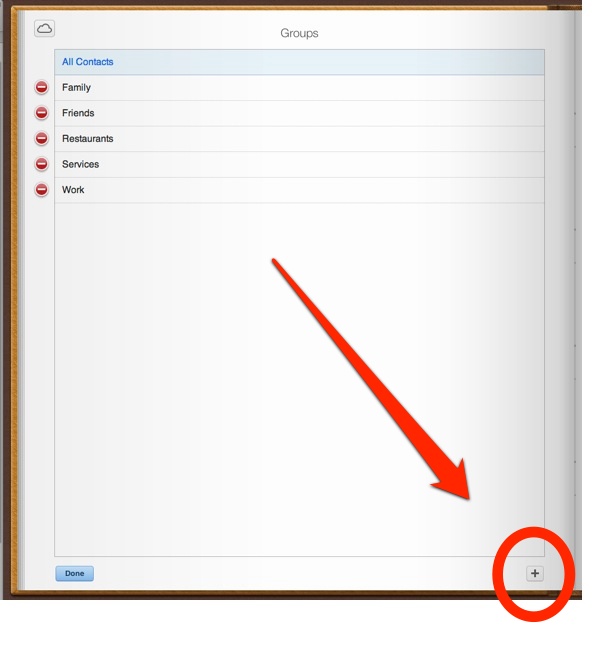
3. Click the plus sign at the bottom right to create a new group:

Click  the Add Groups button on iCloud

4. Type in a name.

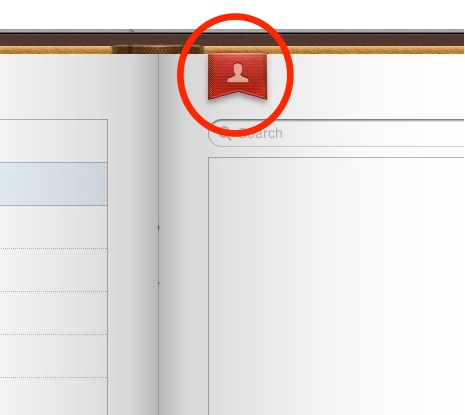
5. Click the red groups ribbon:

Click Red Ribbon for Groups in iCloud

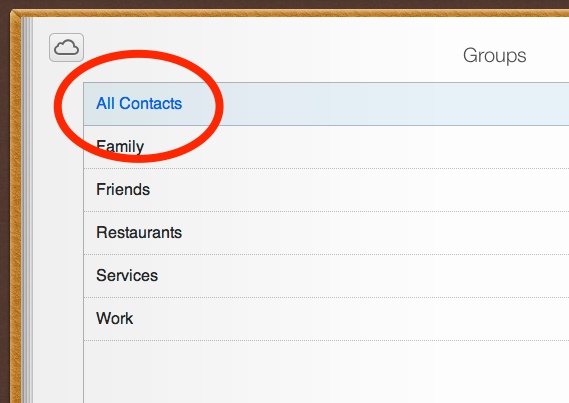
6. Click All Contacts:

Select All Contacts in iCloud

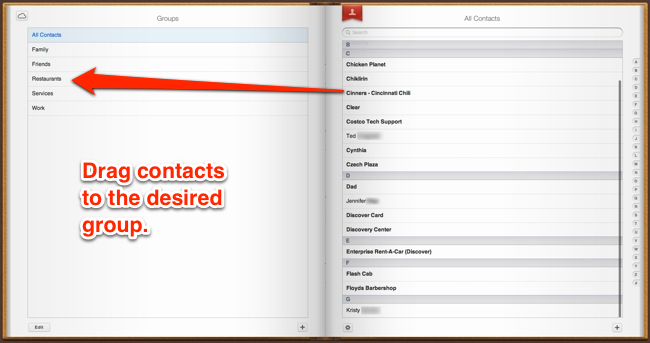
7. Drag a contact from the list on the right to the group name on the left:

Drag Contacts to Group on iCloud

And that’s it. Your new group of contacts should be synced to your iPhone via iCloud almost instantly (depending on your connection).

iPhone/iPad Tip: Notes From the Notes App Can Now Be Edited In a Browser on iCloud.com

iCloud apps in web browser

The Notes app on the iPhone & iPad just became a lot more useful thanks to a recept update to iCloud.com. Now, notes created on the iPhone can be edited in a web browser on iCloud.com, and vice versa. With iCloud syncing, it’s all pushed wirelessly and automatically—no need to tap a button or connect a cord. And no matter if you’re on Windows or Mac, home or office, if there’s a web browser, you can access and edit your notes and sync back the changes to the iPhone instantly.

I find this feature incredibly useful for doing things like maintaining a to-do list, planning vacations, or simply storing important bits of information that I come across throughout the day.

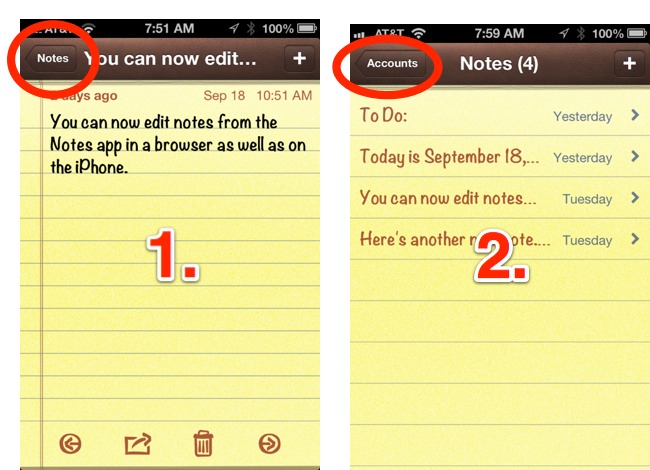
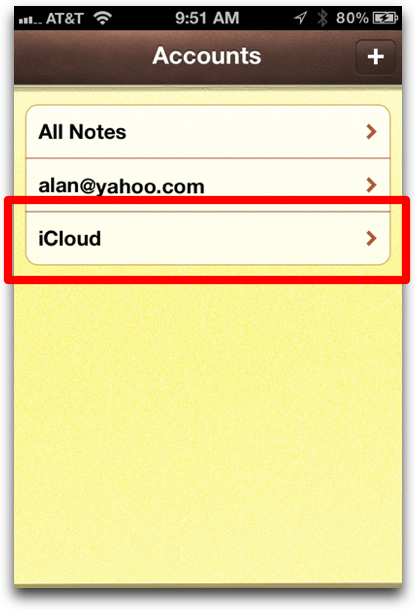
There is one tricky part, however. In the Notes app, you have to create the notes you want to sync in the special iCloud “folder,” which is kind of hidden. To find this folder, open the Notes app, if you see a button labeled Notes in the top-left corner, tap it, then/else tap Accounts:

Maneuver to iCloud account in Notes app

Then tap iCloud from the list shown (see below):

Create Notes in the iCloud folder

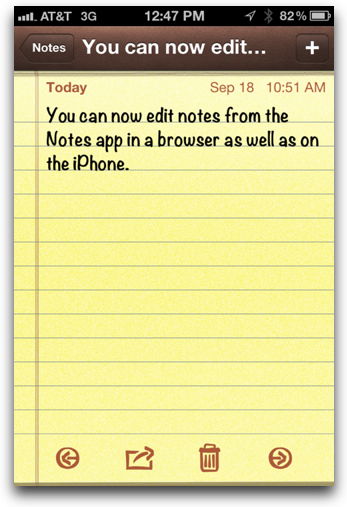
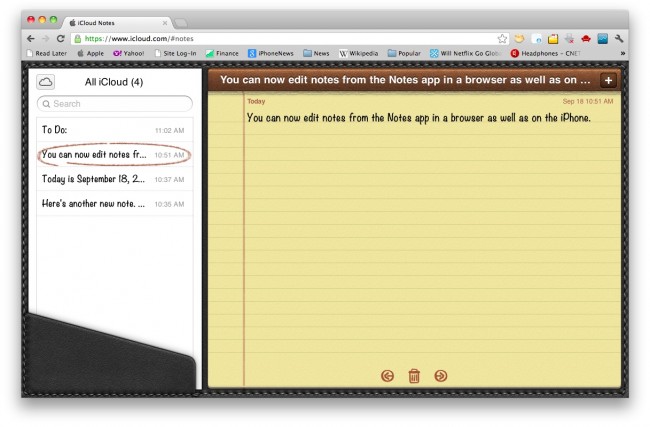
Now, when you create or edit a note, it will created in your iCloud account and be pushed (synced) to iCloud. You can then go to iCloud.com, log in, click on the Notes icon, and take up where you left off. You’ll even see that familiar legal-pad yellow paper background (see below).

You can make your iCloud account the default account for new notes by going into the iPhone’s Settings > Notes and selecting iCloud. That way, when you create new notes (for example, creating a note via Siri), they will by default be synced via iCloud.

The Notes app at iCloud.com, editing a note I created on the iPhone (click to enlarge):

Of course, you must first have iCloud set up on your iPhone/iPad. To set up iCloud, go to Settings > iCloud and make sure the Notes tab set to On.

Tip: Check Your iPhone 5 Verizon, AT&T, & Sprint Subsidized-Pricing Upgrade Eligibility, All In One Place

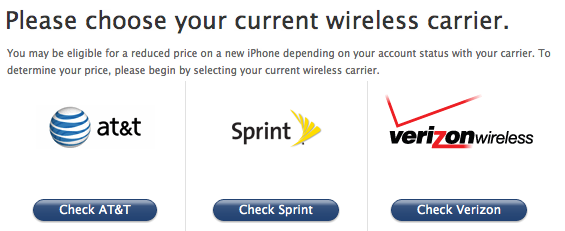
Apple Store Wireless Carrier Upgrade Eligibility Tool

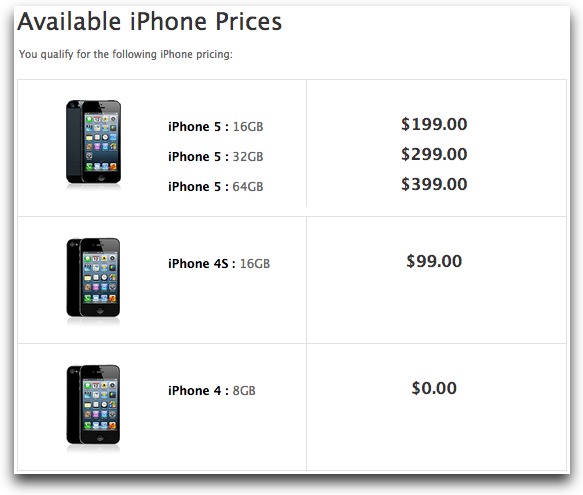
Apple’s iPhone Eligibility Tool is a handy all-in-one place to check if you’re eligible for subsidized “upgrade” pricing for the iPhone 5 from all of the big 3 carriers: Verizon, AT&T, and Sprint. It’s fast and easy.

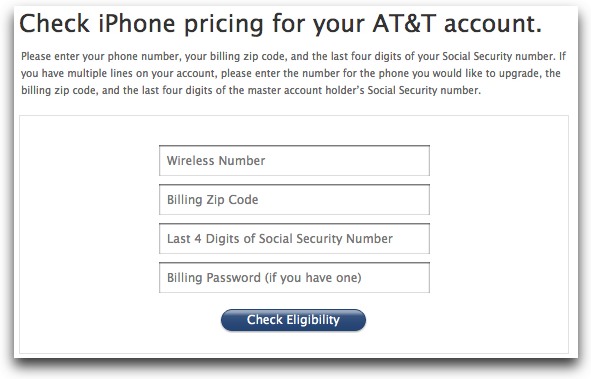
Just select your current carrier, then enter your number, zip code, last 4 digits of your social security number, and billing password (if you have one). It will show what the price of each iPhone iPhone 5.

ATT Upgrade Fields at Apple

iPhone 5 pricing for me

My last iPhone was the iPhone 4, bought at launch, so I’m good to go. $399 64GB Black AT&T iPhone 5, here I come. Wahhh!

Tip: Use a Silent Ringtone to Silence Annoying Repeat Callers

iPhone Ringer Silenced Icon

Do you want to ignore someone who is repeatedly calling you but don’t want to silence your entire iPhone for other potentially important calls? There’s a simple solution: assign a silent ringtone to the annoying caller. When that person calls, the silent ringtone will play, meaning you won’t hear anything. You can download a silent ringtone by right-clicking on the link below.

Right-Click to Save Silent Ringtone for iPhone

Next, you need to add it to iTunes and sync it over to your iPhone. Then, assign the ringtone to the contact (instructions here). You may have to first create a contact with the person’s phone number.

Also make sure to turn off vibrate for calls in the iPhone’s Settings.

iPhone Tip: Send Animated Gifs in Text Messages and Add Some Humor to Your Day

iPhone Messages app icon

Here’s a neat trick involving animated gifs and the iPhone. If you send an animated gif via text message to another iPhone, the animation will be viewable right inside the Messages app. Suddenly seeing an animated photo where you usually see text messages has a funny and surprising effect.

Funny Animated Gif

To send an animated gif via text message, you send it like you would a photo. In Messages, tap the camera icon in the bottom left of the compose message view:

Tap Camera icon in Messages app to send MMS, photo or video

Then tap Choose Existing, then find the animated gif in your Photos app. Then send away!

Of course, you must first save an animated gif to your iPhone. You can save animated gifs right inside your iPhone’s browser by simply holding your finger down on the gif, then tapping Save Image from the pop-up menu.

You can try saving/sending a gif using any of the ones I’ve picked below. Please note that you can’t view the animated part of an animated gif in the iPhone’s Photos app—it will only show a single frame from the animation, but the gif will indeed be animated in the Messages app.

Funny Animated GifDancing Cat Animated GifAnimated Gif Jim Carrey Typing WildlyDancing Banana

Hat tip to Jeff Richardson over at iPhone JD, who inspired this tip via his review of an app call Stick Text that makes it a snap to send funny animated gifs of stick men.

Tip: iPhone Music Mysteriously Skipping to a New Track? Turn Off Shake to Shuffle

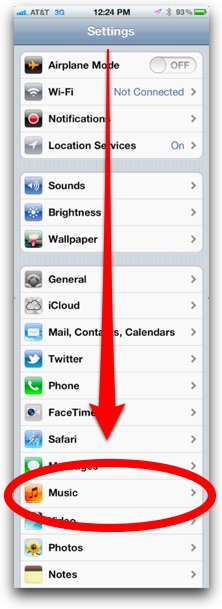
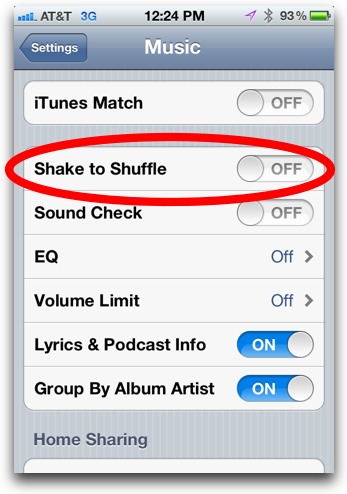
While playing music, is your iPhone suddenly switching to a new track in mid song? Your iPhone isn’t broken, nor is there something wrong with your song. The skipping is mostly likely due to an annoying feature of the iPhone called Shake to Shuffle that is bafflingly turned on by default. To turn it off, go to Settings > Music and move the Shake to Shuffle tab to Off (see visual instructions below).

Shake to Shuffle does exactly what its name implies, randomly shuffles to a new track when the iPhone is given a good shake. The problem is, if you run with your iPhone or make any sudden movement while holding it, it’s easy to activate Shake to Shuffle accidentally.

Visual instructions:

1. Open Settings:

2. Scroll down and tap Music:

Scroll down in iPhone Settings and Tap Music

3. Slide the Shake to Shuffle tab to Off:

And that’s it, your music will no longer skip when the iPhone is shaken.

Tip: How to Prevent the iPhone/iPad’s Screen from Automatically Turning Off

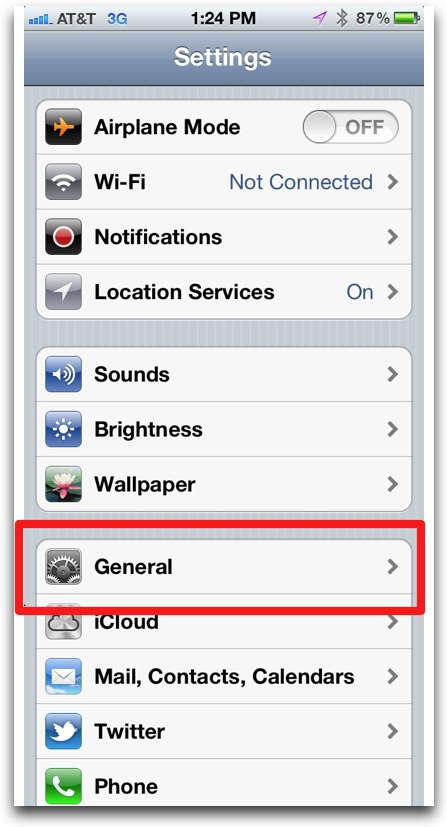
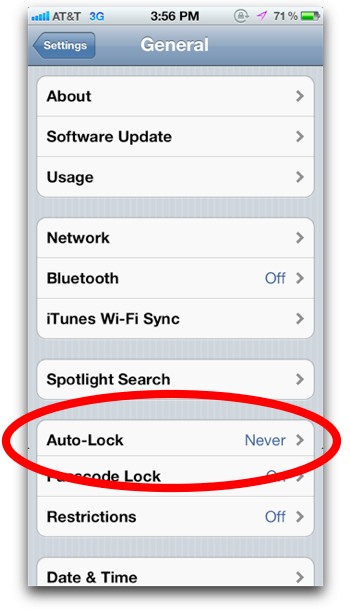
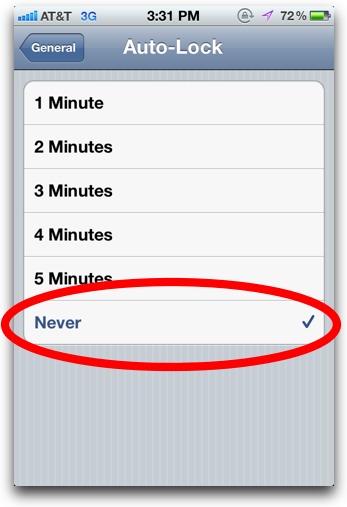
There may be times when you want the iPhone/iPad’s screen to remain on until you physically turn it off. To prevent the screen from auto shutting off, you must turn off the iPhone/iPad’s Auto-Lock feature (just remember to eventually turn it back on for your battery’s sake). To turn off Auto-Lock, go to Settings > General > Auto-Lock and select Never (see visual instructions below).

1. Open Settings:

2. Tap General:

Tap General in the iPhone's Settings

3. Tap Auto-Lock:

Tap Auto-Lock in iPhone General Settings

4. Tap Never:

Tap Never in iPhone Auto-Lock Settings

And that’s it, your screen will no longer automatically shut off. Note that you can still manually shut off the screen and lock the iPhone/iPad by pressing the sleep button on top of the device. Again, remember that leaving the screen on depletes the battery very quickly, so make sure to eventually turn Auto-Lock back on!

Every once in a while, I turn off the iPad’s Auto-Lock when I’m using the iPad to display reference material while I’m working on something else, for example, when I’m writing on my desktop or doing my taxes. I also turn off Auto-Lock on an old iPhone I use as a desk clock.

Tip: View a List of All Your iPhone Apps Sorted By Size

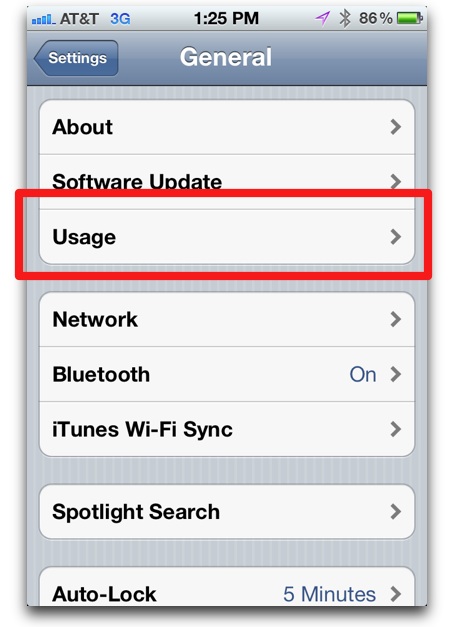
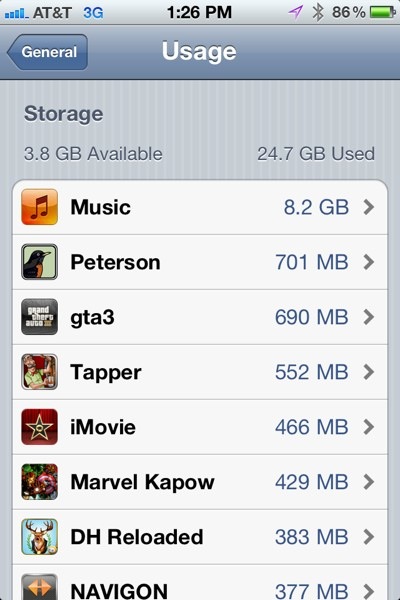
Here’s a tip that comes in handy when you need to clear up storage space on your iPhone. You can view a list of all your apps on your iPhone sorted by size in order to delete the largest ones you no longer use. The tip, in a nutshell, is to go into Settings > General > Usage. There, you’ll see a list of apps sorted by their size (note: it may take several seconds for the list to load). Find and note the largest apps you no longer use.

To delete the apps and gain more storage space, you’ll need to press the home button to go back to the home screen. Find the icon of the app you want to delete, hold your finger on it until an X appears, tap the X, then tap Delete. You’ll now have more memory on the iPhone to use.

Visual Instructions:

1. Open Settings:

iPhone Settings Icon

2. Tap General:

3. Tap Usage:

4. You’ll see a list of apps sorted by size appear (it may take several seconds):

iPhone Apps Listed by Size

Note that you can tap on any app in the list to see further information about app storage usage. This is most useful for the iPhone/iPad’s Music and Video apps, as it will show the size of individual songs, movies, tv shows, podcasts.